With the modern internet falling apart today, I decided to look at something less complicated!

Not worrying too much about cosmetics right now, but it looks like it will actually clean up a lot better than I originally thought.

For now though I'm more interested in the electronics.
Despite the external state, internally it's actually pretty clean internally. Honestly far cleaner than plenty of kit half the age I've worked on.

The whole computer part of the machine is on one board - and is actually based around an 8080 CPU - which is kind of ridiculous when you consider the sort of things that people might have been connecting terminals to in 1978 when this was launched... wouldn't be entirely unexpected for the host computer to be based around an 8080.
Very clean board.

The riser there is part of an expansion option which also includes an additional full size board.

Plus a custom back panel with an additional interface connector.

This whole bundle of bits is a Retro Graphics VT640 upgrade kit.

Which for the time was actually quite capable, expanding the abilities of the terminal to include 640*480 pixels of bit mappable graphics. Obviously this also needs the software to utilise these capabilities, and I doubt it will be something I'll be able to utilise, but if I do get hold of something that can use it it will be great to have.
These things are actually pretty bomb proof if they've not been physically smashed to bits or drowned into a corroded mess. Nevertheless I didn't want to just blindly plug it in and cross my fingers. One thing I could see at a glance was a pair of pretty massive capacitors in the power supply - at the very least I wanted to make sure they weren't shorted and at least try to gently reform them rather than just waking them up from probably a forty year slumber by brute force. That way in my experience is a route to loud bangs. These look like they could make quite a bang.

The case design is largely tool-less, four screws and several pull clips are the only things you need to remove from the bottom of the case and the whole chassis can be lifted out, and the power supply then extracted to be taken to the bench.
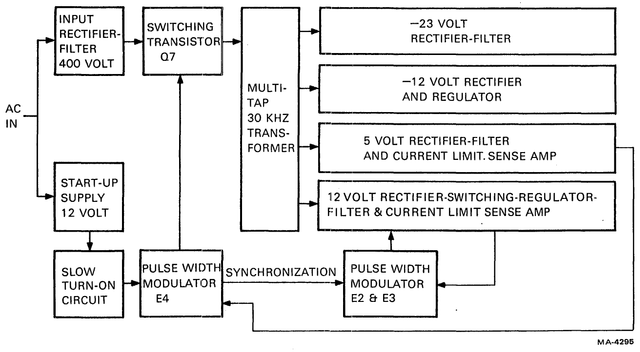
Quite surprising to see something from this era with a switching supply rather than giant heavy transformer and linear supply generating enough heat to supply a small town. Guessing this is part of the reason that the whole unit is actually a lot lighter than I expected. It is still a pretty chunky unit though - especially for the ~100W it's expected to provide. From what I've read though it is actually quite overrated though to ensure headroom when expansions are fitted. Especially keeping in mind that everything here is entirely passively cooled.

These caps are rated to 200VDC, which is more than I can easily supply on the bench - but I figured reforming and checking for leakage at around 40V was better than just slamming them into duty from nothing.

This seemed to go smoothly. One seemed to have a little more leakage than the other but both within what I'd consider reasonable limits.
Rest of the caps in there are far less likely to turn properly violent in the case of failure, and doing some in circuit checks didn't show any that were obviously shorted. So figured it was time to go for the smoke test.
This was... entirely undramatic! No smoke, just a faint and initially slightly unstable 15kHz whistle which told me that the line stage was somewhat to my surprise running. And we did have a little noise on screen (which is green apparently rather than the white I was expecting). Plugging the keyboard in resulted in a beep when powering on as well, though I didn't have anything on the display and the system was otherwise unresponsive. This is still good news though. I'd proven that the system was fundamentally "working" sufficiently well that the CPU is alive, is properly coming out of reset, is executing code from the (quite extensive 8K of ROM), the system is actually booting into at least the self test routine, and that the serial communication line with the keyboard is working (the speaker is in there not on the unit itself). Fact we've had some life on the screen also tells me that the EHT side of things is working.
Returning to things after dinner though it was as dead as a doornail. As far as I can tell the power supply has decided to identify as a door stop. It's *completely* dead and not even trying to start (no the fuse hasn't blown and it's not just the switch). So my first port of call is going to be the startup circuit.
Back on the bench.

While I was in there I reflowed a bunch of suspect looking solder joints and changed a couple of slightly maybe suspect caps (I had the value on hand so just figured on it as insurance), and swapped out the 7812 12V regulator which runs the startup circuit to kick the whole supply into life.
This is as far as I've got. The design of this thing makes it a bit awkward to test things as it all slots together into edge connectors which are deeply buried in the chassis, rendering pretty much everything inaccessible. If the power supply is still sick when I plug it back in I'll need to rig up a dummy load to test it on the bench (NEVER run an early switch mode supply like this without a load unless you're absolutely certain that it's designed to, as they often need a minimum load to regulate properly). Hoping that won't be necessary as probing a live switching supply always feels rather precarious. On the plus side schematics do exist and it's discreet enough that it is actually serviceable rather than just being one mysterious black box. On the downside, the board has no silk screen, so actually following it relative to said schematics is kind of tedious.
Let's see if I can make any more progress tomorrow evening.