Another weekend and another entry in the saga of "this was meant to be easier than it actually was" repairs on my 3L X7.
In today's entry: the exhaust pipe trims. This is also probably valid for the refreshed 2.2L diesel DW12C / 4HL.
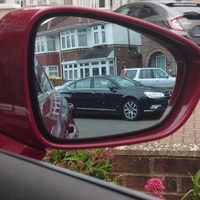
When I bought the car it had some minor crash damage on the rear bumper, presumably a previous owner had backed into a bollard or something. Turns out the damage isn't just a small crack in the bumper, but the rear left exhaust trim took some of the brunt. As a result it looked a little droopy as seen in the poor crop of a photo below.
Most people would let this go, but it annoyed the hell out of me, so I wanted to fix it myself. I Googled the trim piece (part numbers 7452ZF and ZG) and saw that it only mounts to a bracket (7460Q3) with three screws. One at the top and one on either side. From what I could see externally, I thought that it was just a case of the top screw being ripped out of its hole during the impact. I also thought I could get away with just undoing four screws and unclipping the matte black panel with the sensors.
Alas, 'twas not the case.
The whole bumper has to come off. As it turns out, the brackets that the trims are mounted to actually each screw (T10 heads) through three of the clips that mount the matte part to the rest of the bumper as seen here.
You can't remove the matte part without removing the brackets, you can't remove the brackets without removing the bumper. I used this guide to remove the bumper, but I found a few issues with it.
- In step one it tells you to pull off the rear wheel. You don't need to do that. You can get the car to lift-stage 2 to make it a bit easier if you have H3+ though.
- Step one also points out three screws (1) to be removed. These are both right and wrong. The bottom-most and uppermost screws are there (T20 heads), but there is another screw (T30 head) mounted vertically immediately above the uppermost screw shown. It's right on the seam between the bumper and rear wing. The middle screw shown (T20 head) only reveals itself when you peel back the wheel arch liner.
- Step two doesn't explicitly mention it (it does show it in a way), but you need to pull out the main tail light clusters to reveal the screws marked as (3). It shows a pair of screws (4) but the diagram isn't too clear. These are actually inside the wheel arches at the back. Look for a pair of body-coloured, plastic, posts protruding into the wheel arch, these are part of the bumper. The screws will be between these. These are the same T30 heads as (3) and the ones not mentioned in the last step. Luckily, you can get to the left one without having to pull the battery out on the V6 diesels. It's a bit tight, but it's doable.
- Step four mentions unplugging the parking sensor loom connector. On mine the connector was actually on the left side of the car and it was much easier to disconnect it once I had actually pulled the bumper off. Be gentle if using my method as you can damage the loom if you yank the bumper away before unplugging.
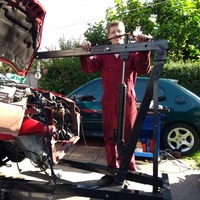
Anyway, once the bumper was off I could actually see the extent of the damage. Turns out the bracket was broken in multiple places. The area near the top screw hole was cracked. The "outside" mount was broken off the bracket and and larger part of the bracket on that side was broken off from itself
And so began the bodgery. I used a mix of superglue gel and activator, random metal strip I had, M6 screws and nuts and a Dremel to get it all back together. I took off the bracket and superglue gel'd the bits together. The superglue isn't meant to be fully structural, I just needed a way to hold everything as close as possible to its original position. I then found the least-worst locations to screw in some lengths of metal strip. I used more gel to stop the nuts from coming off (was too lazy to find my thread lock). I also then cut the top mounting tab of the trim such that the screw hole was now a slit so that I could play with the position. This also meant I had to cut off the top limiter on the bracket itself.
It's not pretty (none of it is visible to the outside world), but it seems to be working and not intruding on the sensor loom or anything else. I didn't think to take a photo of the end result, but the alignment is now bang-on. It was a lot of effort for a minor adjustment, but I'm really happy with it. Now I just need to get a quote from a body shop to fix the bumper crack as I don't have the skills nor tools to DIY it properly.
Let this serve as a warning for you though, if you have an X8Z or 4HL and you want to do something to the exhaust tip trim, it's probably not worth the faff unless you're like me.
[C5 X7] Fixing the exhaust-tip trim on 3L (DT20C / X8Z) or refreshed 2.2L (DW12C / 4HL) diesels.
-
the-termin8r
- (Donor 2025)
- Posts: 321
- Joined: 29 Dec 2022, 22:31
- x 150
[C5 X7] Fixing the exhaust-tip trim on 3L (DT20C / X8Z) or refreshed 2.2L (DW12C / 4HL) diesels.
- Rob
My account accidentally got deleted late Dec '23, so if you're reading my posts from then or earlier and they look weird / are missing media, that's why. There's no fix, sorry.
If you're reading any of my posts with missing design files, find them on my Google drive
My account accidentally got deleted late Dec '23, so if you're reading my posts from then or earlier and they look weird / are missing media, that's why. There's no fix, sorry.
If you're reading any of my posts with missing design files, find them on my Google drive
-
mickthemaverick
- Moderating Team
- Posts: 20101
- Joined: 11 May 2019, 17:56
- x 7790
Re: [C5 X7] Fixing the exhaust-tip trim on 3L (DT20C / X8Z) or refreshed 2.2L (DW12C / 4HL) diesels.
That was one hell of a lot of effort there Rob, but if it makes you feel good then why not? 
I used to be indecisive, now I'm not so sure!
I used to ride on two wheels, but now I need all four!
-
the-termin8r
- (Donor 2025)
- Posts: 321
- Joined: 29 Dec 2022, 22:31
- x 150
Re: [C5 X7] Fixing the exhaust-tip trim on 3L (DT20C / X8Z) or refreshed 2.2L (DW12C / 4HL) diesels.
I got in too deep, I started detaching the matte bit, realised it wasn't so simple, but I'd already committed so I thought "screw it" and did the whole thing. Definitely a learning experience in more than one way. LOL
- Rob
My account accidentally got deleted late Dec '23, so if you're reading my posts from then or earlier and they look weird / are missing media, that's why. There's no fix, sorry.
If you're reading any of my posts with missing design files, find them on my Google drive
My account accidentally got deleted late Dec '23, so if you're reading my posts from then or earlier and they look weird / are missing media, that's why. There's no fix, sorry.
If you're reading any of my posts with missing design files, find them on my Google drive
-
wurlycorner
- Donor 2024
- Posts: 2177
- Joined: 30 Oct 2012, 22:37
- x 272
Re: [C5 X7] Fixing the exhaust-tip trim on 3L (DT20C / X8Z) or refreshed 2.2L (DW12C / 4HL) diesels.
Another brilliant write-up well done.
That kind of misalignment would annoy me also, so I can' understand why you wanted to fix it!
--
Iain
'85 CX GTi Turbo s1 (met. blue)
2x '85 CX GTi Turbo s2 t1 (met. silver & grey)
'88 CX GTi Turbo s2 T2 (met. light blue)
CX DTR T2 Safari (silver)
2x '96 Xantia Activa (Black & met. green)
'01 C5 2.0 HDi LX Estate (Blue)
'11 C5 X7 3.0 V6 Exclusive Tourer
Iain
'85 CX GTi Turbo s1 (met. blue)
2x '85 CX GTi Turbo s2 t1 (met. silver & grey)
'88 CX GTi Turbo s2 T2 (met. light blue)
CX DTR T2 Safari (silver)
2x '96 Xantia Activa (Black & met. green)
'01 C5 2.0 HDi LX Estate (Blue)
'11 C5 X7 3.0 V6 Exclusive Tourer
-
MattBLancs
- Donor 2024
- Posts: 4974
- Joined: 25 Apr 2022, 09:03
- x 2175
Re: [C5 X7] Fixing the exhaust-tip trim on 3L (DT20C / X8Z) or refreshed 2.2L (DW12C / 4HL) diesels.
A really good repair job there. It'd annoy me too, do I'd say well worth the effort of fixing it!
I can recommend a "hot staple" machine to help stitch plastic back together
https://www.frenchcarforum.co.uk/forum/ ... le#p823537
Very cheap on eBay
I can recommend a "hot staple" machine to help stitch plastic back together
https://www.frenchcarforum.co.uk/forum/ ... le#p823537
Very cheap on eBay
-
the-termin8r
- (Donor 2025)
- Posts: 321
- Joined: 29 Dec 2022, 22:31
- x 150
Re: [C5 X7] Fixing the exhaust-tip trim on 3L (DT20C / X8Z) or refreshed 2.2L (DW12C / 4HL) diesels.
Will keep that in mind. I needed a quick repair though as I can only afford to have the car down on the weekend. Didn't even know such a tool existed.
- Rob
My account accidentally got deleted late Dec '23, so if you're reading my posts from then or earlier and they look weird / are missing media, that's why. There's no fix, sorry.
If you're reading any of my posts with missing design files, find them on my Google drive
My account accidentally got deleted late Dec '23, so if you're reading my posts from then or earlier and they look weird / are missing media, that's why. There's no fix, sorry.
If you're reading any of my posts with missing design files, find them on my Google drive