Modification to Xantia height corrector cradles

This is the Forum for all your Citroen Technical Questions, Problems or Advice.

Moderator: RichardW

Post Reply
aerodynamica
Donor 2023
Posts: 1300
Joined: 26 Dec 2007, 18:10
Location: Glasgow
Lexia Available: Yes
My Cars: 2008 C5 Exclusive Tourer
1993 Xantia 1.9 TD VSX Mk1 Sinker A.K.A Slugmobile 13'
'Old Katy'
previous convictions: totaling 52litres of LHM in one go:
1968 ID19B 'Old Polly' Stellar white
1993 Xantia 1.9 TD SX Mk1 Sinker Silver
1992 XM 2.0 SEi Turbo Manual Anthracite Grey
1982 CX 20 Pallas 'Old Goldy'
1993 XM 2.1 SD Auto Light blue
1993 Xantia 1.9 TD SX Mk1 Sinker light Blue
1982 BX 16 TRS 'Cyril' Vallelunga Red
1995 Xantia 1.9 D SX Auto Dark green
1977 CX 2400 Pallas C-Matic 'Aphrodite' Regatta Blue
1982 GSA Pallas SE Silver Pearl
1980 CX 2000 Reflex Vallelunga Red
1978 CX 2400 Pallas C-Matic 'Prometheus' Midnight blue
1984 BX 14E 'Cecil the slugmobile' Maroon
1987 Fiat Panda 'the mighty panda'
x 98

Modification to Xantia height corrector cradles

Post by aerodynamica »

Thanks to citroenxm for supplying a pair of Xantia height correctors. My plan was to make a modification to the notorious pivots. I was inspired by the pictures in the past of the pivot pins removed and replaced with new machine screws. Neither of the correctors on the car have seized pivots but they do have a lot of free play in the pivot.

I like the design of the Xantia height corrector cradles. The point of the design is that the action of the anti roll bar is stepped-up to the height corrector due to the use of the lever that the plastic dog leg moves, around 1:2 ratio since the dogleg acts on the half way point of the lever. It means the self- leveling on the Xantia can be more accurate and sensitive than previous models where the actuation was nearer 1:1, since it only needs half as much input from the anti roll bar to give force to the HC valve. The spring in the lever has a much larger range than the older designs (all previous HC linkages have a springing aspect to allow many movements of the suspension not to over activate the HC valves)

But! the Xantia units can seize as we all know! This isn't the problem though - the other issue is that the main pivot is made of nothing more than a plastic bush moving around the metal pin. Thing is the plastic bush wears terribly and gets loads of slop to the movements of the dogbone so that the smaller movements such as one driver stepping out the car, goes to moving the looseness of the plastic pivot bush instead. It ends up acting worse than the older designs when this part wears. (it's aggravated also by the fact that the plastic dogbone thing acts 'off centre' to the action of the height corrector centre line thus adding a second degree of freedom when it's wearing this way, anyway)

Whether you care or not about how accurate the HC links are, they certainly never work as well as when they're new. My old memory is of watching a brand new Xantia pull up in front of our family car way back in the early 90s, must've been one of the first on the roads, one driver, a lady of say, 40, quite small and as she got out I saw the back of the car float up a little - as they do - and then after less than 8 seconds it lowered back down smartly. I thought it was cool and my fate was set! But as the Xantias aged I noticed less of a tendency for this to work and certainly all of mine have needed serious inputs like sittiing on the back bumper to get it to react significantly. I wanted it to work like factory new..

Anyway, here's what I did to get excellent HC workings..

Major clean of the full thing:
Image

Cleaned up - gives access to the pivot pin
Image

Angle grinder to remove the swaged end of the pin:
Image

Using a vice or press with a large socket over thge other (bigger ) end of the pin and something small to press the pin from the ground - flat side
Image

Then it starts to press the pin through as can be seen here:
Image

Pin out, allows access to clean the inner faces.
Image

Then the plastic bush just lifts out and after the metal support and the spring.
Image
Image
Image

The plan? not to simply clean and refit all this stuff but to improve the construction :-D
Graeme M
2008 C5 Exclusive Tourer 2.0 HDi
harryp
(Donor 2022)
Posts: 687
Joined: 07 May 2011, 16:03
Location: Telford, United Kingdom
My Cars: Forte HDI 110 hatch in wicked red, SORN
Exclusive HDI hatch in quartz, SORN
C4 Picasso Exc E, Wifes
Peugeot 207cc
x 73

Re: Modification to Xantia height corrector cradles

Post by harryp »

Very interesting.. You going to use brass bush or steel on steel? Look forward to completion.
Regards, Harry

2000 Nov Forte HDI 110 hatch in Wicked Red; currently SORN
2000 Mar Exclusive HDI hatch in Quartz; currently SORN
2013 C4 Picasso Excl E
Peugeot 207cc 1.6 Roland Garros
aerodynamica
Donor 2023
Posts: 1300
Joined: 26 Dec 2007, 18:10
Location: Glasgow
Lexia Available: Yes
My Cars: 2008 C5 Exclusive Tourer
1993 Xantia 1.9 TD VSX Mk1 Sinker A.K.A Slugmobile 13'
'Old Katy'
previous convictions: totaling 52litres of LHM in one go:
1968 ID19B 'Old Polly' Stellar white
1993 Xantia 1.9 TD SX Mk1 Sinker Silver
1992 XM 2.0 SEi Turbo Manual Anthracite Grey
1982 CX 20 Pallas 'Old Goldy'
1993 XM 2.1 SD Auto Light blue
1993 Xantia 1.9 TD SX Mk1 Sinker light Blue
1982 BX 16 TRS 'Cyril' Vallelunga Red
1995 Xantia 1.9 D SX Auto Dark green
1977 CX 2400 Pallas C-Matic 'Aphrodite' Regatta Blue
1982 GSA Pallas SE Silver Pearl
1980 CX 2000 Reflex Vallelunga Red
1978 CX 2400 Pallas C-Matic 'Prometheus' Midnight blue
1984 BX 14E 'Cecil the slugmobile' Maroon
1987 Fiat Panda 'the mighty panda'
x 98

Re: Modification to Xantia height corrector cradles

Post by aerodynamica »

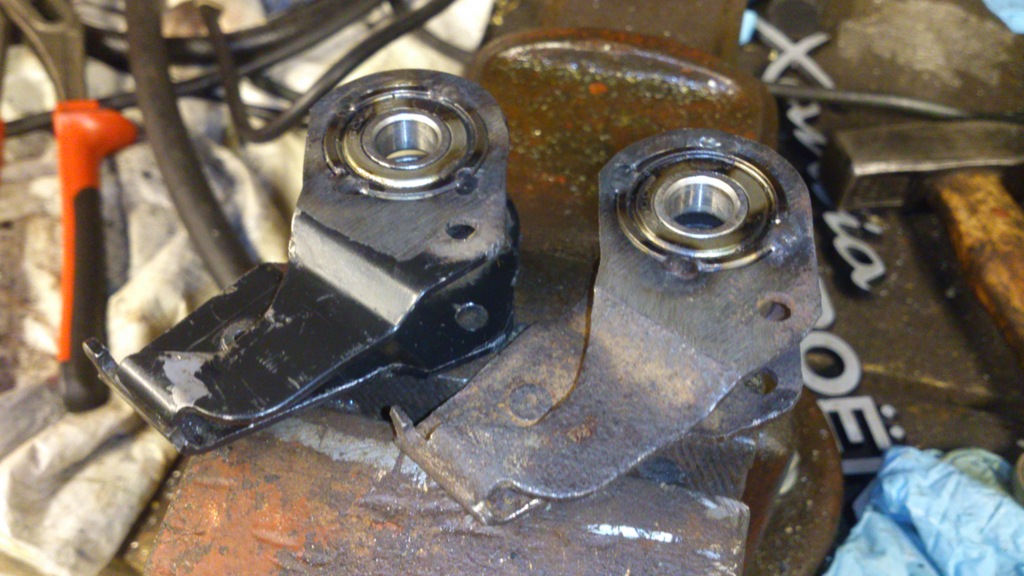
So once the lever is out and the bush, metal spacer and spring, the idea was to get rid of the plastic part altogether and replace with sealed bearings.

26mm outer bearings with 10mm inner size. These are the same outer dimension as the original metal support for the spring (it needs to be held to not move around)

Original left, with bearings, right
Image
Image
the metal guide seen removed on its own here. It's the same size as the bearings

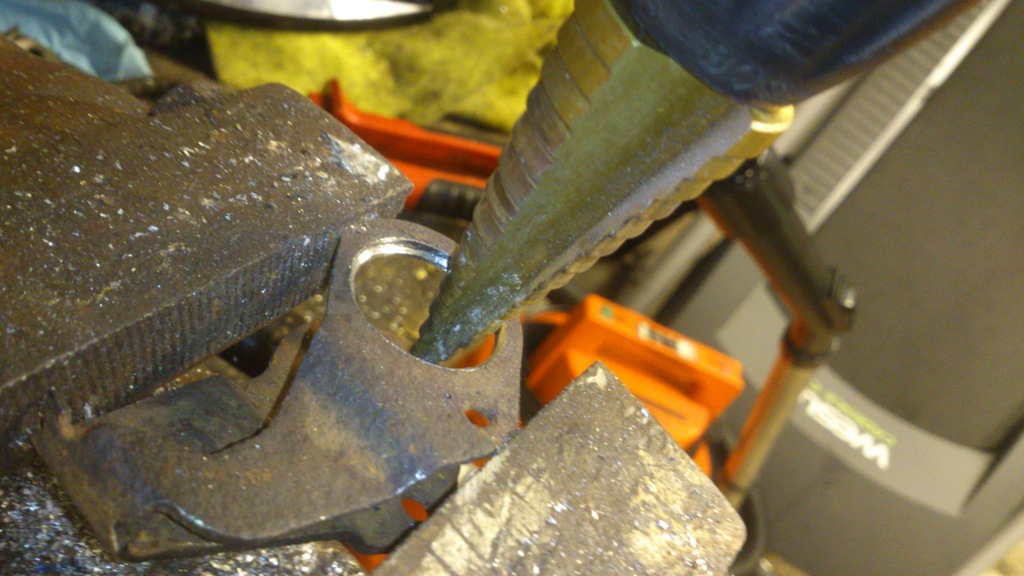
To fit the bearings in The lever needs to be modified to allow the bearings to be pushed in to place. I used a stepping drill to carefully open the 10mm hole to 26mm, and the square hole on the other side of the lever to be enlarged to 26mm.
Image
Image

And the bearings pressed in until flush to the outer surface.
Image

The hole on the cradle needs to be enlarged to 10mm and countersunk to tidy the edge.
Image
Graeme M
2008 C5 Exclusive Tourer 2.0 HDi
aerodynamica
Donor 2023
Posts: 1300
Joined: 26 Dec 2007, 18:10
Location: Glasgow
Lexia Available: Yes
My Cars: 2008 C5 Exclusive Tourer
1993 Xantia 1.9 TD VSX Mk1 Sinker A.K.A Slugmobile 13'
'Old Katy'
previous convictions: totaling 52litres of LHM in one go:
1968 ID19B 'Old Polly' Stellar white
1993 Xantia 1.9 TD SX Mk1 Sinker Silver
1992 XM 2.0 SEi Turbo Manual Anthracite Grey
1982 CX 20 Pallas 'Old Goldy'
1993 XM 2.1 SD Auto Light blue
1993 Xantia 1.9 TD SX Mk1 Sinker light Blue
1982 BX 16 TRS 'Cyril' Vallelunga Red
1995 Xantia 1.9 D SX Auto Dark green
1977 CX 2400 Pallas C-Matic 'Aphrodite' Regatta Blue
1982 GSA Pallas SE Silver Pearl
1980 CX 2000 Reflex Vallelunga Red
1978 CX 2400 Pallas C-Matic 'Prometheus' Midnight blue
1984 BX 14E 'Cecil the slugmobile' Maroon
1987 Fiat Panda 'the mighty panda'
x 98

Re: Modification to Xantia height corrector cradles

Post by aerodynamica »

Cheers Harry, it's sealed bearings fitted in to replace the original bushing - I completed this a couple of weeks ago and it has worked very well so this is just a write up for interest.
Graeme M
2008 C5 Exclusive Tourer 2.0 HDi
aerodynamica
Donor 2023
Posts: 1300
Joined: 26 Dec 2007, 18:10
Location: Glasgow
Lexia Available: Yes
My Cars: 2008 C5 Exclusive Tourer
1993 Xantia 1.9 TD VSX Mk1 Sinker A.K.A Slugmobile 13'
'Old Katy'
previous convictions: totaling 52litres of LHM in one go:
1968 ID19B 'Old Polly' Stellar white
1993 Xantia 1.9 TD SX Mk1 Sinker Silver
1992 XM 2.0 SEi Turbo Manual Anthracite Grey
1982 CX 20 Pallas 'Old Goldy'
1993 XM 2.1 SD Auto Light blue
1993 Xantia 1.9 TD SX Mk1 Sinker light Blue
1982 BX 16 TRS 'Cyril' Vallelunga Red
1995 Xantia 1.9 D SX Auto Dark green
1977 CX 2400 Pallas C-Matic 'Aphrodite' Regatta Blue
1982 GSA Pallas SE Silver Pearl
1980 CX 2000 Reflex Vallelunga Red
1978 CX 2400 Pallas C-Matic 'Prometheus' Midnight blue
1984 BX 14E 'Cecil the slugmobile' Maroon
1987 Fiat Panda 'the mighty panda'
x 98

Re: Modification to Xantia height corrector cradles

Post by aerodynamica »

The next stage is to press the bearings in to a depth that allows the whole thing to fit back in the cradle without the bearings or lever ends fowling anywhere. The clearance is 25mm altogether, each bearing is about 8mm deep and the upper and lower bearing races need to have a washer betweel them and the cradle surface so after measurements and drawings is turned out that the bearings are sunk in to near flush, a 1mm M10 washer is needed on each end and a stack of 3 needed in between the bearings to space them apart. Then it all comes out for the bearings to be tacked in place with a TIG welder. This doesn't affect the bearings if done carefully.
Image
Image
A lever for the front and rear HC cradles each - they're identical it's only the cradle itself that differs.

An M10 bolt is used to replace the original pin.
Image

Bearings in, spring fitted as before and readly to be fitted to the cradle for adjustment (by one more of less washers to get the fit right)
Image
Image

The M10 shouldered screw fits snugly in the enlarged hole but the hole on the other end The oriuginal, unmodified one is too large to locate the assembly securely so I made up a little locating bush out of a steel tube (think it is 10.5 inner diameter, 14mm outer) to locate in the larger hole, conveniently it also acts on the end of the bearing inner race to hole it well clear of rubbing on any of the cradle.
You can see the tube here and secured finally with an M10 nut. I locknut might be better though.
Image
Image

The final assembly
Image

Fitted in the rear of the car and all the usual clearances and adjustments made
Image
Best thing also on the Xantia design is the height setting is unaltered after changing out the unit.
Graeme M
2008 C5 Exclusive Tourer 2.0 HDi
User avatar
chinkostu
Posts: 1180
Joined: 24 Sep 2014, 09:41
Location: cheshire
My Cars: N Xantia 1.9TD SX
03 Fiesta 1.4 Zetec
x 30

Re: Modification to Xantia height corrector cradles

Post by chinkostu »

So does it work better now? I find my rear hc extremely quick to correct, the fronts a touch sluggish!
Stu

Cars
1995 Xantia 1.9TD SX in (faded) Red
2003 Fiesta 1.4 Zetec in GREEEEEEEN
2001 206 1.9 LX
2001 Saxo VTR
1999 Saxo 1.1 East coast
1999 Punto :oops:
1996 306 1.8 XN Auto :?
1996 Fiesta 1.3 #-o
aerodynamica
Donor 2023
Posts: 1300
Joined: 26 Dec 2007, 18:10
Location: Glasgow
Lexia Available: Yes
My Cars: 2008 C5 Exclusive Tourer
1993 Xantia 1.9 TD VSX Mk1 Sinker A.K.A Slugmobile 13'
'Old Katy'
previous convictions: totaling 52litres of LHM in one go:
1968 ID19B 'Old Polly' Stellar white
1993 Xantia 1.9 TD SX Mk1 Sinker Silver
1992 XM 2.0 SEi Turbo Manual Anthracite Grey
1982 CX 20 Pallas 'Old Goldy'
1993 XM 2.1 SD Auto Light blue
1993 Xantia 1.9 TD SX Mk1 Sinker light Blue
1982 BX 16 TRS 'Cyril' Vallelunga Red
1995 Xantia 1.9 D SX Auto Dark green
1977 CX 2400 Pallas C-Matic 'Aphrodite' Regatta Blue
1982 GSA Pallas SE Silver Pearl
1980 CX 2000 Reflex Vallelunga Red
1978 CX 2400 Pallas C-Matic 'Prometheus' Midnight blue
1984 BX 14E 'Cecil the slugmobile' Maroon
1987 Fiat Panda 'the mighty panda'
x 98

Re: Modification to Xantia height corrector cradles

Post by aerodynamica »

The whole thing is reassembled packed with grease. It is difficult to refit the spring and the washers but they do fit finally.

Here is the same treatment for the front unit.
Image
Image

I hope it is clear how it is constructed. And now on to the first unforseen problem!
Graeme M
2008 C5 Exclusive Tourer 2.0 HDi
aerodynamica
Donor 2023
Posts: 1300
Joined: 26 Dec 2007, 18:10
Location: Glasgow
Lexia Available: Yes
My Cars: 2008 C5 Exclusive Tourer
1993 Xantia 1.9 TD VSX Mk1 Sinker A.K.A Slugmobile 13'
'Old Katy'
previous convictions: totaling 52litres of LHM in one go:
1968 ID19B 'Old Polly' Stellar white
1993 Xantia 1.9 TD SX Mk1 Sinker Silver
1992 XM 2.0 SEi Turbo Manual Anthracite Grey
1982 CX 20 Pallas 'Old Goldy'
1993 XM 2.1 SD Auto Light blue
1993 Xantia 1.9 TD SX Mk1 Sinker light Blue
1982 BX 16 TRS 'Cyril' Vallelunga Red
1995 Xantia 1.9 D SX Auto Dark green
1977 CX 2400 Pallas C-Matic 'Aphrodite' Regatta Blue
1982 GSA Pallas SE Silver Pearl
1980 CX 2000 Reflex Vallelunga Red
1978 CX 2400 Pallas C-Matic 'Prometheus' Midnight blue
1984 BX 14E 'Cecil the slugmobile' Maroon
1987 Fiat Panda 'the mighty panda'
x 98

Re: Modification to Xantia height corrector cradles

Post by aerodynamica »

Yes, it works immensely well. All of the movement of the plastic dog leg goes into moving the corrector and nothing else! The effect is that when you step out the car and stand back, the front relevels in about 8 seconds and the rear about a second later. The reverse happens when you return to the car, step in, it sinks a little front and rear, and within a few seconds the rear re levels (good accumulator on this car), start the motor and the front follows suit.

The action is not excessive, the correctors' built-in delay is still there but the car now needs less weight change to activate the need to re level itself.

Obviously other factors such as good arm bearings, LHM and spheres and correct set ride height need to be in check.

The car also responds far more accurately to the manual selector.
Graeme M
2008 C5 Exclusive Tourer 2.0 HDi
aerodynamica
Donor 2023
Posts: 1300
Joined: 26 Dec 2007, 18:10
Location: Glasgow
Lexia Available: Yes
My Cars: 2008 C5 Exclusive Tourer
1993 Xantia 1.9 TD VSX Mk1 Sinker A.K.A Slugmobile 13'
'Old Katy'
previous convictions: totaling 52litres of LHM in one go:
1968 ID19B 'Old Polly' Stellar white
1993 Xantia 1.9 TD SX Mk1 Sinker Silver
1992 XM 2.0 SEi Turbo Manual Anthracite Grey
1982 CX 20 Pallas 'Old Goldy'
1993 XM 2.1 SD Auto Light blue
1993 Xantia 1.9 TD SX Mk1 Sinker light Blue
1982 BX 16 TRS 'Cyril' Vallelunga Red
1995 Xantia 1.9 D SX Auto Dark green
1977 CX 2400 Pallas C-Matic 'Aphrodite' Regatta Blue
1982 GSA Pallas SE Silver Pearl
1980 CX 2000 Reflex Vallelunga Red
1978 CX 2400 Pallas C-Matic 'Prometheus' Midnight blue
1984 BX 14E 'Cecil the slugmobile' Maroon
1987 Fiat Panda 'the mighty panda'
x 98

Re: Modification to Xantia height corrector cradles

Post by aerodynamica »

The one mistake I made was to assume that the spring that actually touches the HC extension to move it was tightly coiled around the original metal guide (part removed here, bottom)
Image

The metal guide is 'stepped' and I didn't initially realise why. It is to allow the spring a certain amount of 'length' to the coils so as to let the spring move around the metal guide without binding. Trouble with the two bearings is they are both the same size so the spring was binding on them in use that had the effect of making the spring much stiffer when fitted. My fear being it would put too much strain on the plastic dog leg or the anti roll bar clamp rod (these can snap on seized pivots anyway) so the solution was to bend the long straight legs of the spring to slightly reduce the spring tension enough to stop the binding. Comparing it on the bench with one of the outgoing corrector units showed it was the same spring tension.

As an extra, the spring ends wear where they touch the HC valve extension and this extension piece wears little notches too so the fit between these needs checked for slack before it's all finished.

Anyway, it has been weeks now and the performance is still like new.

I also replaced the plastic dog legs to finish the job.

Anyway, all just for interest really as it's quite involved task but it really does work well
Graeme M
2008 C5 Exclusive Tourer 2.0 HDi
User avatar
myglaren
Forum Admin Team
Posts: 25465
Joined: 02 Mar 2008, 13:30
Location: Washington
My Cars: Mazda 6
Ooops.
Previously:
2009 Honda Civic :(
C5, C5, Xantia, BX, GS, Visa.
R4, R11TXE, R14, R30TX
x 4920

Re: Modification to Xantia height corrector cradles

Post by myglaren »

Excellent job and write up, definitely a candidate for the FCF Wiki!
aerodynamica
Donor 2023
Posts: 1300
Joined: 26 Dec 2007, 18:10
Location: Glasgow
Lexia Available: Yes
My Cars: 2008 C5 Exclusive Tourer
1993 Xantia 1.9 TD VSX Mk1 Sinker A.K.A Slugmobile 13'
'Old Katy'
previous convictions: totaling 52litres of LHM in one go:
1968 ID19B 'Old Polly' Stellar white
1993 Xantia 1.9 TD SX Mk1 Sinker Silver
1992 XM 2.0 SEi Turbo Manual Anthracite Grey
1982 CX 20 Pallas 'Old Goldy'
1993 XM 2.1 SD Auto Light blue
1993 Xantia 1.9 TD SX Mk1 Sinker light Blue
1982 BX 16 TRS 'Cyril' Vallelunga Red
1995 Xantia 1.9 D SX Auto Dark green
1977 CX 2400 Pallas C-Matic 'Aphrodite' Regatta Blue
1982 GSA Pallas SE Silver Pearl
1980 CX 2000 Reflex Vallelunga Red
1978 CX 2400 Pallas C-Matic 'Prometheus' Midnight blue
1984 BX 14E 'Cecil the slugmobile' Maroon
1987 Fiat Panda 'the mighty panda'
x 98

Re: Modification to Xantia height corrector cradles

Post by aerodynamica »

Haha, cheers - It's a labour of love :oops: For the love of hydropneumatics!

I'll add a video clip soon of the improvement
Graeme M
2008 C5 Exclusive Tourer 2.0 HDi
User avatar
Stickyfinger
(Donor 2016)
Posts: 10436
Joined: 28 Mar 2013, 21:05
Location: Somset my lovleee
My Cars: Xantia V6 ACTIVA 3ltr 24v Manual p1
Xm 2.1TD Ph2 Exclusive
AX, little Daffodil
SAXO White Mk1. Sally
x 1290
Contact:

Re: Modification to Xantia height corrector cradles

Post by Stickyfinger »

Nice work....very well worked thru.....

one question,,,,,? Could you press bearings into the stepped sleeve then re-fit that ??
Alasdair
Activa, the Moose Rider
3x C5x7 Steering racks and counting
wurlycorner
Posts: 1366
Joined: 30 Oct 2012, 22:37
Location: Chelmsford, Essex
My Cars: Two C5's...
Lots of CXs...
A couple of Xantia...
A C2...
Lots of Prelude's...
And a Sunny!
x 66
Contact:

Re: Modification to Xantia height corrector cradles

Post by wurlycorner »

Interesting work. Well done for all the effort in that!

Question though, why did you use such a long bolt and sleeve it, rather than just cut the bolt down in length?

I would definitely advise a locknut instead yes, or at least preening the bolt threads over if sticking with a plain nut.
--
Iain

1x '85 CX GTi Turbo s1 (metallic blue)
2x '85 CX GTi Turbo s2 t1 (metallic silver & grey)
'88 CX GTi Turbo s2 T2 (metallic light blue)
CX DTR T2 Safari (silver)
2x '96 Xantia Activa (Black & metallic green)
'01 C5 2.0 HDi LX Estate (Blue)
User avatar
xantia_v6
Forum Admin Team
Posts: 9084
Joined: 09 Nov 2005, 22:03
Location: France or NewZealand
Lexia Available: Yes
My Cars: -
1997 Citroen Xantia V6 (France)
1999 Citroen XM V6 ES9 (France)
2011 Peugeot 308 CC THP 155 (NZ)
1975 Jaguar XJ-S pre-HE (NZ)
x 834

Re: Modification to Xantia height corrector cradles

Post by xantia_v6 »

myglaren wrote:Excellent job and write up, definitely a candidate for the FCF Wiki!
There is already a guide to height corrector refurbishment at http://www.frenchcarforum.co.uk/wiki/He ... d_overhaul , but this version has a different approach to the problem, so would be a welcome addition.
aerodynamica
Donor 2023
Posts: 1300
Joined: 26 Dec 2007, 18:10
Location: Glasgow
Lexia Available: Yes
My Cars: 2008 C5 Exclusive Tourer
1993 Xantia 1.9 TD VSX Mk1 Sinker A.K.A Slugmobile 13'
'Old Katy'
previous convictions: totaling 52litres of LHM in one go:
1968 ID19B 'Old Polly' Stellar white
1993 Xantia 1.9 TD SX Mk1 Sinker Silver
1992 XM 2.0 SEi Turbo Manual Anthracite Grey
1982 CX 20 Pallas 'Old Goldy'
1993 XM 2.1 SD Auto Light blue
1993 Xantia 1.9 TD SX Mk1 Sinker light Blue
1982 BX 16 TRS 'Cyril' Vallelunga Red
1995 Xantia 1.9 D SX Auto Dark green
1977 CX 2400 Pallas C-Matic 'Aphrodite' Regatta Blue
1982 GSA Pallas SE Silver Pearl
1980 CX 2000 Reflex Vallelunga Red
1978 CX 2400 Pallas C-Matic 'Prometheus' Midnight blue
1984 BX 14E 'Cecil the slugmobile' Maroon
1987 Fiat Panda 'the mighty panda'
x 98

Re: Modification to Xantia height corrector cradles

Post by aerodynamica »

Stickyfinger wrote:Nice work....very well worked thru.....

one question,,,,,? Could you press bearings into the stepped sleeve then re-fit that ??
That's a good pointer - I thought about it as there's a set of bearings I have that have near as dammit the right size to do this but the metal sleeve is only held in place by the plastic bush as it's the bush that locates in the lever itself, the metal sleeve only serves to seperate the spring coils from the plastic bush. I considered milling out the plastic bush and pressing smaller bearings into the bush so as to keep almost everything the same but there's just not enough material in the plastic to do that.
wurlycorner wrote:Interesting work. Well done for all the effort in that!

Question though, why did you use such a long bolt and sleeve it, rather than just cut the bolt down in length?

I would definitely advise a locknut instead yes, or at least preening the bolt threads over if sticking with a plain nut.
It's a good point! the only real method to that madness was to give better access to the nut which points upwards, with the bit extra length you can reach the nut easily. But another reason is that this was kind of an 'alpha' version that I was going to refine e.g maybe reduce the length but when it was all in and working I kind of got a bit lazy..

Locknut is easy enough to fit nowthough the bolt itself is pretty solidly fit - I'll check everything in a couple of weeks to monitor any issues but the bearings themselves are quite under worked in this role so hoping this is a permanent fix.

I've had this Xantia for 3 months now and only just realised the DVLA haven't sent the new V5c.. A quick enquiry there and they have no record of the transfer.. (automated enquiry though) and two attempts to contact the seller have resulted in silence.. bit concerned but the guy still has a couple of Citroens for sale on CarandClassic so I can contact him tomorrow and ask about the transfer. Off topic soz
Graeme M
2008 C5 Exclusive Tourer 2.0 HDi
Post Reply