

Zel's Fleet Blog - BX, Jag XJ-S, Sinclair C5, Mercedes 208D & 230TE, AC Model 70.
-
mickthemaverick

- Forum Admin Team
- Posts: 20968
- Joined: 11 May 2019, 17:56
- x 8064
Re: Zel's Fleet Blog - BX, Jag XJ-S, Sinclair C5, Mercedes 208D & 230TE, AC Model 70.
Polestar 3?
I used to be indecisive, now I'm not so sure!
I used to ride on two wheels, but now I need all four!
I used to ride on two wheels, but now I need all four!
-
Zelandeth

- Donor 2024
- Posts: 5289
- Joined: 16 Nov 2014, 23:36
- x 1592
Re: Zel's Fleet Blog - BX, Jag XJ-S, Sinclair C5, Mercedes 208D & 230TE, AC Model 70.
Hmmm...."Starting at £76,540..."
The interior looks like a sensory deprivation chamber to me, absolutely everything being through the touchscreen is definitely a black mark. It's also an SUV.
Current fleet:
07 Volvo V70 SE D5, 85 Sinclair C5, 84 Trabant 601S, 73 AC Model 70, 62 Rover 110.
07 Volvo V70 SE D5, 85 Sinclair C5, 84 Trabant 601S, 73 AC Model 70, 62 Rover 110.
-
mickthemaverick
- Forum Admin Team
- Posts: 20968
- Joined: 11 May 2019, 17:56
- x 8064
Re: Zel's Fleet Blog - BX, Jag XJ-S, Sinclair C5, Mercedes 208D & 230TE, AC Model 70.
I used to be indecisive, now I'm not so sure!
I used to ride on two wheels, but now I need all four!
I used to ride on two wheels, but now I need all four!
-
Zelandeth
- Donor 2024
- Posts: 5289
- Joined: 16 Nov 2014, 23:36
- x 1592
Re: Zel's Fleet Blog - BX, Jag XJ-S, Sinclair C5, Mercedes 208D & 230TE, AC Model 70.
Haven't had a chance to watch that yet, though the thumbnail and title just immediately looks like the sort of click bait that YouTube loves to try to sneak into my feed when I'm not looking and I have honestly little time for.
Do I really care that there's a camera pointed in my face? Being absolutely honest, not really. In fact it's probably the active safety kit I object to the least. Of all the active safety systems I've seen, the one which detects when you're getting tired is the most likely to have in my case at least reduced risk. Especially back when I was far younger and wasn't anywhere near as good at listening to my body as I am now and used to do daft nonsense like Aberdeen to MK runs non stop, or driving from Aberdeen to Elgin or Inverness while running on 2 hours sleep. I've caught myself veering at least once or twice before going "Okay I need to take a break now" - and if the car had been smart enough to tell 18 year old me I was being an utter and complete idiot, that can only be a good thing. Only reason I didn't cause an accident back then was because I was *lucky* and because Aberdeenshire roads at 5am in 2003 tended to be empty.
Not really sure why anyone would have expected Brexit to in any way impact what safety kit was going to end up in our cars though, aside from making it more expensive to the buyer though. There are *plenty* of things in the world which seem worth worrying about to me, but a fixed, low resolution monochrome camera pointed at me in my car really isn't at all high on that list for me.
As it is though I'd personally be *perfectly* happy with an entirely classic fleet. I reckon between the Rover and the Trabant I'd have all my needs perfectly covered. I'd miss the air conditioning in the summer, but otherwise I'd be happy. It's not just about me though - Abby needs the car for work periodically and has a 2+ hour commute through rush hour Birmingham traffic. Additional to that I'm going to be needing to get Darren to/from regular medical appointments we simply can't miss at either the John Radcliffe or Churchill Hospitals in Oxford going forward.
Abby is entirely capable of driving my classics (and honestly she's probably a better driver than me), but gets no enjoyment out of it like I do. She's also been brought up in a country where niceties like air conditioning, power steering and an automatic gearbox are givens even on the most knackered wreck you get as your first car when you pass your test. So being plonked in the Rover where she has...uuh...a heater...for luxury doesn't tend to get me any thanks.
If I'm transporting someone to or from appointments for chemo or radiotherapy I really want it to all be conducted with the absolute bare minimum of fuss or risk of problems. Anyone who's travelled regularly between MK and Oxford recently will know it's an utterly horrible journey with no good route, especially in rush hour. Abby used to work in the JR, and used to leave MK before 6am if she wanted to be confident of actually being in the office by 9. We'd usually see her back about eight or nine in the evening. If I've got no choice but to deal with that nonsense, and there's technology which can make it easier for me I'm all for it. I've long said that the most likely accident I am to have is going to be in stop start traffic, I'll get distracted for a fraction of a second and wind up running into the car in front of me at 2mph. The fact that I seem to spend about half my life stuck in said traffic and how that skews the statistics has a lot to do with it! Under those circumstances, do I think automatic emergency braking systems are a good idea? Absolutely. Having them false trigger in lane 3 at 70mph on the M6 when someone cuts in front of us slightly too close for comfort? Not so much!
I actually did some crunching of numbers this afternoon for the sake of curiosity to see how things would stack up financially if I were to run out tomorrow and buy a Renault 4. I've discounted the Kia for now I think. It's just too much excess for the sake of it, and honestly I've realised running around in the Volvo a lot this last few weeks just how tiresome dealing with a properly big car around town really is. Taking a step back down in terms of footprint isn't the worst idea. Am I saying I Won't buy an EV6 GT one day? Absolutely not. Especially once they've depreciated for a few years. The vibe I still get from them is that they're a Tesla Model S for someone who really quite liked what the Model S offered when it arrived on the scene, but really doesn't want to buy a Tesla. The Renault though is a car more rooted in what makes more sense in the real world... list price is a third of that of the Kia as well.
While quite a few of the numbers were generalised and spitballed, I was really surprised to find that the running costs of the Volvo and the Renault (including the finance payments) are within a hundred quid or so over the course of the year. The orders of magnitude saved on fuel count for most of that. You're talking ~£250 (pessimistically) rather than £2750. Servicing is a saving as well (especially with how expensive engine oil is getting and the Volvo taking 7.5 litres of it!), and I'm not even taking into account the fact it'll need a timing belt in the next year or two and that's not a small job on this engine; or or course that with a 20 year old car that any manner of Expensive Things could go awry at any moment. I've been pretty lucky on that count with this car so far - despite the number of people telling me that these gearboxes are made of cheese and like to explode as a pass time. Other savings come in with both tax and insurance being roughly halved.
Of course it's not as simple as that, and there's still the balloon payment at the end of the term to consider - but honestly we've been down this road when I bought the 107 - and we had that for nearly ten years in the end. Having a car which Just Worked without perpetually wondering what that noise was or where I'm going to get that part from this time was really quite pleasant from the perspective of someone who spent most of his early years in motoring keeping cars held together with duct tape, bailing twine and sheer determination for many years.
We'll see if this actually does end up going anywhere, it might not. I've very much needed a distraction over the last couple of weeks though and this has been a subject which drew the short straw as it's something I've been able to dip in and out of.
I am definitely going to see if I can arrange a test drive of a 4 though. Last EV I really spent any time driving aside from a quick shot of a friend's Model S was the pair of electric 106s we had at work before they were replaced by the C1s at work back around 2006 or so. Curious to see how things have moved on since then. My only real gripe with those though always that nobody ever bothers to plug them in to the charger when they were finished, and with a 50 mile range, that was a problem!
Do I really care that there's a camera pointed in my face? Being absolutely honest, not really. In fact it's probably the active safety kit I object to the least. Of all the active safety systems I've seen, the one which detects when you're getting tired is the most likely to have in my case at least reduced risk. Especially back when I was far younger and wasn't anywhere near as good at listening to my body as I am now and used to do daft nonsense like Aberdeen to MK runs non stop, or driving from Aberdeen to Elgin or Inverness while running on 2 hours sleep. I've caught myself veering at least once or twice before going "Okay I need to take a break now" - and if the car had been smart enough to tell 18 year old me I was being an utter and complete idiot, that can only be a good thing. Only reason I didn't cause an accident back then was because I was *lucky* and because Aberdeenshire roads at 5am in 2003 tended to be empty.
Not really sure why anyone would have expected Brexit to in any way impact what safety kit was going to end up in our cars though, aside from making it more expensive to the buyer though. There are *plenty* of things in the world which seem worth worrying about to me, but a fixed, low resolution monochrome camera pointed at me in my car really isn't at all high on that list for me.
As it is though I'd personally be *perfectly* happy with an entirely classic fleet. I reckon between the Rover and the Trabant I'd have all my needs perfectly covered. I'd miss the air conditioning in the summer, but otherwise I'd be happy. It's not just about me though - Abby needs the car for work periodically and has a 2+ hour commute through rush hour Birmingham traffic. Additional to that I'm going to be needing to get Darren to/from regular medical appointments we simply can't miss at either the John Radcliffe or Churchill Hospitals in Oxford going forward.
Abby is entirely capable of driving my classics (and honestly she's probably a better driver than me), but gets no enjoyment out of it like I do. She's also been brought up in a country where niceties like air conditioning, power steering and an automatic gearbox are givens even on the most knackered wreck you get as your first car when you pass your test. So being plonked in the Rover where she has...uuh...a heater...for luxury doesn't tend to get me any thanks.
If I'm transporting someone to or from appointments for chemo or radiotherapy I really want it to all be conducted with the absolute bare minimum of fuss or risk of problems. Anyone who's travelled regularly between MK and Oxford recently will know it's an utterly horrible journey with no good route, especially in rush hour. Abby used to work in the JR, and used to leave MK before 6am if she wanted to be confident of actually being in the office by 9. We'd usually see her back about eight or nine in the evening. If I've got no choice but to deal with that nonsense, and there's technology which can make it easier for me I'm all for it. I've long said that the most likely accident I am to have is going to be in stop start traffic, I'll get distracted for a fraction of a second and wind up running into the car in front of me at 2mph. The fact that I seem to spend about half my life stuck in said traffic and how that skews the statistics has a lot to do with it! Under those circumstances, do I think automatic emergency braking systems are a good idea? Absolutely. Having them false trigger in lane 3 at 70mph on the M6 when someone cuts in front of us slightly too close for comfort? Not so much!
I actually did some crunching of numbers this afternoon for the sake of curiosity to see how things would stack up financially if I were to run out tomorrow and buy a Renault 4. I've discounted the Kia for now I think. It's just too much excess for the sake of it, and honestly I've realised running around in the Volvo a lot this last few weeks just how tiresome dealing with a properly big car around town really is. Taking a step back down in terms of footprint isn't the worst idea. Am I saying I Won't buy an EV6 GT one day? Absolutely not. Especially once they've depreciated for a few years. The vibe I still get from them is that they're a Tesla Model S for someone who really quite liked what the Model S offered when it arrived on the scene, but really doesn't want to buy a Tesla. The Renault though is a car more rooted in what makes more sense in the real world... list price is a third of that of the Kia as well.
While quite a few of the numbers were generalised and spitballed, I was really surprised to find that the running costs of the Volvo and the Renault (including the finance payments) are within a hundred quid or so over the course of the year. The orders of magnitude saved on fuel count for most of that. You're talking ~£250 (pessimistically) rather than £2750. Servicing is a saving as well (especially with how expensive engine oil is getting and the Volvo taking 7.5 litres of it!), and I'm not even taking into account the fact it'll need a timing belt in the next year or two and that's not a small job on this engine; or or course that with a 20 year old car that any manner of Expensive Things could go awry at any moment. I've been pretty lucky on that count with this car so far - despite the number of people telling me that these gearboxes are made of cheese and like to explode as a pass time. Other savings come in with both tax and insurance being roughly halved.
Of course it's not as simple as that, and there's still the balloon payment at the end of the term to consider - but honestly we've been down this road when I bought the 107 - and we had that for nearly ten years in the end. Having a car which Just Worked without perpetually wondering what that noise was or where I'm going to get that part from this time was really quite pleasant from the perspective of someone who spent most of his early years in motoring keeping cars held together with duct tape, bailing twine and sheer determination for many years.
We'll see if this actually does end up going anywhere, it might not. I've very much needed a distraction over the last couple of weeks though and this has been a subject which drew the short straw as it's something I've been able to dip in and out of.
I am definitely going to see if I can arrange a test drive of a 4 though. Last EV I really spent any time driving aside from a quick shot of a friend's Model S was the pair of electric 106s we had at work before they were replaced by the C1s at work back around 2006 or so. Curious to see how things have moved on since then. My only real gripe with those though always that nobody ever bothers to plug them in to the charger when they were finished, and with a 50 mile range, that was a problem!
Current fleet:
07 Volvo V70 SE D5, 85 Sinclair C5, 84 Trabant 601S, 73 AC Model 70, 62 Rover 110.
07 Volvo V70 SE D5, 85 Sinclair C5, 84 Trabant 601S, 73 AC Model 70, 62 Rover 110.
-
CitroJim

- A very naughty boy
- Posts: 54951
- Joined: 30 Apr 2005, 23:33
- x 8298
Re: Zel's Fleet Blog - BX, Jag XJ-S, Sinclair C5, Mercedes 208D & 230TE, AC Model 70.
A good read Zel and I must say I generally agree on the points you make; particularly having one car that just works...
And very much agreed about manoeuvring a big car around town; wish more would think like you!
May I wish Darren all the very best...
And very much agreed about manoeuvring a big car around town; wish more would think like you!
May I wish Darren all the very best...
Jim
A bit of a Citroen AX fan...
A bit of a Citroen AX fan...
-
Zelandeth
- Donor 2024
- Posts: 5289
- Joined: 16 Nov 2014, 23:36
- x 1592
Re: Zel's Fleet Blog - BX, Jag XJ-S, Sinclair C5, Mercedes 208D & 230TE, AC Model 70.
Sorry if the start of that last post came across as unintendedly snappy. Running on virtually no sleep and have essentially been on high alert continually for the last month now so I'm not at my best!
Current fleet:
07 Volvo V70 SE D5, 85 Sinclair C5, 84 Trabant 601S, 73 AC Model 70, 62 Rover 110.
07 Volvo V70 SE D5, 85 Sinclair C5, 84 Trabant 601S, 73 AC Model 70, 62 Rover 110.
-
OnlineRp0thejester

- Donor 2024
- Posts: 3267
- Joined: 11 May 2022, 19:54
- x 1055
Re: Zel's Fleet Blog - BX, Jag XJ-S, Sinclair C5, Mercedes 208D & 230TE, AC Model 70.
I think the 'You are tired warning' should exist on all vehicles that have driver assist. The C5X I hired had drivers assist. On the motorway it drives itself, literally drives itself!! If I took both hands off the steering wheel it would warn me, I soon sussed that, just 2 fingers on the steering wheel and it drives itself. Extremely dangerous in my opinion when tired or bored as concentration levels drop. I think modern cars are so clever now that they can sometimes be dangerous.
Ryan
'99 Xsara 1.6 X (Red) with Sunkissed bonnet. T59 SBX
'54 Astra Estate 1.7DTI (Artic White)
'06 C8 2.2Hdi Exclusive (Aster Grey)
Champion of Where's CitroJim
Yes I ask the stupid questions, because normally it is that simple.
'99 Xsara 1.6 X (Red) with Sunkissed bonnet. T59 SBX
'54 Astra Estate 1.7DTI (Artic White)
'06 C8 2.2Hdi Exclusive (Aster Grey)
Champion of Where's CitroJim
Yes I ask the stupid questions, because normally it is that simple.
-
Zelandeth
- Donor 2024
- Posts: 5289
- Joined: 16 Nov 2014, 23:36
- x 1592
Re: Zel's Fleet Blog - BX, Jag XJ-S, Sinclair C5, Mercedes 208D & 230TE, AC Model 70.
Few bits and pieces have arrived.
Firstly was this bundle of bits for the Trabant.

Most significantly, a gearbox that's in considerably better shape than the one in the car. This one actually was recently rebuilt shortly before the car it was in was condemned due to rust, so should have plenty of life left in it. It's significantly less incontinent than the one on the car that's for sure!
It's a truly giant lump of a thing I'll surely need to hire a crane to move.

All 20kg of it. Nice to see that it's had the uprated release bearing fitted - the stock one is simply a graphite bushing.

Will be interesting to see how different this is given that the gearbox has made more noise than the engine the whole time I've owned the car.
It *looks* like changing it should be relatively painless. So long as there's enough articulation available in the CV joints I think I should just be able to lift it up and out without needing to faff about splitting ball joints or anything.
The donor car apparently had a few more options than mine - evidenced by the presence of a reversing light switch.

In addition to the speedometer having a trip counter.

That's actually not a bad quality of life improvement to have, so I'll probably swap that over. The reason I got the speedometer was actually as a few people have expressed interest in a MPH overlay for it. It's not a particularly difficult bit of graphic design to put that together so long as you've got a high resolution scan of the face at a known resolution - I grabbed this one so I could get the aforementioned scan without risking breaking the one in the car.
It's taken nearly a month to turn up but a box of goodies for the Rover also turned up this morning.

Hopefully this will be everything I need to get a properly working braking system again. Fingers crossed.
Firstly was this bundle of bits for the Trabant.
Most significantly, a gearbox that's in considerably better shape than the one in the car. This one actually was recently rebuilt shortly before the car it was in was condemned due to rust, so should have plenty of life left in it. It's significantly less incontinent than the one on the car that's for sure!
It's a truly giant lump of a thing I'll surely need to hire a crane to move.
All 20kg of it. Nice to see that it's had the uprated release bearing fitted - the stock one is simply a graphite bushing.
Will be interesting to see how different this is given that the gearbox has made more noise than the engine the whole time I've owned the car.
It *looks* like changing it should be relatively painless. So long as there's enough articulation available in the CV joints I think I should just be able to lift it up and out without needing to faff about splitting ball joints or anything.
The donor car apparently had a few more options than mine - evidenced by the presence of a reversing light switch.
In addition to the speedometer having a trip counter.
That's actually not a bad quality of life improvement to have, so I'll probably swap that over. The reason I got the speedometer was actually as a few people have expressed interest in a MPH overlay for it. It's not a particularly difficult bit of graphic design to put that together so long as you've got a high resolution scan of the face at a known resolution - I grabbed this one so I could get the aforementioned scan without risking breaking the one in the car.
It's taken nearly a month to turn up but a box of goodies for the Rover also turned up this morning.
Hopefully this will be everything I need to get a properly working braking system again. Fingers crossed.
Current fleet:
07 Volvo V70 SE D5, 85 Sinclair C5, 84 Trabant 601S, 73 AC Model 70, 62 Rover 110.
07 Volvo V70 SE D5, 85 Sinclair C5, 84 Trabant 601S, 73 AC Model 70, 62 Rover 110.
-
CitroJim
- A very naughty boy
- Posts: 54951
- Joined: 30 Apr 2005, 23:33
- x 8298
Re: Zel's Fleet Blog - BX, Jag XJ-S, Sinclair C5, Mercedes 208D & 230TE, AC Model 70.
Great to see you back Zel 
Jim
A bit of a Citroen AX fan...
A bit of a Citroen AX fan...
-
Hell Razor5543
- (Donor 2023)
- Posts: 14287
- Joined: 01 Apr 2012, 09:47
- x 3297
Re: Zel's Fleet Blog - BX, Jag XJ-S, Sinclair C5, Mercedes 208D & 230TE, AC Model 70.
I heartily concur!
James
ex BX 1.9
ex Xantia 2.0HDi SX
ex Xantia 2.0HDi LX
ex C5 2.0HDi VTR
ex C5 2.0HDi VTR
ex C5 2.2HDi VTX+
Yes, I am paranoid, but am I paranoid ENOUGH?
Out amongst the stars, looking for a world of my own!
ex BX 1.9
ex Xantia 2.0HDi SX
ex Xantia 2.0HDi LX
ex C5 2.0HDi VTR
ex C5 2.0HDi VTR
ex C5 2.2HDi VTX+
Yes, I am paranoid, but am I paranoid ENOUGH?
Out amongst the stars, looking for a world of my own!
-
Zelandeth
- Donor 2024
- Posts: 5289
- Joined: 16 Nov 2014, 23:36
- x 1592
Re: Zel's Fleet Blog - BX, Jag XJ-S, Sinclair C5, Mercedes 208D & 230TE, AC Model 70.
Presented with two jobs and having to pick one to attack first when one is a braking system service and one is a gearbox swap, you'd usually think that the latter would seem like far more work and be the one that was put off. However the brakes are on the Rover and the gearbox is in the Trabant, so normal rules didn't necessarily apply here. Given the Trabant is in active mainstream service as well meant that getting it sorted out was more of a priority anyway, and as the 'box had started making even *more* exciting noises at times recently, that meant swapping the gearbox.
Let's get stuck in.
The observant among you might spot that the vast majority of the photos below were taken during the reassembly rather than disassembly portion. That's because I had a better idea what I was actually doing by then - and I was considerably less covered in disgusting greasy slime from decades of leakage from the old gearbox during assembly rather than teardown!
[] Disconnect the battery (we're going to need to disturb the starter motor later), pull the front panel, set it in the "service position," and pull out all the heater ducting. Rotating the air intake snorkel to the rear will help keep it from getting in the way later as well.

[] Pop the centre caps off both front wheels, crack off and remove the centre hub nuts. Don't lose the spacer which sits behind the nut between it and the hub.

[] Release the pinch bolt holding the gear lever rod to the selector fork and withdraw the lever far enough to get it well out of the way. Thankfully there's plenty of clearance to do this without needing to mess around removing the steering wheel.

Once it's clear of the selector fork and the guide bushing it actually makes sense to push it back forward to a more normal position as you're going to want to be able to freely rotate the steering, though you will need to withdraw it again before you actually go to remove the gearbox or it will be in the way.
[] Disconnect the clutch cable and withdraw it from the groove it sits in on the gearbox housing.

[] While you're in that neighbourhood it's a good time to also disconnect the speedometer drive cable, and tuck both this and the clutch cable out of the way.

[] Unbolt, disconnect and remove the starter motor. Do NOT be lazy like me and figure you can just prop it out of the way. If you do this it will be a continuous thorn in your side the whole time you're trying to wrangle the gearbox out - and it takes all of about 30 seconds to disconnect the feed to it and get it clear of the car. I regret my laziness there.
I still can't help but feel that this giant lump is somewhat overkill for 650cc and two cylinders. It's considerably bigger than the starter on the P6 was.

[] Remove the nuts and washers from the two gearbox and one engine mounts. One under the subframe and nice and easy to get to, the engine one is in roughly the same location on the other side of the car.

In contrast the rear gearbox mount initially looks all but impossible to properly access, being buried underneath the steering rack at the back. It's roughly where I've circled below. Yes I see that the steering rack gaiter has escaped again - I'll come back to that next weekend.

It actually isn't anywhere near as difficult to get to as it looks at first glance. The trick is to approach it from behind the offside wheel. Access is still a little bit restricted then but is entirely workable - Yes the washer was missing on this mount - I've since replaced that.

The engine mount does need to be removed as well as being able to shift the engine to one side a bit is really helpful as the clearance to get the diff housing in between the crankcase and the subframe is pretty tight.
[] Disconnect the exhaust from the hanger on the gearbox.

[] Disconnect the exhaust manifold from the expansion box/heat exchanger unit. In theory you could remove this and it would make the bell housing bolts a bit easier to access but I didn't really feel it was worth it. It didn't really get in the way.
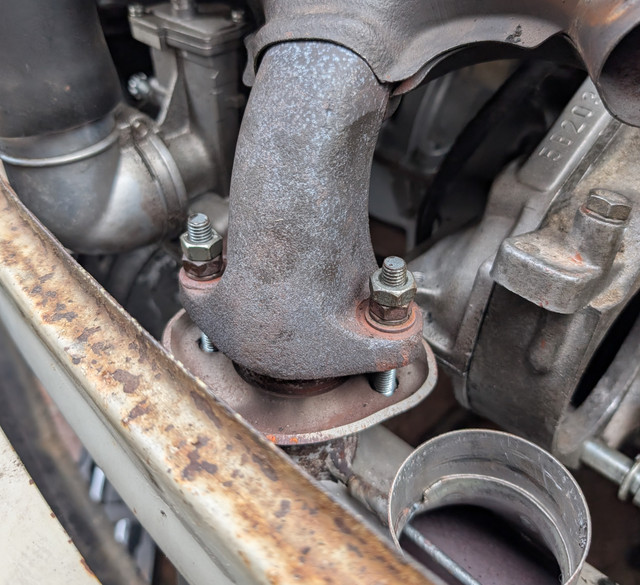
[] Undo the four 13mm bolts which hold the gearbox and engine together. Don't go looking for more than that, there really are only four plus the ones also holding the starter motor on. Note that the top two also have things attached to them - the one nearest the front of the car a spring clip to hold the wiring loom in place, and the rear one the engine ground lead.
[] Pick a side of the car, jack it up, secure the car on an axle stand or other appropriate support, and remove the wheel.
At this point I personally wasted a bunch of time trying to see if there was any way I could wriggle things out without dismantling hubs, simply because I have a tragically poor history of getting suspension ball joints separated without it turning into a multiple day long slog which ends up involving having to take apart half the car. This was stupid and completely unwarranted. Firstly, no, There is absolutely not enough room to just pull the inner joints out once the gearbox is loose. Secondly, the usual ball joint pain isn't an issue on the Trabant...because it doesn't use them for anything aside from the track rod ends (which you don't need to disturb).
Instead there's a separate swivel joint for vertical and horizontal motion as you'll see below.

[] Remove the lower suspension swivel from the wishbone.
To do this first remove the locking bolt from below the joint in the direction shown.

Then once the nut on either side is removed, using a suitable drift the pin can be knocked clear.

Either direction is valid...Just take the nut off the appropriate side.
One extracted swivel pin.

Which then allows the bottom of the hub to be pulled clear of the wishbone. The suspension geometry is such that all the tension is off the spring when the wheel is off the ground, so you can just do this by hand without needing to worry about spring compressors or anything.

This whole procedure to release the bottom of the hub took maybe ten minutes...including jacking the car up and removing the wheel. So much easier than having to mess around with ball joint splitters. You could probably have the entire hub off the car in fifteen minutes I reckon.
[] Position an oil catch pan or similar beneath the car to catch any CV joint grease which may drip during the next couple of steps.
[] Reach in alongside the driveshaft and release the inner CV boot from the joint housing. There's a spring around the boot which sits in a groove in the housing. So this can just be pulled free - no messing around trying to cut or release zip ties.

[] With the inner boot clear and the bottom of the hub free, you should have just enough clearance at a bit of a stretch to slide the outer end of the driveshaft clear of the hub, and the inner end can then be carefully pulled clear of the housing cup on the gearbox. It's worth making sure there's a bit of cardboard or something under the car at this point in case any of the spherical joint sections decides to drop off the tripod and scatter its needle bearings to the four winds. Thankfully I wasn't reusing the driveshafts so that wasn't a particularly major inconvenience when one of them made a bid for freedom.
-> If you don't have enough jacks/axle stands available to jack both sides of the car at once - loosely reassemble the wishbone to hub swivel and put the wheel back on.
[] Repeat the above procedure for the other side of the car.
[] If you've not forgotten to remove anything, with a bit of highly technical wiggling and only a moderate amount of swearing, the gearbox can now be lifted out of the car. While it's an awkward shape and there isn't much room to work with initially, it's not particularly heavy at around 20kg, so is entirely doable by hand. If I had a helper on hand honestly I'd probably have pulled the engine and box as one unit and separated them out of the car - probably only would have added about ten minutes work as the only things left to disconnect are the choke/throttle cables, a fuel line, two wires to the alternator and one wiring connector to the ignition module. Engine and gearbox together are still light enough at around 55kg that so long as you're paying attention that two people could manage it easily enough without needing any lifting gear.
One knackered gearbox, out of the car.

The conspicuous hole left where it used to be.

Note the comments I made earlier about removing the starter motor. It was while lifting the 'box out that I REALLY was berating Past Me for my laziness there as it consistently refused to stay where it was wedged and the wiring kept wrapping itself around things. Just remove it if you're doing this! I did before even entertaining the idea of putting the new one in.
This gearbox had clearly been leaking oil for Some Considerable Time. This chunky a layer of oily slime hasn't built up overnight.

This is why there were actually very few photos from the strip down phase - as that stuff was all over everything I was working on and by extension, ended up all over me while I was working on the car. I didn't worry too much about removing all of it as it's basically free rust proofing and isn't anywhere it's going to hinder me - I just scraped the heaviest of it off and left it at that. I will be attacking the general vicinity with the pressure washer and degreaser at some point so I can pinpoint any future leaks - but I'm honestly not worried about up on top of the subframe where I can't see and am never going to be sticking my hands. The amount of situations where you actually need to be accessing components from underneath on this car is *vanishingly* small. Basically exhaust work, hard brake lines to the rear, and getting to the engine/gearbox mounting bolts mentioned earlier, and one bolt at the rear to remove the rear suspension arms. That's honestly all I can think of.
In case you wondered HOW knackered the old gearbox was...Generally you shouldn't be able to wobble the input shaft by about 1mm, and clearly hear grumbly bearings even when just rotating it by hand.
Reassembly as the Haynes Manuals are so fond of saying really is "the above process in reverse." While I'm often skeptical...it really is that simple. The only bit which was in any way really annoying was trying to get the input shaft to the gearbox lined up and to slot into the engine because you've got very limited room to wiggle things. Which is why if I was doing this again I'd probably borrow a helper and pull/install the engine and gearbox as one unit, having split and reattached them out of the car.
There are a handful of additional steps.
[] Once the engine and gearbox have been mated and secured together it's worth making sure that the engine can be turned over freely to ensure that nothing odd has happened that's jamming the clutch in place, or bolts getting dropped into the bell housing...Should be fine, but it's worth double checking. The cooling fan makes this a pretty easy test to do as it's an easy thing to get hold of to turn the engine over manually. Obviously if it's locked up or there are funny noises you're going to need to backtrack and investigate.
[] Before the driveshafts are fitted, ensure that the inner CV joints are thoroughly greased. Aside from anything else this should help prevent anything falling apart while you're trying to get things into place.
[] With everything sitting in the correct position, check the gearbox oil level. This is the location of the level plug on the end of the gearbox case. This is accessible with the steering turned hard left, but is a bit easier with the wheel off.

The filler plug is a red plastic cap on the top of the casing, just forward of the differential housing.

Note that by the book that the Trabant uses HLP68 oil for the gearbox. This is actually a hydraulic fluid rather than conventional gear oil, and isn't particularly common in the UK and tends to need to be special ordered. Apparently using a normal GL4 rated 80W gear oil won't hurt anything though, just likely to make the shift a little heavier when the 'box is cold. My approach is personally that "oil is cheap, gearboxes aren't" with this though, but it's worth knowing that in an emergency that is an option.
[] While you're in there already and have good access, it makes sense to give the grease points on the suspension swivels a going over.
[] Before you refit the road wheels, give the brakes a *thorough* cleaning with an appropriate solvent cleaner as you absolutely definitely will have left the discs covered in greasy hand prints.

[] Ensure that the hub nut is properly peened over to lock it in place after you've tightened it. Given how tight you want this to be, it's best to do this after the car is back on the ground. Ideally this should be replaced with each use, but I found that it seated at a completely different location to when previously used so is thoroughly immobilised. I will change it though - it's just going to wait until I'm next ordering parts as it would be daft paying €25 shipping for €4 worth of nuts alone.
[] Once you're done there, clip the centre caps back into the wheels and double check that the wheel nuts are tight.

[] Grease up the sliding sections of the gear lever shift rod then wipe up the excess.
[] When reconnecting the clutch cable, adjust it so that there's just a tiny bit of free play when pressure is applied to the arm by hand. This is especially important if the original style of clutch release bearing is used (which is just a graphite bushing), as if it's adjusted too tight it will wear the bearing out in short order.
That really is all there is to it beyond systematically putting everything you took apart in the reverse order until you have an engine bay that looks like this again.

Obviously double check everything you've had apart is tight - ESPECIALLY as you've had bits of the suspension apart.
[] Last (and important) step, whenever the front panel has been off is to check before you close the bonnet that the end of the bonnet release cable sheath is indeed sitting properly in its little locating cup on the latch.

If it isn't, pulling the lever won't release it. You then have to spend fifteen minutes messing around poking tools between the bonnet and the scuttle, unscrewing the two screws which hold the panel on and remove that to get the bonnet open. Yes, I have found this out the hard way. Yes, I have done it more than once. Yes one of these occasions was done in the forecourt of a filling station, having discovered my mistake when I went to put fuel in. I'm hoping two is the magic number for this...
Finally...Test drive! I'd by lying if I said I wasn't a little nervous the first time I started the engine and attempted movement. Firstly it's the first time I've ever had the gearbox out of a front wheel drive car that I can think of, it's a secondhand box, so I'm having to take the seller at their word that it's healthy, and I always second guess I've done something daft. However at least based on a brief test around the block, it seems we're in the clear here.
I hate to use the whole "it's like a totally different car" statement as that is so horribly overused...however it IS like a totally different car! I knew that the old box was making a godawful din and had been as long as I'd had the car, but I didn't really appreciate how bad it really was. It absolutely was making probably twice as much mechanical noise as the engine. There is literally no difference in noise level now between the clutch being in or out.
This definitely wasn't the case before - in the video below you can clearly hear at about 0:30 where I dip the clutch and the overall noise level drops by about 50%.
Also as soon as you started moving there was just a hugely loud amount of what can only be described as "white noise" from the box, not like a discernable bearing howl or anything, just NOISE and a lot of it. Now there's a rather delightful but subdued bit of whine in 1st and 2nd...exactly the sort of thing you'd expect from a box from this vintage, but that's it. I'd say that the noise level in the cabin at speed is probably halved.
Couple of little bits of snagging I need to do.
[] I didn't get the gear lever in quite the right place - it's too low and fouls on my knee when going into reverse. There's no "right or wrong" position for it, you can position it anywhere so just a matter of fine tuning that a bit.
[] Clutch bite point is a touch high. I was expecting this as things would settle after the clutch was actuated a few times and the release bearing located itself.
[] Exhaust expansion box/heat exchanger wants rotating anticlockwise when viewed from above. Noticed when putting it back together that the hot air outlet is basically wedged hard up against the front panel. That's probably not helping our noise levels either.
[] Replace the zip tie on the steering rack boot with a narrower one which will hopefully stay in the groove better. Nothing to do with this job, just noticed while I was there.
[] I want to change the gearbox oil as a precaution now it's been proven to work just so I know it's been done as I have no idea how old the oil in there is - though what came out of the level plug looked pristine. I did just crack the drain plug a while ago just to make sure that there wasn't a bunch of water sitting in the bottom of the case or anything like that (as the water would sink to the bottom), and clean oil is all that seeped out through the threads, so I'm not panicking too much about that.
I reckon this took me probably four or five hours all in with zero reading up beforehand - and at *least* half or that was me pussyfooting around trying to find excuses not to disturb the suspension initially, and I ended up taking things apart further on the one side than I needed to, including pulling the track rod end off to get extra clearance that I just didn't need. Plus I spent a good fifteen minutes fighting with the first hub nut before remembering that there was a reason I bought this thing a few years ago.

Which of course immediately buzzed the thing off in about 0.2 seconds as if it wasn't even there. Which is exactly why I bought the thing. It's hard to overstate how much...and pardon the pun...impact, that the impact part of an impact gun has when dealing with fasteners like this. It's bulky, it's heavy and it needs 400W of mains power...but to date I have yet to find a fastener that has defeated it. Only headache usually is that it's too bulky to get into some places.
I reckon if I was to go into this job again now I could probably have the box out and back in within two and a half hours. With a helper you could probably knock a bit more off that as a fair chunk of the time is doing the same stuff twice with the driveshafts/hubs and I do reckon that pulling the whole driveline as one unit is *probably* quicker.
The only real "oops" moment I had was when I jacked up the second side of the car. I spent a while wondering why I kept thinking I could smell WD40...I'd only used a little bit to clean gunk off a couple of bits and pieces. Next time I walked around the car it became clear exactly why I could smell WD40. The can was absolutely fine where I left it...until I jacked up the far side of the car.

At which point it caused the sill on this side to drop just far enough to with pinpoint precision depress the button on the can. Oh well...the underside of the nearside sill is REALLY clean now!
It was honestly quite an enjoyable experience though aside from getting absolutely covered in grime from the old gearbox. It really does go to show how much difference it makes when a car is designed with serviceability in mind. Yes *some* of it does come simply with simplicity in the case of the Trabant - and things like the gearbox being so light really do help. From a general serviceability perspective though, it's honestly no less sophisticated a car than plenty of other stuff from the 60s (hello, Mini) in most ways but is orders of magnitude more pleasant to work on. I think aside from the big 32mm socket for the hub nuts I needed three sizes of spanner/socket (10, 13 and 17mm), a big hex head bit for the starter bolts, a screwdriver, a punch, and a hammer. While the impact gun might not be something everyone is likely to have, a big breaker bar would probably do the job just fine as well just requiring a bit more effort. The big (8mm?) hex bit for the starter motor bolts and a socket as big as 32mm for the hub nuts I think was the only things likely to trip up an even vaguely well equipped home mechanic. It can make enough difference that CHANGING A GEARBOX was actually an ENJOYABLE experience even just figuring things out as I went rather than a battle...and I think that says a lot about the whole way the car is designed and put together.
Let's get stuck in.
The observant among you might spot that the vast majority of the photos below were taken during the reassembly rather than disassembly portion. That's because I had a better idea what I was actually doing by then - and I was considerably less covered in disgusting greasy slime from decades of leakage from the old gearbox during assembly rather than teardown!
[] Disconnect the battery (we're going to need to disturb the starter motor later), pull the front panel, set it in the "service position," and pull out all the heater ducting. Rotating the air intake snorkel to the rear will help keep it from getting in the way later as well.
[] Pop the centre caps off both front wheels, crack off and remove the centre hub nuts. Don't lose the spacer which sits behind the nut between it and the hub.
[] Release the pinch bolt holding the gear lever rod to the selector fork and withdraw the lever far enough to get it well out of the way. Thankfully there's plenty of clearance to do this without needing to mess around removing the steering wheel.
Once it's clear of the selector fork and the guide bushing it actually makes sense to push it back forward to a more normal position as you're going to want to be able to freely rotate the steering, though you will need to withdraw it again before you actually go to remove the gearbox or it will be in the way.
[] Disconnect the clutch cable and withdraw it from the groove it sits in on the gearbox housing.
[] While you're in that neighbourhood it's a good time to also disconnect the speedometer drive cable, and tuck both this and the clutch cable out of the way.
[] Unbolt, disconnect and remove the starter motor. Do NOT be lazy like me and figure you can just prop it out of the way. If you do this it will be a continuous thorn in your side the whole time you're trying to wrangle the gearbox out - and it takes all of about 30 seconds to disconnect the feed to it and get it clear of the car. I regret my laziness there.
I still can't help but feel that this giant lump is somewhat overkill for 650cc and two cylinders. It's considerably bigger than the starter on the P6 was.
[] Remove the nuts and washers from the two gearbox and one engine mounts. One under the subframe and nice and easy to get to, the engine one is in roughly the same location on the other side of the car.
In contrast the rear gearbox mount initially looks all but impossible to properly access, being buried underneath the steering rack at the back. It's roughly where I've circled below. Yes I see that the steering rack gaiter has escaped again - I'll come back to that next weekend.
It actually isn't anywhere near as difficult to get to as it looks at first glance. The trick is to approach it from behind the offside wheel. Access is still a little bit restricted then but is entirely workable - Yes the washer was missing on this mount - I've since replaced that.
The engine mount does need to be removed as well as being able to shift the engine to one side a bit is really helpful as the clearance to get the diff housing in between the crankcase and the subframe is pretty tight.
[] Disconnect the exhaust from the hanger on the gearbox.
[] Disconnect the exhaust manifold from the expansion box/heat exchanger unit. In theory you could remove this and it would make the bell housing bolts a bit easier to access but I didn't really feel it was worth it. It didn't really get in the way.
[] Undo the four 13mm bolts which hold the gearbox and engine together. Don't go looking for more than that, there really are only four plus the ones also holding the starter motor on. Note that the top two also have things attached to them - the one nearest the front of the car a spring clip to hold the wiring loom in place, and the rear one the engine ground lead.
[] Pick a side of the car, jack it up, secure the car on an axle stand or other appropriate support, and remove the wheel.
At this point I personally wasted a bunch of time trying to see if there was any way I could wriggle things out without dismantling hubs, simply because I have a tragically poor history of getting suspension ball joints separated without it turning into a multiple day long slog which ends up involving having to take apart half the car. This was stupid and completely unwarranted. Firstly, no, There is absolutely not enough room to just pull the inner joints out once the gearbox is loose. Secondly, the usual ball joint pain isn't an issue on the Trabant...because it doesn't use them for anything aside from the track rod ends (which you don't need to disturb).
Instead there's a separate swivel joint for vertical and horizontal motion as you'll see below.
[] Remove the lower suspension swivel from the wishbone.
To do this first remove the locking bolt from below the joint in the direction shown.
Then once the nut on either side is removed, using a suitable drift the pin can be knocked clear.
Either direction is valid...Just take the nut off the appropriate side.
One extracted swivel pin.
Which then allows the bottom of the hub to be pulled clear of the wishbone. The suspension geometry is such that all the tension is off the spring when the wheel is off the ground, so you can just do this by hand without needing to worry about spring compressors or anything.
This whole procedure to release the bottom of the hub took maybe ten minutes...including jacking the car up and removing the wheel. So much easier than having to mess around with ball joint splitters. You could probably have the entire hub off the car in fifteen minutes I reckon.
[] Position an oil catch pan or similar beneath the car to catch any CV joint grease which may drip during the next couple of steps.
[] Reach in alongside the driveshaft and release the inner CV boot from the joint housing. There's a spring around the boot which sits in a groove in the housing. So this can just be pulled free - no messing around trying to cut or release zip ties.
[] With the inner boot clear and the bottom of the hub free, you should have just enough clearance at a bit of a stretch to slide the outer end of the driveshaft clear of the hub, and the inner end can then be carefully pulled clear of the housing cup on the gearbox. It's worth making sure there's a bit of cardboard or something under the car at this point in case any of the spherical joint sections decides to drop off the tripod and scatter its needle bearings to the four winds. Thankfully I wasn't reusing the driveshafts so that wasn't a particularly major inconvenience when one of them made a bid for freedom.
-> If you don't have enough jacks/axle stands available to jack both sides of the car at once - loosely reassemble the wishbone to hub swivel and put the wheel back on.
[] Repeat the above procedure for the other side of the car.
[] If you've not forgotten to remove anything, with a bit of highly technical wiggling and only a moderate amount of swearing, the gearbox can now be lifted out of the car. While it's an awkward shape and there isn't much room to work with initially, it's not particularly heavy at around 20kg, so is entirely doable by hand. If I had a helper on hand honestly I'd probably have pulled the engine and box as one unit and separated them out of the car - probably only would have added about ten minutes work as the only things left to disconnect are the choke/throttle cables, a fuel line, two wires to the alternator and one wiring connector to the ignition module. Engine and gearbox together are still light enough at around 55kg that so long as you're paying attention that two people could manage it easily enough without needing any lifting gear.
One knackered gearbox, out of the car.
The conspicuous hole left where it used to be.
Note the comments I made earlier about removing the starter motor. It was while lifting the 'box out that I REALLY was berating Past Me for my laziness there as it consistently refused to stay where it was wedged and the wiring kept wrapping itself around things. Just remove it if you're doing this! I did before even entertaining the idea of putting the new one in.
This gearbox had clearly been leaking oil for Some Considerable Time. This chunky a layer of oily slime hasn't built up overnight.
This is why there were actually very few photos from the strip down phase - as that stuff was all over everything I was working on and by extension, ended up all over me while I was working on the car. I didn't worry too much about removing all of it as it's basically free rust proofing and isn't anywhere it's going to hinder me - I just scraped the heaviest of it off and left it at that. I will be attacking the general vicinity with the pressure washer and degreaser at some point so I can pinpoint any future leaks - but I'm honestly not worried about up on top of the subframe where I can't see and am never going to be sticking my hands. The amount of situations where you actually need to be accessing components from underneath on this car is *vanishingly* small. Basically exhaust work, hard brake lines to the rear, and getting to the engine/gearbox mounting bolts mentioned earlier, and one bolt at the rear to remove the rear suspension arms. That's honestly all I can think of.
In case you wondered HOW knackered the old gearbox was...Generally you shouldn't be able to wobble the input shaft by about 1mm, and clearly hear grumbly bearings even when just rotating it by hand.
Reassembly as the Haynes Manuals are so fond of saying really is "the above process in reverse." While I'm often skeptical...it really is that simple. The only bit which was in any way really annoying was trying to get the input shaft to the gearbox lined up and to slot into the engine because you've got very limited room to wiggle things. Which is why if I was doing this again I'd probably borrow a helper and pull/install the engine and gearbox as one unit, having split and reattached them out of the car.
There are a handful of additional steps.
[] Once the engine and gearbox have been mated and secured together it's worth making sure that the engine can be turned over freely to ensure that nothing odd has happened that's jamming the clutch in place, or bolts getting dropped into the bell housing...Should be fine, but it's worth double checking. The cooling fan makes this a pretty easy test to do as it's an easy thing to get hold of to turn the engine over manually. Obviously if it's locked up or there are funny noises you're going to need to backtrack and investigate.
[] Before the driveshafts are fitted, ensure that the inner CV joints are thoroughly greased. Aside from anything else this should help prevent anything falling apart while you're trying to get things into place.
[] With everything sitting in the correct position, check the gearbox oil level. This is the location of the level plug on the end of the gearbox case. This is accessible with the steering turned hard left, but is a bit easier with the wheel off.
The filler plug is a red plastic cap on the top of the casing, just forward of the differential housing.
Note that by the book that the Trabant uses HLP68 oil for the gearbox. This is actually a hydraulic fluid rather than conventional gear oil, and isn't particularly common in the UK and tends to need to be special ordered. Apparently using a normal GL4 rated 80W gear oil won't hurt anything though, just likely to make the shift a little heavier when the 'box is cold. My approach is personally that "oil is cheap, gearboxes aren't" with this though, but it's worth knowing that in an emergency that is an option.
[] While you're in there already and have good access, it makes sense to give the grease points on the suspension swivels a going over.
[] Before you refit the road wheels, give the brakes a *thorough* cleaning with an appropriate solvent cleaner as you absolutely definitely will have left the discs covered in greasy hand prints.
[] Ensure that the hub nut is properly peened over to lock it in place after you've tightened it. Given how tight you want this to be, it's best to do this after the car is back on the ground. Ideally this should be replaced with each use, but I found that it seated at a completely different location to when previously used so is thoroughly immobilised. I will change it though - it's just going to wait until I'm next ordering parts as it would be daft paying €25 shipping for €4 worth of nuts alone.
[] Once you're done there, clip the centre caps back into the wheels and double check that the wheel nuts are tight.
[] Grease up the sliding sections of the gear lever shift rod then wipe up the excess.
[] When reconnecting the clutch cable, adjust it so that there's just a tiny bit of free play when pressure is applied to the arm by hand. This is especially important if the original style of clutch release bearing is used (which is just a graphite bushing), as if it's adjusted too tight it will wear the bearing out in short order.
That really is all there is to it beyond systematically putting everything you took apart in the reverse order until you have an engine bay that looks like this again.
Obviously double check everything you've had apart is tight - ESPECIALLY as you've had bits of the suspension apart.
[] Last (and important) step, whenever the front panel has been off is to check before you close the bonnet that the end of the bonnet release cable sheath is indeed sitting properly in its little locating cup on the latch.
If it isn't, pulling the lever won't release it. You then have to spend fifteen minutes messing around poking tools between the bonnet and the scuttle, unscrewing the two screws which hold the panel on and remove that to get the bonnet open. Yes, I have found this out the hard way. Yes, I have done it more than once. Yes one of these occasions was done in the forecourt of a filling station, having discovered my mistake when I went to put fuel in. I'm hoping two is the magic number for this...
Finally...Test drive! I'd by lying if I said I wasn't a little nervous the first time I started the engine and attempted movement. Firstly it's the first time I've ever had the gearbox out of a front wheel drive car that I can think of, it's a secondhand box, so I'm having to take the seller at their word that it's healthy, and I always second guess I've done something daft. However at least based on a brief test around the block, it seems we're in the clear here.
I hate to use the whole "it's like a totally different car" statement as that is so horribly overused...however it IS like a totally different car! I knew that the old box was making a godawful din and had been as long as I'd had the car, but I didn't really appreciate how bad it really was. It absolutely was making probably twice as much mechanical noise as the engine. There is literally no difference in noise level now between the clutch being in or out.
This definitely wasn't the case before - in the video below you can clearly hear at about 0:30 where I dip the clutch and the overall noise level drops by about 50%.
Also as soon as you started moving there was just a hugely loud amount of what can only be described as "white noise" from the box, not like a discernable bearing howl or anything, just NOISE and a lot of it. Now there's a rather delightful but subdued bit of whine in 1st and 2nd...exactly the sort of thing you'd expect from a box from this vintage, but that's it. I'd say that the noise level in the cabin at speed is probably halved.
Couple of little bits of snagging I need to do.
[] I didn't get the gear lever in quite the right place - it's too low and fouls on my knee when going into reverse. There's no "right or wrong" position for it, you can position it anywhere so just a matter of fine tuning that a bit.
[] Clutch bite point is a touch high. I was expecting this as things would settle after the clutch was actuated a few times and the release bearing located itself.
[] Exhaust expansion box/heat exchanger wants rotating anticlockwise when viewed from above. Noticed when putting it back together that the hot air outlet is basically wedged hard up against the front panel. That's probably not helping our noise levels either.
[] Replace the zip tie on the steering rack boot with a narrower one which will hopefully stay in the groove better. Nothing to do with this job, just noticed while I was there.
[] I want to change the gearbox oil as a precaution now it's been proven to work just so I know it's been done as I have no idea how old the oil in there is - though what came out of the level plug looked pristine. I did just crack the drain plug a while ago just to make sure that there wasn't a bunch of water sitting in the bottom of the case or anything like that (as the water would sink to the bottom), and clean oil is all that seeped out through the threads, so I'm not panicking too much about that.
I reckon this took me probably four or five hours all in with zero reading up beforehand - and at *least* half or that was me pussyfooting around trying to find excuses not to disturb the suspension initially, and I ended up taking things apart further on the one side than I needed to, including pulling the track rod end off to get extra clearance that I just didn't need. Plus I spent a good fifteen minutes fighting with the first hub nut before remembering that there was a reason I bought this thing a few years ago.
Which of course immediately buzzed the thing off in about 0.2 seconds as if it wasn't even there. Which is exactly why I bought the thing. It's hard to overstate how much...and pardon the pun...impact, that the impact part of an impact gun has when dealing with fasteners like this. It's bulky, it's heavy and it needs 400W of mains power...but to date I have yet to find a fastener that has defeated it. Only headache usually is that it's too bulky to get into some places.
I reckon if I was to go into this job again now I could probably have the box out and back in within two and a half hours. With a helper you could probably knock a bit more off that as a fair chunk of the time is doing the same stuff twice with the driveshafts/hubs and I do reckon that pulling the whole driveline as one unit is *probably* quicker.
The only real "oops" moment I had was when I jacked up the second side of the car. I spent a while wondering why I kept thinking I could smell WD40...I'd only used a little bit to clean gunk off a couple of bits and pieces. Next time I walked around the car it became clear exactly why I could smell WD40. The can was absolutely fine where I left it...until I jacked up the far side of the car.
At which point it caused the sill on this side to drop just far enough to with pinpoint precision depress the button on the can. Oh well...the underside of the nearside sill is REALLY clean now!
It was honestly quite an enjoyable experience though aside from getting absolutely covered in grime from the old gearbox. It really does go to show how much difference it makes when a car is designed with serviceability in mind. Yes *some* of it does come simply with simplicity in the case of the Trabant - and things like the gearbox being so light really do help. From a general serviceability perspective though, it's honestly no less sophisticated a car than plenty of other stuff from the 60s (hello, Mini) in most ways but is orders of magnitude more pleasant to work on. I think aside from the big 32mm socket for the hub nuts I needed three sizes of spanner/socket (10, 13 and 17mm), a big hex head bit for the starter bolts, a screwdriver, a punch, and a hammer. While the impact gun might not be something everyone is likely to have, a big breaker bar would probably do the job just fine as well just requiring a bit more effort. The big (8mm?) hex bit for the starter motor bolts and a socket as big as 32mm for the hub nuts I think was the only things likely to trip up an even vaguely well equipped home mechanic. It can make enough difference that CHANGING A GEARBOX was actually an ENJOYABLE experience even just figuring things out as I went rather than a battle...and I think that says a lot about the whole way the car is designed and put together.
Current fleet:
07 Volvo V70 SE D5, 85 Sinclair C5, 84 Trabant 601S, 73 AC Model 70, 62 Rover 110.
07 Volvo V70 SE D5, 85 Sinclair C5, 84 Trabant 601S, 73 AC Model 70, 62 Rover 110.
-
mickthemaverick
- Forum Admin Team
- Posts: 20968
- Joined: 11 May 2019, 17:56
- x 8064
Re: Zel's Fleet Blog - BX, Jag XJ-S, Sinclair C5, Mercedes 208D & 230TE, AC Model 70.
Excellent write up Zel, well done on the work too!
I used to be indecisive, now I'm not so sure!
I used to ride on two wheels, but now I need all four!
I used to ride on two wheels, but now I need all four!
-
OnlineRp0thejester
- Donor 2024
- Posts: 3267
- Joined: 11 May 2022, 19:54
- x 1055
Re: Zel's Fleet Blog - BX, Jag XJ-S, Sinclair C5, Mercedes 208D & 230TE, AC Model 70.
I thoroughly enjoyed reading that, the fact the last time I checked there was only 2 Trabants of your year in the country makes no difference. It did put me off doing a clutch change on my car though. What a great write up and explanation of everything involved. If I see that lawnmower again I'll get a days insurance to drive it, such a unique vehicle.
Ryan
'99 Xsara 1.6 X (Red) with Sunkissed bonnet. T59 SBX
'54 Astra Estate 1.7DTI (Artic White)
'06 C8 2.2Hdi Exclusive (Aster Grey)
Champion of Where's CitroJim
Yes I ask the stupid questions, because normally it is that simple.
'99 Xsara 1.6 X (Red) with Sunkissed bonnet. T59 SBX
'54 Astra Estate 1.7DTI (Artic White)
'06 C8 2.2Hdi Exclusive (Aster Grey)
Champion of Where's CitroJim
Yes I ask the stupid questions, because normally it is that simple.
-
CitroJim
- A very naughty boy
- Posts: 54951
- Joined: 30 Apr 2005, 23:33
- x 8298
Re: Zel's Fleet Blog - BX, Jag XJ-S, Sinclair C5, Mercedes 208D & 230TE, AC Model 70.
Great work Zel Another most enjoyable read 
Another most enjoyable read Jim
A bit of a Citroen AX fan...
A bit of a Citroen AX fan...
-
Zelandeth
- Donor 2024
- Posts: 5289
- Joined: 16 Nov 2014, 23:36
- x 1592
Re: Zel's Fleet Blog - BX, Jag XJ-S, Sinclair C5, Mercedes 208D & 230TE, AC Model 70.
While the difference is I think even more stark in person - I think a quick video of it on the move will show an immediate dramatic difference to anyone who's ever travelled in this car.
Before:
This is actually from about a year ago, and I'm pretty sure it had become worse since.
After:
Excuse the horrible angle (and immediate traffic encounter) I just had my phone wedged under the passenger seat headrest. It serves the purpose though in showing there's a dramatic difference!
Goes well for a "lawnmower" I reckon!
Before:
This is actually from about a year ago, and I'm pretty sure it had become worse since.
After:
Excuse the horrible angle (and immediate traffic encounter) I just had my phone wedged under the passenger seat headrest. It serves the purpose though in showing there's a dramatic difference!
Goes well for a "lawnmower" I reckon!
Current fleet:
07 Volvo V70 SE D5, 85 Sinclair C5, 84 Trabant 601S, 73 AC Model 70, 62 Rover 110.
07 Volvo V70 SE D5, 85 Sinclair C5, 84 Trabant 601S, 73 AC Model 70, 62 Rover 110.