
Zel's Fleet Blog - BX, Jag XJ-S, Sinclair C5, Mercedes 208D & 230TE, AC Model 70.
-
Hell Razor5543
- (Donor 2023)
- Posts: 14302
- Joined: 01 Apr 2012, 09:47
- x 3303
Re: Zel's Fleet Blog - BX, Jag XJ-S, Sinclair C5, Mercedes 208D & 230TE, AC Model 70.
I heard that somebody took some C4, mixed it with a different type of C4, poured the concoction into the fuel tank of another C4, put in a long fuse, lit it (and retired to a very safe distance), and the light from the resulting explosion meant that he could C4 miles!
James
ex BX 1.9
ex Xantia 2.0HDi SX
ex Xantia 2.0HDi LX
ex C5 2.0HDi VTR
ex C5 2.0HDi VTR
ex C5 2.2HDi VTX+
Yes, I am paranoid, but am I paranoid ENOUGH?
Out amongst the stars, looking for a world of my own!
ex BX 1.9
ex Xantia 2.0HDi SX
ex Xantia 2.0HDi LX
ex C5 2.0HDi VTR
ex C5 2.0HDi VTR
ex C5 2.2HDi VTX+
Yes, I am paranoid, but am I paranoid ENOUGH?
Out amongst the stars, looking for a world of my own!
-
MattBLancs
- Donor 2024
- Posts: 5304
- Joined: 25 Apr 2022, 09:03
- x 2336
Re: Zel's Fleet Blog - BX, Jag XJ-S, Sinclair C5, Mercedes 208D & 230TE, AC Model 70.
My 2.0 EW10J4 Coupe was off the road for best part of ten years. When I got chance to crack on with finishing it (the swap auto to manual, interrupted by getting our first house and well, work in general) it ran for a bit on the petrol that was in the tank. Ran surprisingly well - though a hesitation when coming onto the throttle.
Fresh fuel (and no other changes) cured that
Pre ethanol E5 / E10 days though. I think the ethanol is hygroscopic - so the increasing water content isn't good to run on.
I'm sure I heard old petrol is effectively decreasing in Octane rating - so a more high performance/more highly strung engine might play up more readily than something lower compression/lower specific output.
Fresh fuel (and no other changes) cured that
Pre ethanol E5 / E10 days though. I think the ethanol is hygroscopic - so the increasing water content isn't good to run on.
I'm sure I heard old petrol is effectively decreasing in Octane rating - so a more high performance/more highly strung engine might play up more readily than something lower compression/lower specific output.
-
bobins

- (Donor 2025)
- Posts: 6846
- Joined: 05 Jul 2012, 18:07
- x 3566
Re: Zel's Fleet Blog - BX, Jag XJ-S, Sinclair C5, Mercedes 208D & 230TE, AC Model 70.
One of the issues with the old quad bike I used (apart from the fact it was a little 'tired') was that it used a carburettor so it had no effective way of compensating for dodgy fuel, whereas injection engines will have multpile ways of monitoring and adjusting for crap fuel.
-
Zelandeth

- Donor 2024
- Posts: 5301
- Joined: 16 Nov 2014, 23:36
- x 1593
Re: Zel's Fleet Blog - BX, Jag XJ-S, Sinclair C5, Mercedes 208D & 230TE, AC Model 70.
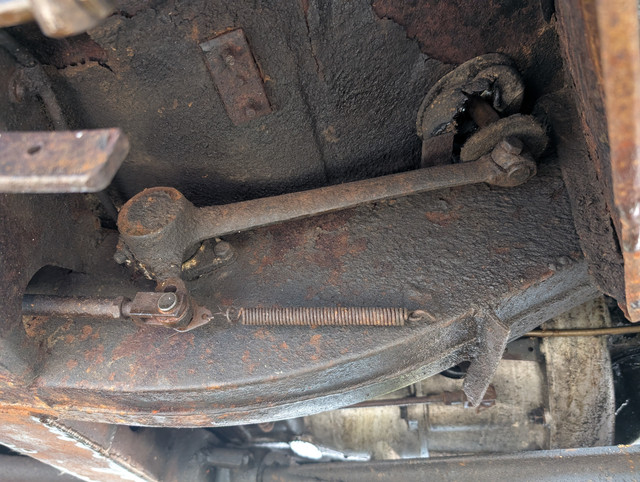
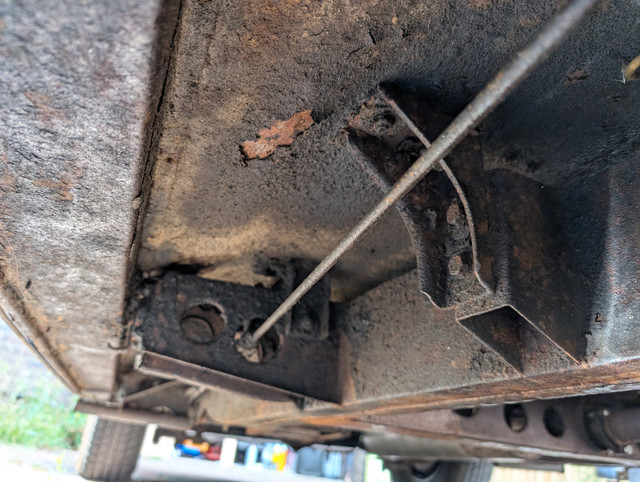
Isn't this a funky looking brake pedal arrangement compared to a modern car?
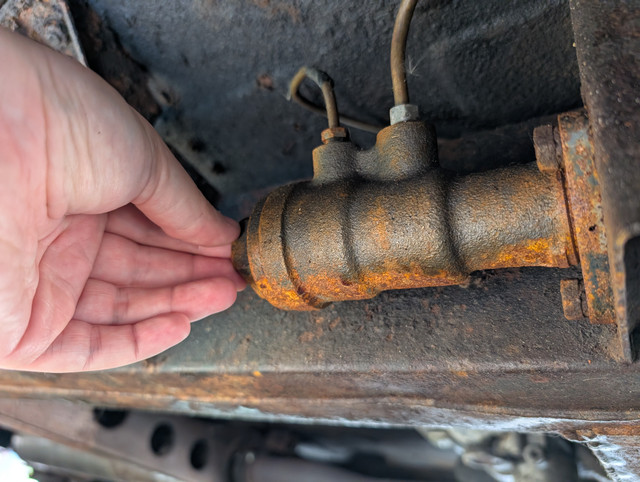
That rod heading out of frame to the left runs to the master cylinder, which is quite a chunky one. Hand for scale.
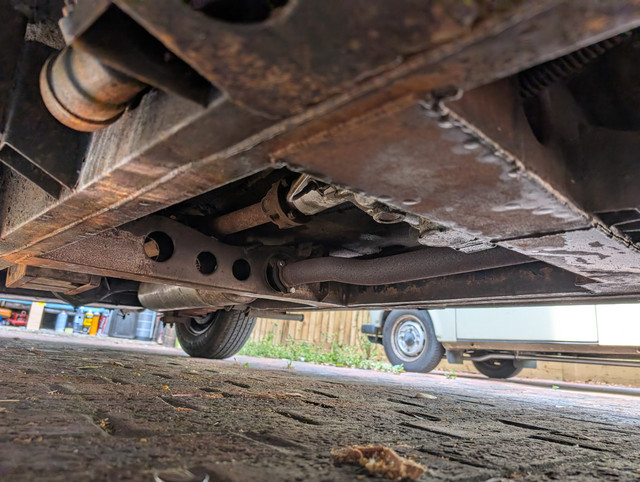
Underside in general at a glance from this corner looks really pretty clean. Well, not clean clean, but you know what I mean.
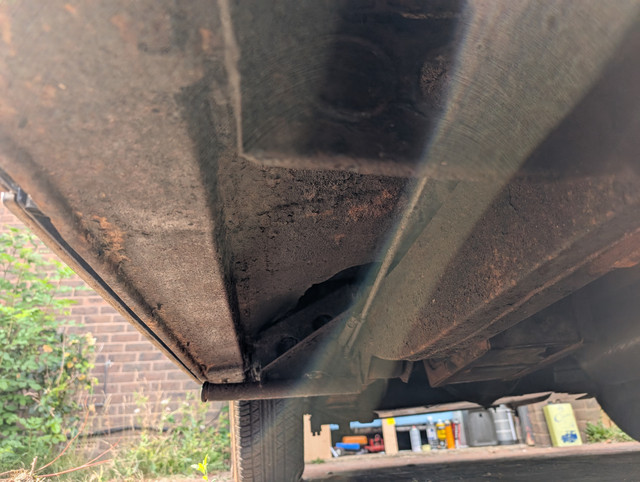
I believe there should be a shield covering the handbrake mechanism to keep the worst of the road spray off of it. I'll need to find or make one of those.
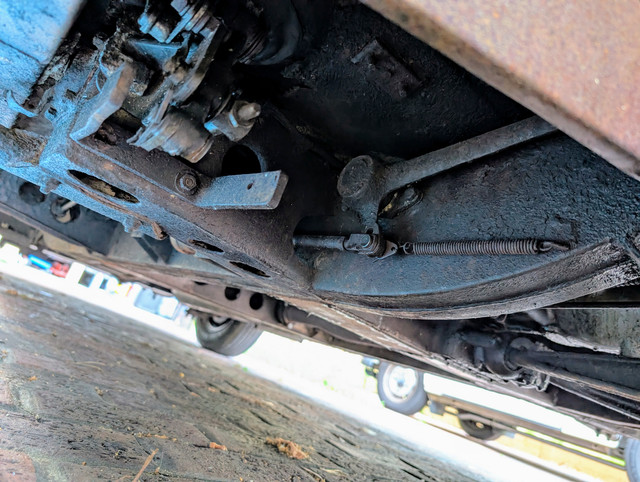
This is what was left of the rubber boot meant to be sealing around the handbrake lever where it goes through the floor.
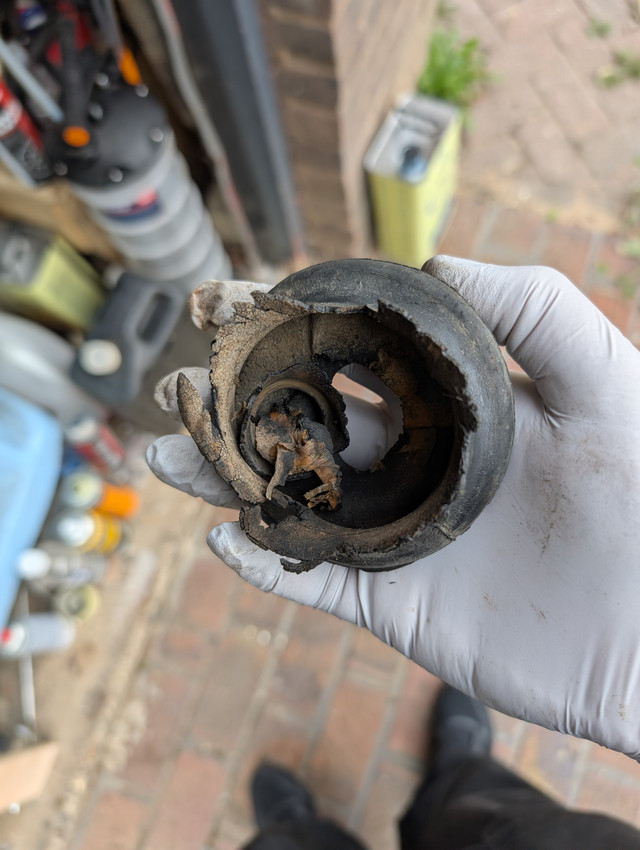
This should do a better job at keeping the elements outside I think.
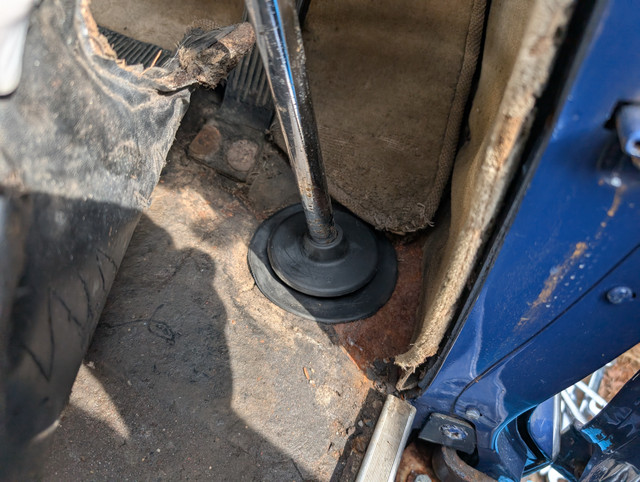
Though that's not going to do much given the gaping hole around the brake and clutch pedals.
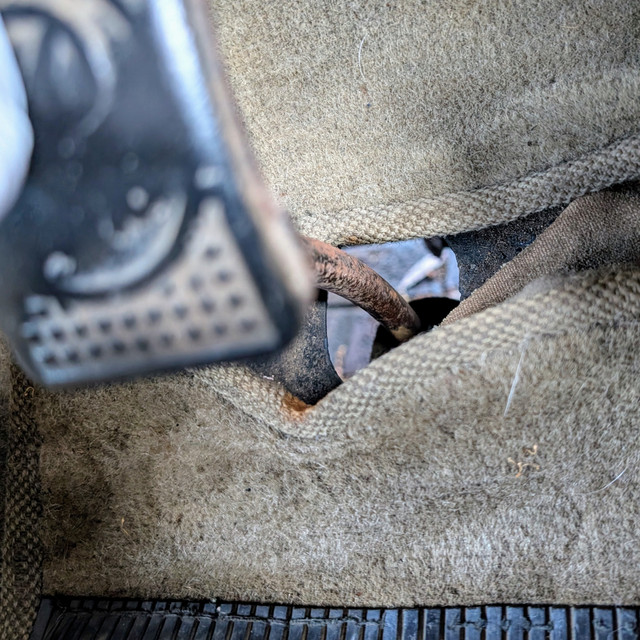
There is supposed to be a rubber boot there which holds a felt "washer" in place around the pedal shafts. Unsurprisingly these had disintegrated.
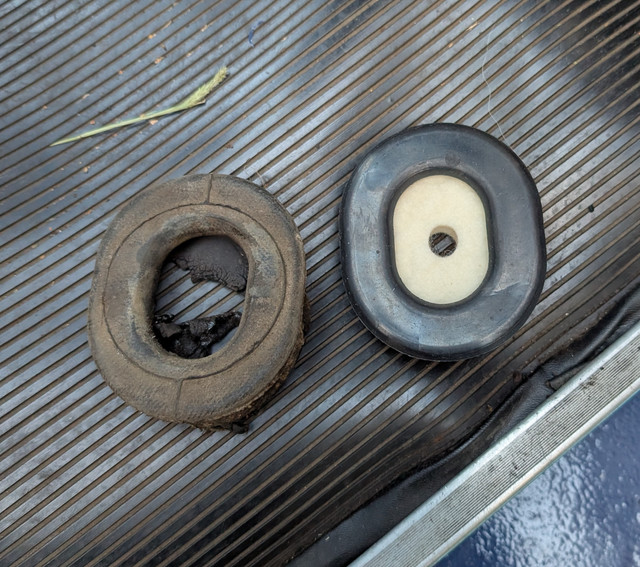
To change these you remove the pinch bolt holding the pedal to the actuator rod and pull it off, pull the old boot out, and stuff the new one in from outside - *before* putting the felt pad in as you need all the flex you can get to get the thing into place.
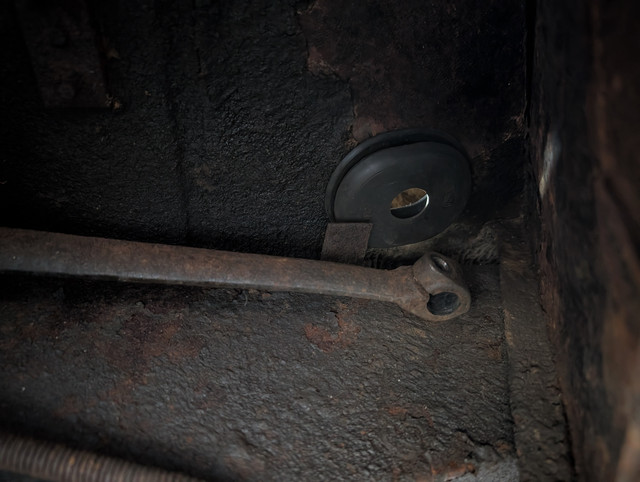
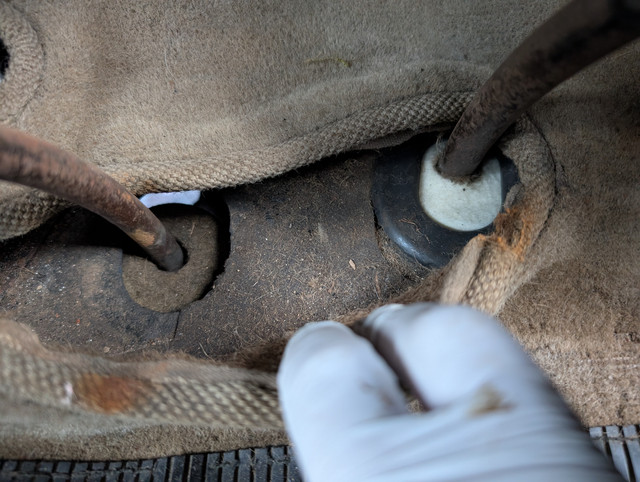
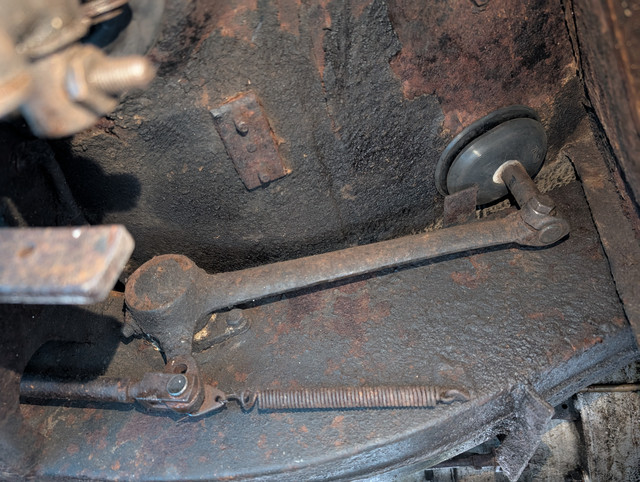
I do need to tweak the adjustment of the pedal though - the rod should be level with the stop tab just by the boot in the above photo, whereas there's the best part of an inch of clearance at the moment. I suspect with that set right the pedal will feel a lot better - an inch here equates to probably well over two at the pedal.
Clutch pedal seal will be more of a pain to do as there's a chassis rail in my way. I will probably pull the brake pedal again and clean up the shaft a bit so it doesn't tear up the new felt seal in a matter of minutes (it takes less than a minute to remove so no huge loss doing it a couple of times) and do the same to the clutch while I have that out to change. Assuming those felt pads really want to be soaked in oil as well - the manual I have makes no mention that they even exist much less how to prepare them.
That rod heading out of frame to the left runs to the master cylinder, which is quite a chunky one. Hand for scale.
Underside in general at a glance from this corner looks really pretty clean. Well, not clean clean, but you know what I mean.
I believe there should be a shield covering the handbrake mechanism to keep the worst of the road spray off of it. I'll need to find or make one of those.
This is what was left of the rubber boot meant to be sealing around the handbrake lever where it goes through the floor.
This should do a better job at keeping the elements outside I think.
Though that's not going to do much given the gaping hole around the brake and clutch pedals.
There is supposed to be a rubber boot there which holds a felt "washer" in place around the pedal shafts. Unsurprisingly these had disintegrated.
To change these you remove the pinch bolt holding the pedal to the actuator rod and pull it off, pull the old boot out, and stuff the new one in from outside - *before* putting the felt pad in as you need all the flex you can get to get the thing into place.
I do need to tweak the adjustment of the pedal though - the rod should be level with the stop tab just by the boot in the above photo, whereas there's the best part of an inch of clearance at the moment. I suspect with that set right the pedal will feel a lot better - an inch here equates to probably well over two at the pedal.
Clutch pedal seal will be more of a pain to do as there's a chassis rail in my way. I will probably pull the brake pedal again and clean up the shaft a bit so it doesn't tear up the new felt seal in a matter of minutes (it takes less than a minute to remove so no huge loss doing it a couple of times) and do the same to the clutch while I have that out to change. Assuming those felt pads really want to be soaked in oil as well - the manual I have makes no mention that they even exist much less how to prepare them.
Current fleet:
07 Volvo V70 SE D5, 85 Sinclair C5, 84 Trabant 601S, 73 AC Model 70, 62 Rover 110.
07 Volvo V70 SE D5, 85 Sinclair C5, 84 Trabant 601S, 73 AC Model 70, 62 Rover 110.
-
MattBLancs
- Donor 2024
- Posts: 5304
- Joined: 25 Apr 2022, 09:03
- x 2336
Re: Zel's Fleet Blog - BX, Jag XJ-S, Sinclair C5, Mercedes 208D & 230TE, AC Model 70.
Interesting designs, definitely! And a grease nipple on that lever/pivot.
Bit of cardboard template fabrication for the handbrake mechanism weather shield?
Bit of cardboard template fabrication for the handbrake mechanism weather shield?
-
Gibbo2286
- (Donor 2020)
- Posts: 8170
- Joined: 08 Jun 2011, 18:04
- x 2941
Re: Zel's Fleet Blog - BX, Jag XJ-S, Sinclair C5, Mercedes 208D & 230TE, AC Model 70.
The 'cold wind up your trouser leg' design.
Anyone who has never made a mistake has never tried anything new. (Albert Einstein)
-
Zelandeth
- Donor 2024
- Posts: 5301
- Joined: 16 Nov 2014, 23:36
- x 1593
Re: Zel's Fleet Blog - BX, Jag XJ-S, Sinclair C5, Mercedes 208D & 230TE, AC Model 70.
The word "sturdy" I think sums up just about everything underneath that car. The brake drums on the rear are absurdly huge for the size/weight of car - pretty sure they're larger than the ones on the back of the camper were.MattBLancs wrote: 04 Jul 2025, 07:42 Interesting designs, definitely! And a grease nipple on that lever/pivot.
Bit of cardboard template fabrication for the handbrake mechanism weather shield?
Random photo from when I was working on the last one.
Common to MANY buses and coaches. Though the first generation Dennis Darts were by far the worst of any I've ever driven for it by a mile. Which given their heating is...shall we just say poor and leave it at that...isn't exactly ideal!
Especially when you hit a puddle that was deeper than you thought and you get a bunch of ice cold water sprayed up your right ankle. Though it does definitely ensure that you are absolutely fully awake and paying full attention. It also apparently makes me make an absolutely hilarious yelping noise based on how long my friend (the owner of the bus in question) was all but rolling around on the floor laughing after the event.
I did nearly drive off and leave him at the depot when we dropped that off and switched back into his Bedford...but I took pity on him and let him in. After a couple of circuits round the yard anyway... I'd insisted on us taking that one back home, purely because it actually had a decent heater and it was and it was February in Aberdeenshire and fluffing cold!
I do miss our nonsense from back then.
Last edited by Zelandeth on 12 Jul 2025, 04:36, edited 1 time in total.
Current fleet:
07 Volvo V70 SE D5, 85 Sinclair C5, 84 Trabant 601S, 73 AC Model 70, 62 Rover 110.
07 Volvo V70 SE D5, 85 Sinclair C5, 84 Trabant 601S, 73 AC Model 70, 62 Rover 110.
-
Zelandeth
- Donor 2024
- Posts: 5301
- Joined: 16 Nov 2014, 23:36
- x 1593
Re: Zel's Fleet Blog - BX, Jag XJ-S, Sinclair C5, Mercedes 208D & 230TE, AC Model 70.
We now have a fully functional set of side and tail lights.
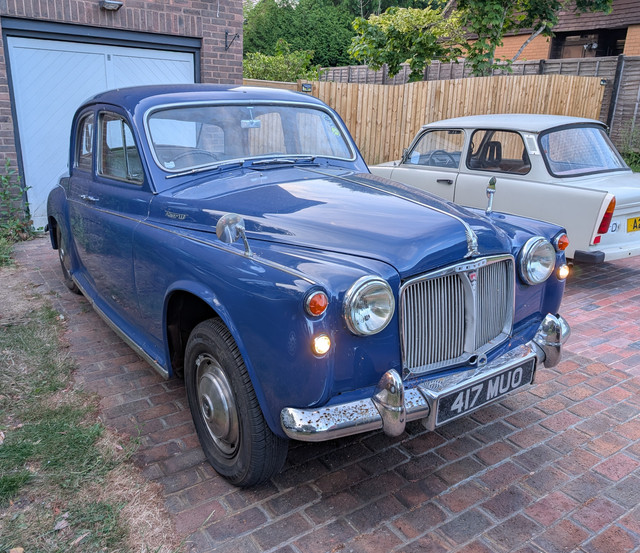
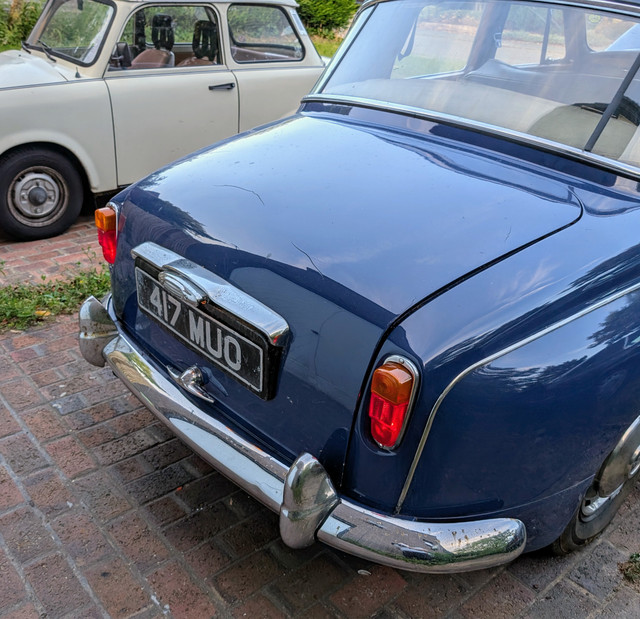
I still need to tidy up the routing a little, but the wiring on the inner wings is looking a bit better now I've properly repaired the couple of bits that had chafed. They still look terrible as the outer cloth covering has degraded in quite a few areas, but the actual insulation aside from those couple of spots looks to be in good shape.
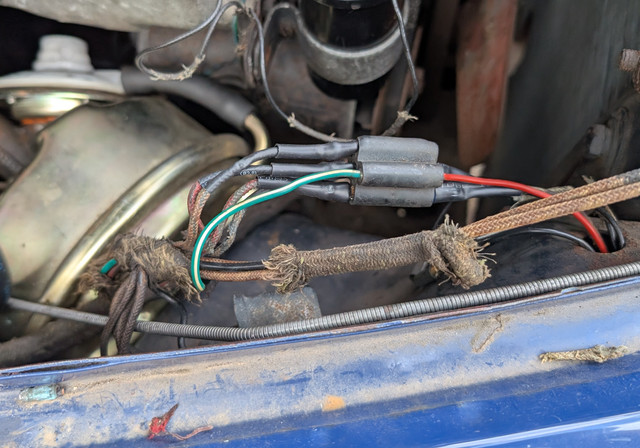
Once I've got things routed properly I'll get some new wrap on there to stop the outer loom from disintegrating any further at the ends. It's never going to look pretty, but short of replacing the whole loom that's always going to be the case.
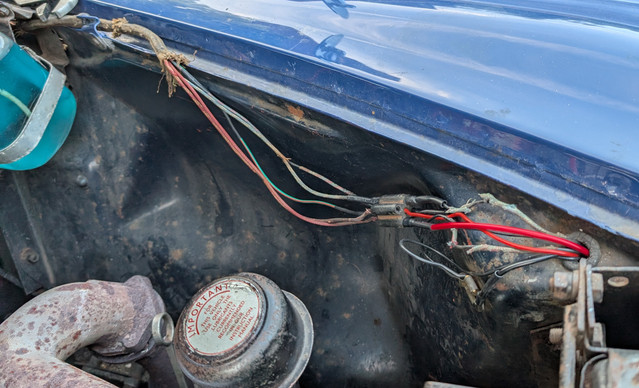
I will add a heat shrink sheath to where the wiring goes through the wing - I've deliberately left things like they are at the moment as I know I need to do fault finding on the wiring to the headlights, so being able to see what's left of the coloured sheathing will make that easier for me to follow.
I'm not totally sure why these side lights came fitted with 21W bulbs...that's total overkill. I'll grab some 5W ones shortly which is far more reasonable.
The horn currently doesn't work. I can hear the relay clicking when you press the horn ring on the steering wheel but there's nothing in terms of sound. Thankfully the original horns are still present.
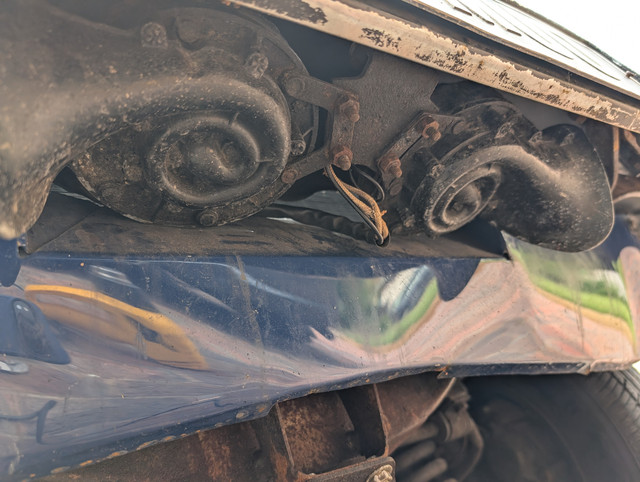
Hopefully they just need a service and will be brought back to life soon. Most likely just the points gummed up from years of disuse. I did wonder if the negative earth conversion might have caused issues here, but apparently this style don't care about polarity. It's still going to be a right pain to work around for the clock and radio though. I really should put a couple of prominent labels in the engine bay and by the battery showing the car is negative earth now to prevent anyone making expensive mistakes in the future. It's not something I would have done myself, but it's already done and swapping back would mean rebuilding half the ignition system.
-- -- --
Today I've done a little detective work on the headlights.
On that note, does anyone have a good 110 wiring diagram? The one in the manual I have is tiny and quite hard to read. Colour would be even better, but I'll take what I can get. Trying to search on Google just gets me about 50,000 Land Rover 110 results. The wiring in the 110 is quite fundamentally different to the other P4s so it really does need to be the right one. It's not the end of the world, and I could probably just spend an evening redrawing the one in the manual in a more user friendly form if it came to it.
The way the lights *should* work on a P4 is as follows.
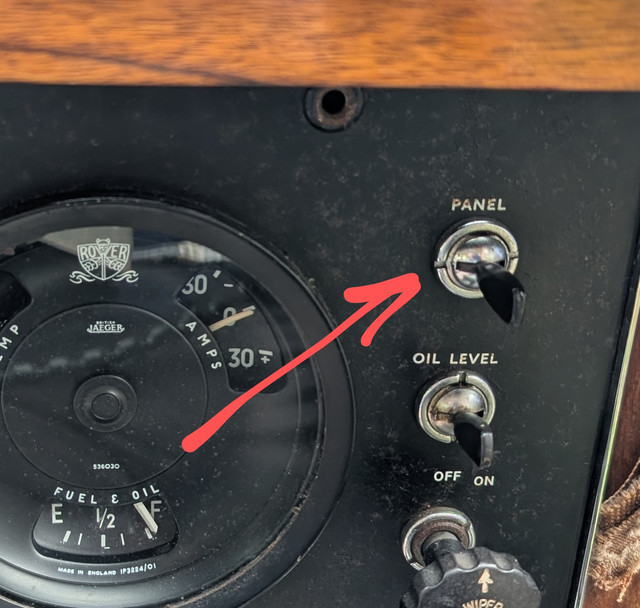
This switch on the dash when flipped to the right turns on the parking lights, and to the left turns on the panel illumination, side & tail lights.
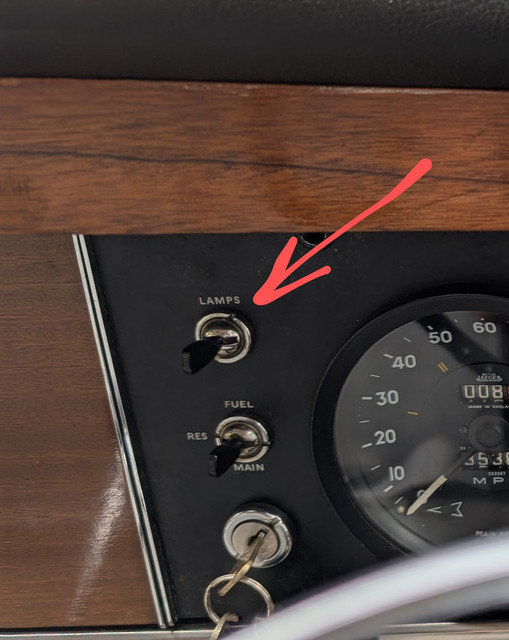
Flicking the rearmost stalk on the right hand side of the steering column down should then energise the dip/main circuit.
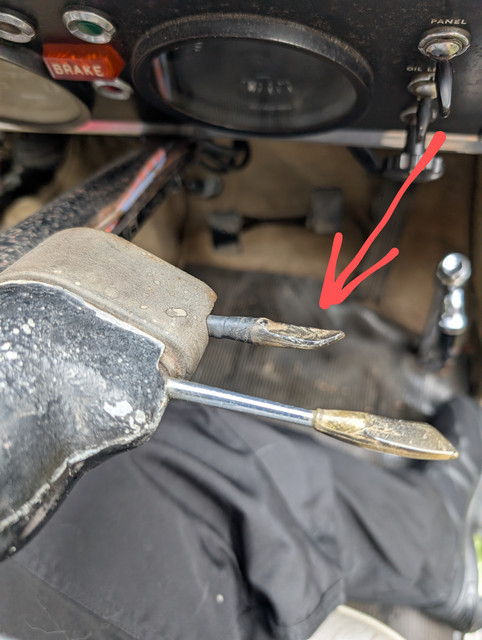
The one nearer the steering wheel is the indicators.
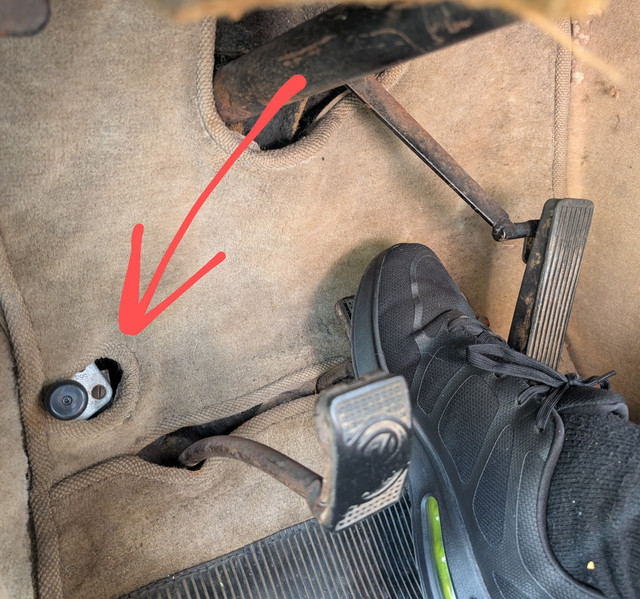
Main/dip is toggled by the foot switch to the left of the clutch.
The instrument panel illumination can be adjusted using a rheostat that looks just like a switch on the other side of the instrument panel.
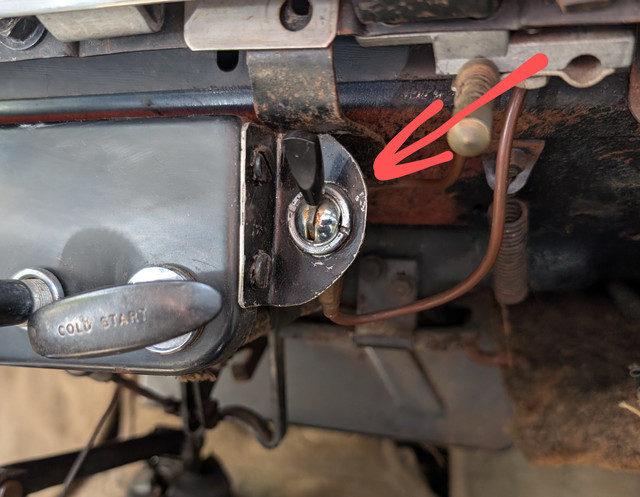
There has at some point obviously been an issue in this car. While the park/side switch works normally, the dip switch has been disconnected and replaced by this one down by the choke. This turns on the dip/main circuit irrespective of the position of the park/side switch.
However looking closer at things I don't think they have just interrupted the feed to that switch, as if you look closely when you turn that switch on, both main and dip filaments are lighting at the same time when on dip. Something ain't right.
The wires to the dip switch should be red/blue and blue. A little digging behind the instrument panel, sure enough I found these floating around not hooked to anything.
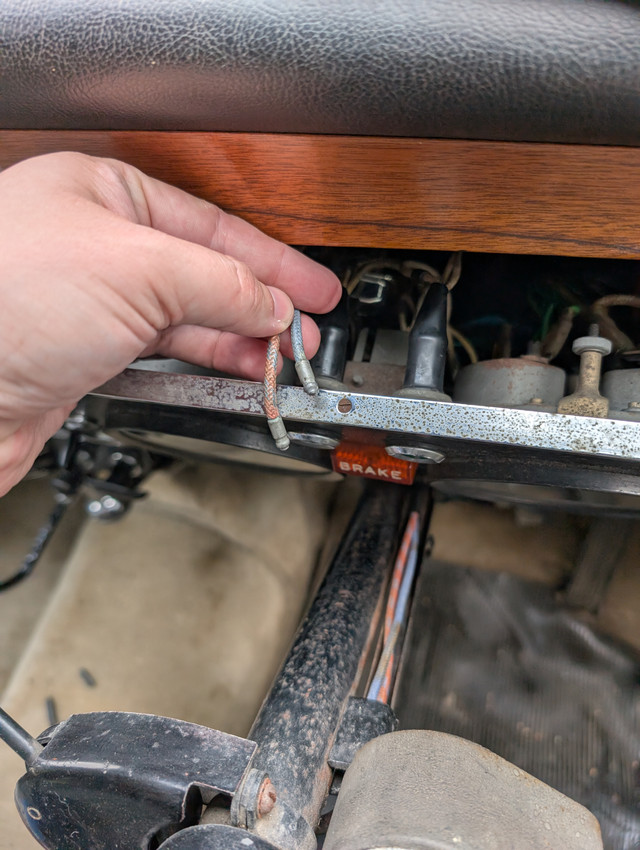
I had expected this switch to be dead - but it tests absolutely fine. 0.2 ohms when closed, and no ground faults.
There definitely has been some hacking going on in here as expected.
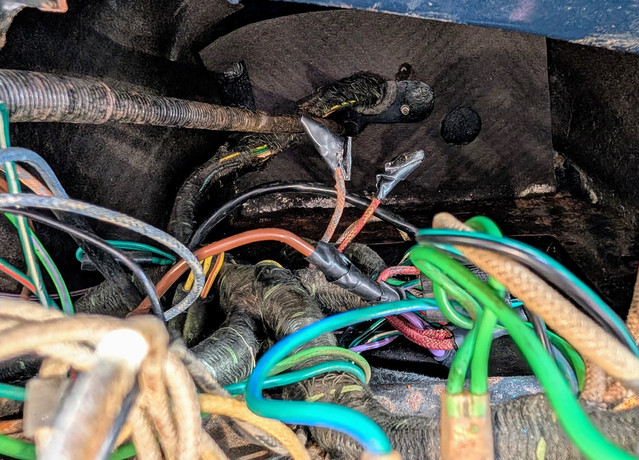
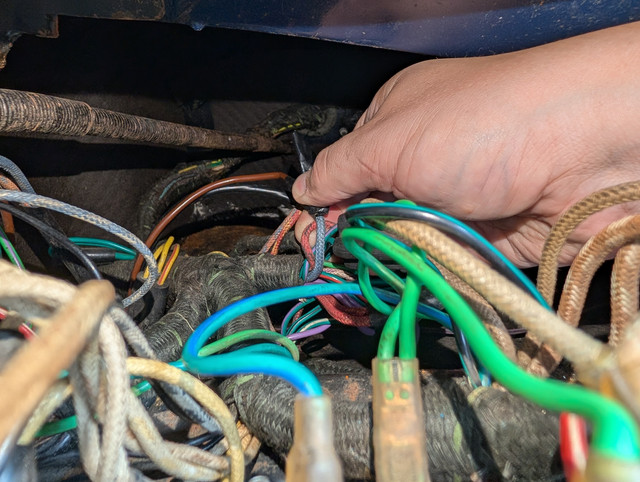
That brown wire taped in is one of the ones that goes to the added switch, the other is jumping power from a permanent live on park/side switch.
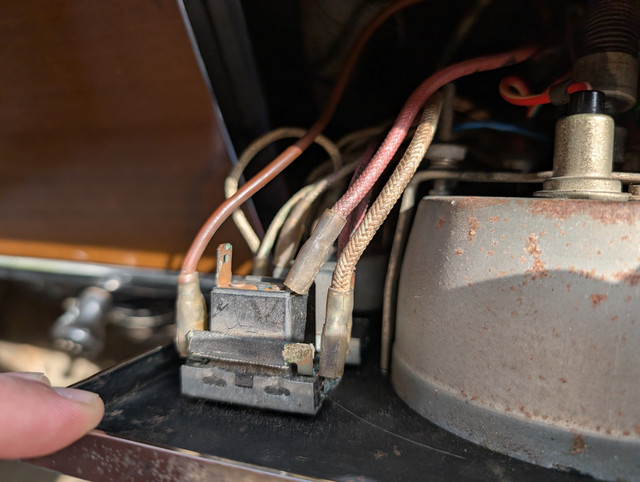
I'm 99% sure that the three connections in question are the connections to the disconnected switch and the missing one which should hook up where the brown one is on the park/side switch. It's actually easier to see the colours in the photos than in person - one reason I took them.
I just want to get a better diagram so I can see what exactly they have done (and document it!) before I go and change anything. It wouldn't be the first time I've gone and reversed mods like these and things have *just worked* afterwards, leaving me completely at a loss as to why things had been hacked around, and questioning what was going on for ever more.
It's also possible that the dip/main issue is entirely at the headlights themselves as well, they have been replaced - they could just be wired wrong and it's nothing to do with what's going on behind the dash. We'll figure it out. It's not a complicated electrical system at the end of the day.
The torrential rain this morning has also identified that there's some water getting in on the driver's side of the windscreen.
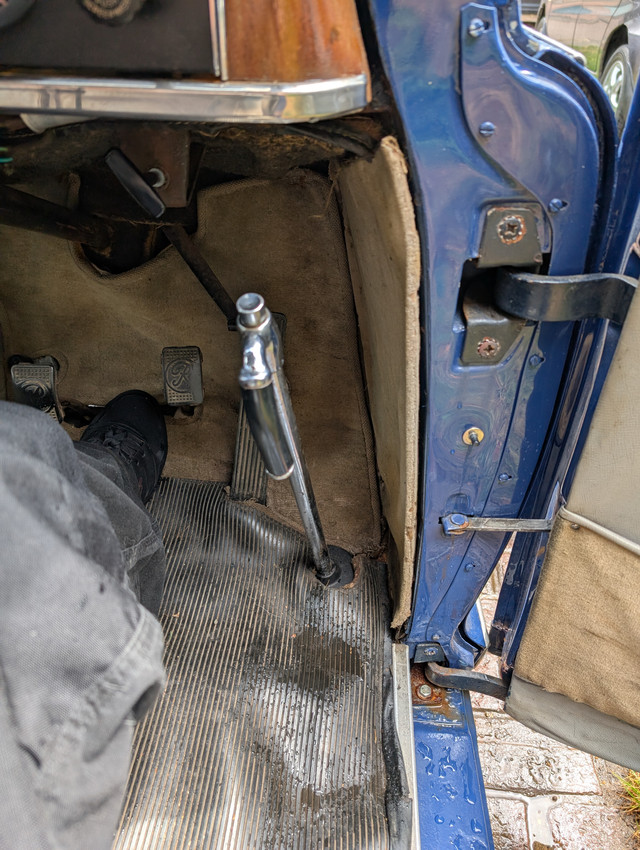
Hopefully a bit of Cpt. Tolley's will improve that. I'd rather not have to faff around replacing screen seals. The rear windscreen doesn't seem to leak though as far as I can tell, which is definitely better than was the case on the previous one I had.
I still need to tidy up the routing a little, but the wiring on the inner wings is looking a bit better now I've properly repaired the couple of bits that had chafed. They still look terrible as the outer cloth covering has degraded in quite a few areas, but the actual insulation aside from those couple of spots looks to be in good shape.
Once I've got things routed properly I'll get some new wrap on there to stop the outer loom from disintegrating any further at the ends. It's never going to look pretty, but short of replacing the whole loom that's always going to be the case.
I will add a heat shrink sheath to where the wiring goes through the wing - I've deliberately left things like they are at the moment as I know I need to do fault finding on the wiring to the headlights, so being able to see what's left of the coloured sheathing will make that easier for me to follow.
I'm not totally sure why these side lights came fitted with 21W bulbs...that's total overkill. I'll grab some 5W ones shortly which is far more reasonable.
The horn currently doesn't work. I can hear the relay clicking when you press the horn ring on the steering wheel but there's nothing in terms of sound. Thankfully the original horns are still present.
Hopefully they just need a service and will be brought back to life soon. Most likely just the points gummed up from years of disuse. I did wonder if the negative earth conversion might have caused issues here, but apparently this style don't care about polarity. It's still going to be a right pain to work around for the clock and radio though. I really should put a couple of prominent labels in the engine bay and by the battery showing the car is negative earth now to prevent anyone making expensive mistakes in the future. It's not something I would have done myself, but it's already done and swapping back would mean rebuilding half the ignition system.
-- -- --
Today I've done a little detective work on the headlights.
On that note, does anyone have a good 110 wiring diagram? The one in the manual I have is tiny and quite hard to read. Colour would be even better, but I'll take what I can get. Trying to search on Google just gets me about 50,000 Land Rover 110 results. The wiring in the 110 is quite fundamentally different to the other P4s so it really does need to be the right one. It's not the end of the world, and I could probably just spend an evening redrawing the one in the manual in a more user friendly form if it came to it.
The way the lights *should* work on a P4 is as follows.
This switch on the dash when flipped to the right turns on the parking lights, and to the left turns on the panel illumination, side & tail lights.
Flicking the rearmost stalk on the right hand side of the steering column down should then energise the dip/main circuit.
The one nearer the steering wheel is the indicators.
Main/dip is toggled by the foot switch to the left of the clutch.
The instrument panel illumination can be adjusted using a rheostat that looks just like a switch on the other side of the instrument panel.
There has at some point obviously been an issue in this car. While the park/side switch works normally, the dip switch has been disconnected and replaced by this one down by the choke. This turns on the dip/main circuit irrespective of the position of the park/side switch.
However looking closer at things I don't think they have just interrupted the feed to that switch, as if you look closely when you turn that switch on, both main and dip filaments are lighting at the same time when on dip. Something ain't right.
The wires to the dip switch should be red/blue and blue. A little digging behind the instrument panel, sure enough I found these floating around not hooked to anything.
I had expected this switch to be dead - but it tests absolutely fine. 0.2 ohms when closed, and no ground faults.
There definitely has been some hacking going on in here as expected.
That brown wire taped in is one of the ones that goes to the added switch, the other is jumping power from a permanent live on park/side switch.
I'm 99% sure that the three connections in question are the connections to the disconnected switch and the missing one which should hook up where the brown one is on the park/side switch. It's actually easier to see the colours in the photos than in person - one reason I took them.
I just want to get a better diagram so I can see what exactly they have done (and document it!) before I go and change anything. It wouldn't be the first time I've gone and reversed mods like these and things have *just worked* afterwards, leaving me completely at a loss as to why things had been hacked around, and questioning what was going on for ever more.
It's also possible that the dip/main issue is entirely at the headlights themselves as well, they have been replaced - they could just be wired wrong and it's nothing to do with what's going on behind the dash. We'll figure it out. It's not a complicated electrical system at the end of the day.
The torrential rain this morning has also identified that there's some water getting in on the driver's side of the windscreen.
Hopefully a bit of Cpt. Tolley's will improve that. I'd rather not have to faff around replacing screen seals. The rear windscreen doesn't seem to leak though as far as I can tell, which is definitely better than was the case on the previous one I had.
Current fleet:
07 Volvo V70 SE D5, 85 Sinclair C5, 84 Trabant 601S, 73 AC Model 70, 62 Rover 110.
07 Volvo V70 SE D5, 85 Sinclair C5, 84 Trabant 601S, 73 AC Model 70, 62 Rover 110.
-
mickthemaverick

- Forum Admin Team
- Posts: 21049
- Joined: 11 May 2019, 17:56
- x 8084
Re: Zel's Fleet Blog - BX, Jag XJ-S, Sinclair C5, Mercedes 208D & 230TE, AC Model 70.
I don't know if this is any use Zel? https://www.ebay.com.au/itm/365577101635
I used to be indecisive, now I'm not so sure!
I used to ride on two wheels, but now I need all four!
I used to ride on two wheels, but now I need all four!
-
Rp0thejester

- Donor 2024
- Posts: 3291
- Joined: 11 May 2022, 19:54
- x 1066
Re: Zel's Fleet Blog - BX, Jag XJ-S, Sinclair C5, Mercedes 208D & 230TE, AC Model 70.
Bagsy first drive in it when it's up and running!! That means I'm driving  If I see you in Trabant I still want first go!!
If I see you in Trabant I still want first go!!Ryan
'99 Xsara 1.6 X (Red) with Sunkissed bonnet. T59 SBX
'54 Astra Estate 1.7DTI (Artic White)
'06 C8 2.2Hdi Exclusive (Aster Grey)
Champion of Where's CitroJim
Yes I ask the stupid questions, because normally it is that simple.
'99 Xsara 1.6 X (Red) with Sunkissed bonnet. T59 SBX
'54 Astra Estate 1.7DTI (Artic White)
'06 C8 2.2Hdi Exclusive (Aster Grey)
Champion of Where's CitroJim
Yes I ask the stupid questions, because normally it is that simple.
-
Zelandeth
- Donor 2024
- Posts: 5301
- Joined: 16 Nov 2014, 23:36
- x 1593
Re: Zel's Fleet Blog - BX, Jag XJ-S, Sinclair C5, Mercedes 208D & 230TE, AC Model 70.
Pretty sure that's the diagram Autobooks ripped off for their manual.mickthemaverick wrote: 06 Jul 2025, 23:39 I don't know if this is any use Zel? https://www.ebay.com.au/itm/365577101635
This is what we started with.
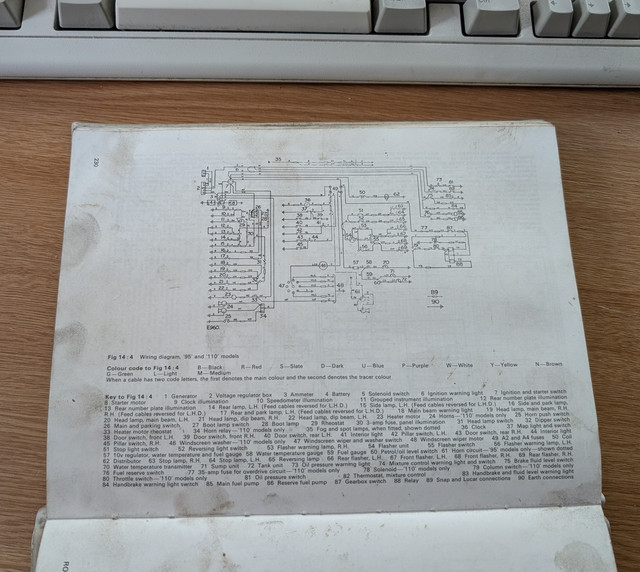
Not exactly user friendly.
After I'd been left alone with it for a few hours.
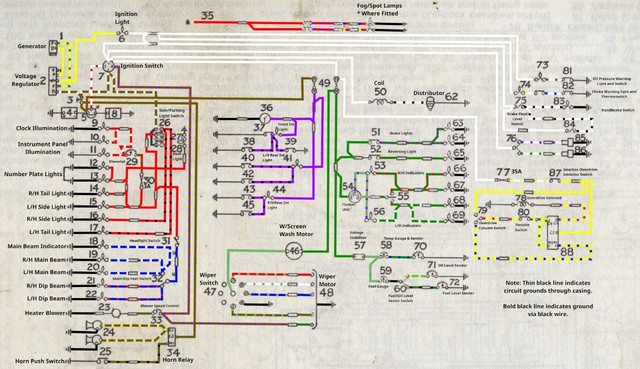
Still needs a bit of tidying up, but isn't that several orders of magnitude easier to follow now? This is also a vastly scaled down version - the original is about 7000px wide, and currently has about ten layers as I'm still meddling with it.
Key to Item Numbers on the diagram - in a format you can actually scan through rather than a totally unformatted wall of text. Especially helpful as the sequence of numbering isn't exactly easy to follow in some areas.
1 Generator
2 Voltage Regulator
3 Ammeter
4 Battery
5 Starter Solenoid
6 Ignition Warning Light (Red)
7 Ignition Switch
8 Starter Motor
9 Clock Illumination
10 Speedometer Illumination
11 Grouped Instrument Illumination
12 Number Plate Light
13 Number Plate Light
14 LH Tail Light
15 LH Side Light
16 RH Side/Park Light
17 RH Tail/Park Light
18 Main Beam Warning Light
19 RH Head Lamp Main Beam
20 LH Head Lamp Main Beam
21 RH Head Lamp Dip Beam
22 LH Head Lamp Dip Beam
23 Heater Motor
24 Horns
25 Horn Push Switch
26 Parking/Side Light Switch
27 Boot Light Switch
28 Boot Light
29 Dash Illumination Rheostat
30 Panel Illumination Fuse (3A)
31 Side/Dip Head Lamp Switch
32 Side/Main Beam Foot Switch
33 Heater Motor Rheostat
34 Horn Relay
35 Fog/Spot Lamps – Where Fitted
36 Clock
37 Front Interior Light & Switch (combined unit)
38 Front LH Door Switch
39 Front RH Door Switch
40 Rear LH Door Switch
41 Rear Interior Light
42 Interior Light Switch LH
43 Rear RH Door Switch
44 Rear Interior Light
45 Interior Light Switch RH
46 Windscreen Washer Pump Motor
47 Windscreen Wiper and Washer Switch
48 Windscreen Wiper Motor
49 Fuses A2 and A4
50 Ignition Coil
51 Brake Light Switch
52 Reversing Light Switch
53 RH Indicator Tell Tale
54 Indicator Flasher Unit
55 Indicator Stalk
56 LH Indicator Tell Tale
57 Instrument Panel 10V Voltage Stabiliser
58 Coolant Temperature Gauge
59 Fuel Gauge
60 Fuel/Oil Level Selector Switch
61 N/A
62 Distributor
63 RH Brake Light
64 LH Brake Light
65 Reversing Light
66 LH Rear Indicator
67 LH Front Indicator
68 RH Front Indicator
69 RH Rear Indicator
70 Coolant Temperature Sender
71 Oil Level Sender
72 Fuel Level Sender
73 Oil Pressure Warning Light (Green)
74 Choke Warning Light (Amber)
75 Brake Fluid Level Float Switch
76 Fuel Main/Reserve Pump Selector Switch
77 Overdrive Fuse (35A)
78 Overdrive Solenoid
79 Overdrive Column Switch
80 Overdrive Throttle “Kickdown” Switch
81 Oil Pressure Switch
82 Choke Warning Light Thermoswitch
83 Brake Fluid Level and Handbrake Combined Warning Light
84 Handbrake Switch
85 Fuel Pump (Main)
86 Fuel Pump (Reserve)
87 Gearbox Overdrive Inhibitor Switch
88 Overdrive Relay
I think this was worth spending a couple of hours on as it will make continuing the detective work on what's been meddled with massively easier. Yes I probably could have found one if I kept digging long enough, but I definitely learned a lot more about the car's electrical system doing it this way
Current fleet:
07 Volvo V70 SE D5, 85 Sinclair C5, 84 Trabant 601S, 73 AC Model 70, 62 Rover 110.
07 Volvo V70 SE D5, 85 Sinclair C5, 84 Trabant 601S, 73 AC Model 70, 62 Rover 110.
-
mickthemaverick
- Forum Admin Team
- Posts: 21049
- Joined: 11 May 2019, 17:56
- x 8084
Re: Zel's Fleet Blog - BX, Jag XJ-S, Sinclair C5, Mercedes 208D & 230TE, AC Model 70.
Great job Zel, much easier to work with and extract cct elements from should you so wish!
I used to be indecisive, now I'm not so sure!
I used to ride on two wheels, but now I need all four!
I used to ride on two wheels, but now I need all four!
-
Hell Razor5543
- (Donor 2023)
- Posts: 14302
- Joined: 01 Apr 2012, 09:47
- x 3303
Re: Zel's Fleet Blog - BX, Jag XJ-S, Sinclair C5, Mercedes 208D & 230TE, AC Model 70.
I don't know what your preferred reading matter is, Zel, but one book you might want to read is 'Glide Path' by Arthur C Clarke. It is his ONLY work of fiction that is not Sci-Fi, and is about the development of ground control RADAR. At one point the main character is re-doing the wiring diagrams for the system. When another character asks why Alan replies "It's the only way to learn how a new piece of equipment works. Besides, if I've got to train RAF mechs to run it, I must make sure I'm one jump ahead of them". Alan's aesthetic sense gave him artistic pleasure from a well laid out circuit diagram as well.
James
ex BX 1.9
ex Xantia 2.0HDi SX
ex Xantia 2.0HDi LX
ex C5 2.0HDi VTR
ex C5 2.0HDi VTR
ex C5 2.2HDi VTX+
Yes, I am paranoid, but am I paranoid ENOUGH?
Out amongst the stars, looking for a world of my own!
ex BX 1.9
ex Xantia 2.0HDi SX
ex Xantia 2.0HDi LX
ex C5 2.0HDi VTR
ex C5 2.0HDi VTR
ex C5 2.2HDi VTX+
Yes, I am paranoid, but am I paranoid ENOUGH?
Out amongst the stars, looking for a world of my own!
-
CitroJim

- A very naughty boy
- Posts: 55017
- Joined: 30 Apr 2005, 23:33
- x 8349
Re: Zel's Fleet Blog - BX, Jag XJ-S, Sinclair C5, Mercedes 208D & 230TE, AC Model 70.
Agreed wholeheartedly. A well-drawn circuit diagram is indeed truly a work of art. I can pleasurably look at them for hours and read them like a book.Hell Razor5543 wrote: 08 Jul 2025, 08:33Alan's aesthetic sense gave him artistic pleasure from a well laid out circuit diagram as well.
I served part of my apprenticeship in our drawing office back in the days of pen, ink, a scalpel to erase mistakes, freehand block lettering (no stencils allowed), french curves and smelly (ammonia) Blueline/Diazo printing. This was before CAD had made any serious inroads...
I was very tempted to change my career direction to become a draftsman as I loved it so much - still do - but was warned against it as the new and emerging CAD technology would eventually kill the profession dead.
So I continued on my HF radio communications engineering path only for that profession to be killed dead by the Internet
 My recollection is that both professions died at about the same time in our organisation.
Some of the drawings I created were still in use some 20 years later in our training school - Huge A0 explanatory block diagrams and flow charts of one of our crypto machines; an example of which I last saw on display in the Bletchley Park museum. Shows how long ago it was

One drawing I was proud to date '7/7/77'

Nearly 50 years on I still miss those times - proper Halcyon Days...
Jim
A bit of a Citroen AX fan...
A bit of a Citroen AX fan...
-
Zelandeth
- Donor 2024
- Posts: 5301
- Joined: 16 Nov 2014, 23:36
- x 1593
Re: Zel's Fleet Blog - BX, Jag XJ-S, Sinclair C5, Mercedes 208D & 230TE, AC Model 70.
I have to admit that the technical drawing section was probably one of my favourite parts of secondary school. I could quite happily while away hours that way. To that end when I was having to deal with the retrospective planning application for the fence we'd fouled up and built where we shouldn't, after spending far too long trying to find software that would do what I wanted, I wound up digging out Dad's old drawing board and just drew up a plan by hand.
They weren't quite sure what to make of it, but conceded that it met all their requirements after a bit of head scratching. They still refused the application anyway (as it wasn't in keeping with the local plan or surrounding area...yeah less said about that the better). I enjoyed drawing the plan though!
-- -- --
I had a sneaking suspicion that I was facing issues with the head gasket on the Rover. Primarily based on the amount of gurgling and nonsense from the radiator and the tendency for it to immediately violently dump about half the coolant the moment the thermostat opens.
Did a really quick and dirty test to see if I was dealing with combustion gases getting into the cooling system.
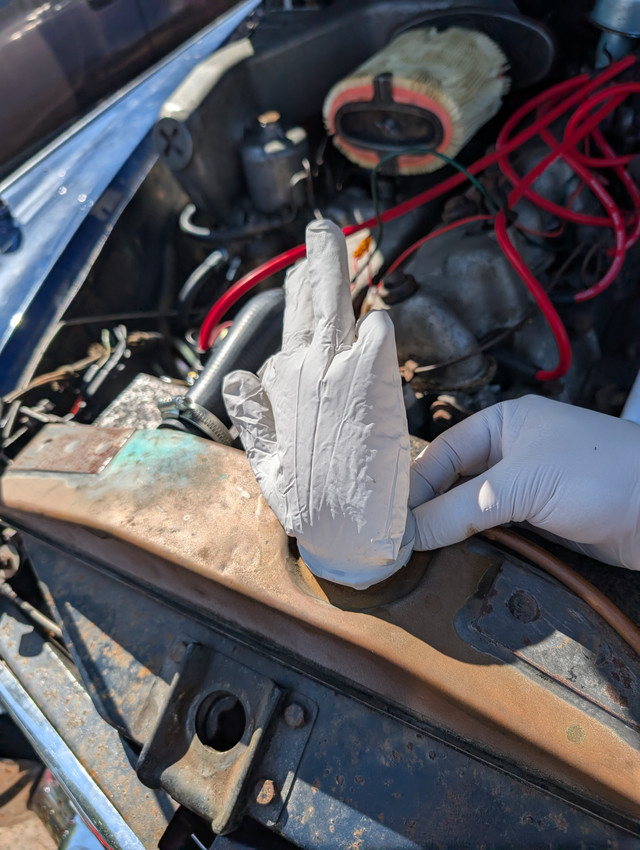
While it might be a very crude test, it's pretty conclusive! That glove started to inflate the moment the engine was started. There's only one place that can be coming from, and that's the cylinders.
Not the end of the world. I want to change the water pump O-ring anyway, and the inlet manifold gasket is suspect, changing that will be orders of magnitude easier with the head off the car. At least I won't need to disturb the exhaust which is usually the thing I'd dread most when pulling a cylinder head.
Everything I should need is already in stock.
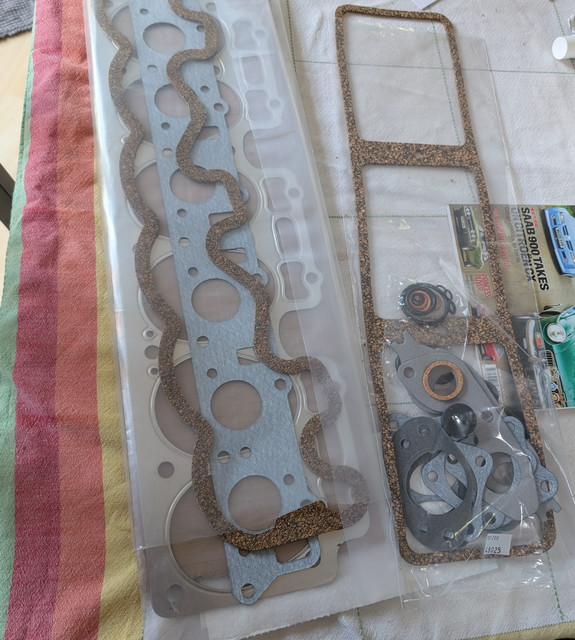
Gasket is a little simpler than on modern engines...
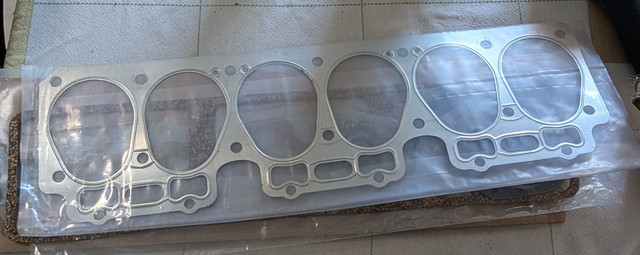
I guess before I do go pulling it apart I probably should check that all the head bolts are actually tight (with non composite gaskets like this it *can* actually be that simple sometimes) but I'm not expecting miracles. Worth checking though as I've no idea what work has been done to the engine beforehand. I need to pull the inlet valve cover to change the gasket anyway so may as well do that at the same time.
Project Pinball has taken a few steps towards functionality today in that I think everything needed to get the PC side up and running is now here.
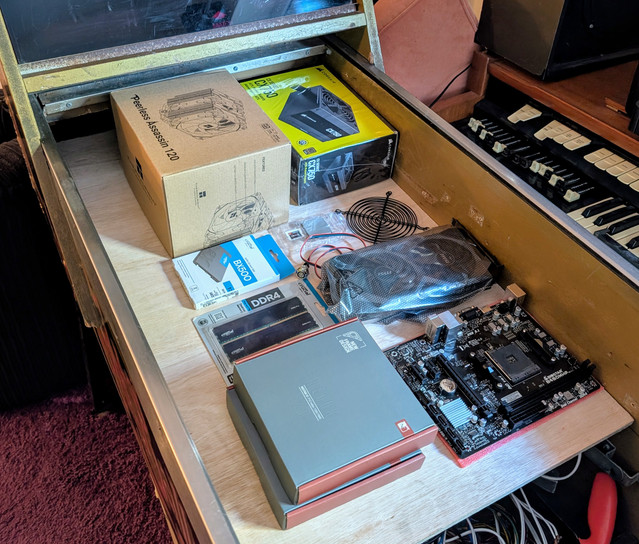
My plan is to get the absolute basics up and going first before we start worrying about the extras. Not least because my interface board isn't likely to turn up for at least a couple of weeks yet. That is essentially just building a PC into a massively oversized case and setting up some software though, so shouldn't be too difficult. Even if it does mean I need to do battle with Windows 11 for the first time which I'm really not looking forward to. At least once it's set up here I won't have any need to interact with it much beyond seeing startup and shutdown screens.
They weren't quite sure what to make of it, but conceded that it met all their requirements after a bit of head scratching. They still refused the application anyway (as it wasn't in keeping with the local plan or surrounding area...yeah less said about that the better). I enjoyed drawing the plan though!
-- -- --
I had a sneaking suspicion that I was facing issues with the head gasket on the Rover. Primarily based on the amount of gurgling and nonsense from the radiator and the tendency for it to immediately violently dump about half the coolant the moment the thermostat opens.
Did a really quick and dirty test to see if I was dealing with combustion gases getting into the cooling system.
While it might be a very crude test, it's pretty conclusive! That glove started to inflate the moment the engine was started. There's only one place that can be coming from, and that's the cylinders.
Not the end of the world. I want to change the water pump O-ring anyway, and the inlet manifold gasket is suspect, changing that will be orders of magnitude easier with the head off the car. At least I won't need to disturb the exhaust which is usually the thing I'd dread most when pulling a cylinder head.
Everything I should need is already in stock.
Gasket is a little simpler than on modern engines...
I guess before I do go pulling it apart I probably should check that all the head bolts are actually tight (with non composite gaskets like this it *can* actually be that simple sometimes) but I'm not expecting miracles. Worth checking though as I've no idea what work has been done to the engine beforehand. I need to pull the inlet valve cover to change the gasket anyway so may as well do that at the same time.
Project Pinball has taken a few steps towards functionality today in that I think everything needed to get the PC side up and running is now here.
My plan is to get the absolute basics up and going first before we start worrying about the extras. Not least because my interface board isn't likely to turn up for at least a couple of weeks yet. That is essentially just building a PC into a massively oversized case and setting up some software though, so shouldn't be too difficult. Even if it does mean I need to do battle with Windows 11 for the first time which I'm really not looking forward to. At least once it's set up here I won't have any need to interact with it much beyond seeing startup and shutdown screens.
Current fleet:
07 Volvo V70 SE D5, 85 Sinclair C5, 84 Trabant 601S, 73 AC Model 70, 62 Rover 110.
07 Volvo V70 SE D5, 85 Sinclair C5, 84 Trabant 601S, 73 AC Model 70, 62 Rover 110.