
All that shedding of the fuel filters is likely getting into the carb. needle valves and causing the flooding and so on Zel...
The lovely thing about the SU is they're lovely and easy to overhaul. Check your needles and jets. the needles can wear the jets oval over time and this will tend to richen up the mixture right across the range and cause some odd running issues, not least high fuel consumption...
Zel's Fleet Blog - BX, Jag XJ-S, Sinclair C5, Mercedes 208D & 230TE, AC Model 70.
-
CitroJim

- A very naughty boy
- Posts: 54630
- Joined: 30 Apr 2005, 23:33
- x 8117
Re: Zel's Fleet Blog - BX, Jag XJ-S, Sinclair C5, Mercedes 208D & 230TE, AC Model 70.
Jim
A bit of a Citroen AX fan...
A bit of a Citroen AX fan...
-
Gibbo2286
- (Donor 2020)
- Posts: 8170
- Joined: 08 Jun 2011, 18:04
- x 2943
Re: Zel's Fleet Blog - BX, Jag XJ-S, Sinclair C5, Mercedes 208D & 230TE, AC Model 70.
SU carbs were always prone to spilling over if the tiniest bit of grot got in the system, an inline filter works best for most.
That start up is the best part of the job doubt becomes excitement pretty quickly.
That start up is the best part of the job doubt becomes excitement pretty quickly.
Anyone who has never made a mistake has never tried anything new. (Albert Einstein)
-
Zelandeth

- Donor 2024
- Posts: 5265
- Joined: 16 Nov 2014, 23:36
- x 1583
Re: Zel's Fleet Blog - BX, Jag XJ-S, Sinclair C5, Mercedes 208D & 230TE, AC Model 70.
Yep... we're definitely going to make very sure the tracking is sorted before we put the new tyres on. This is going to hurt, no two ways about it!

Those prices are each, and I'll be needing four.
Those prices are each, and I'll be needing four.
Current fleet:
07 Volvo V70 SE D5, 85 Sinclair C5, 84 Trabant 601S, 73 AC Model 70, 62 Rover 110.
07 Volvo V70 SE D5, 85 Sinclair C5, 84 Trabant 601S, 73 AC Model 70, 62 Rover 110.
-
mickthemaverick

- Moderating Team
- Posts: 20260
- Joined: 11 May 2019, 17:56
- x 7831
Re: Zel's Fleet Blog - BX, Jag XJ-S, Sinclair C5, Mercedes 208D & 230TE, AC Model 70.
Obviously that is one hell of a high aspect ratio Zel! Is it worth considering some bigger wheels with more normal size tyres giving you the same overall wheel diameter? Something like this:
- BFTW
I used to be indecisive, now I'm not so sure!
I used to ride on two wheels, but now I need all four!
I used to ride on two wheels, but now I need all four!
-
Zelandeth
- Donor 2024
- Posts: 5265
- Joined: 16 Nov 2014, 23:36
- x 1583
Re: Zel's Fleet Blog - BX, Jag XJ-S, Sinclair C5, Mercedes 208D & 230TE, AC Model 70.
Given the state of the roads around here, aspect ratio is your friend. The ride quality offered by this car is one of its great qualities so it would be a shame to mar that by putting lower profile and stiffer walled tyres on. Plus I'd have to find wheels which looked as at home as these.mickthemaverick wrote: 07 Oct 2023, 12:55 Obviously that is one hell of a high aspect ratio Zel! Is it worth considering some bigger wheels with more normal size tyres giving you the same overall wheel diameter? Something like this:


Then there's also the whole question of whether that would result in a huge hike to my insurance costs, or indeed the current cover underwriter saying no. They do specifically mention wheels on the modifications list now, which these days can be a right old can of worms.
Last edited by Zelandeth on 07 Oct 2023, 13:08, edited 1 time in total.
Current fleet:
07 Volvo V70 SE D5, 85 Sinclair C5, 84 Trabant 601S, 73 AC Model 70, 62 Rover 110.
07 Volvo V70 SE D5, 85 Sinclair C5, 84 Trabant 601S, 73 AC Model 70, 62 Rover 110.
-
MattBLancs
- Donor 2024
- Posts: 5004
- Joined: 25 Apr 2022, 09:03
- x 2189
Re: Zel's Fleet Blog - BX, Jag XJ-S, Sinclair C5, Mercedes 208D & 230TE, AC Model 70.
Quite a bit wider, but 205/65 R15 fairly close on diameter
Edit, really long screenshot seems blurry, here's a smaller slice of the results
- Size comparison
- Black circles fully fitted prices
- Shorter
Last edited by MattBLancs on 07 Oct 2023, 13:09, edited 1 time in total.
-
Armidillo
- (Donor 2022)
- Posts: 477
- Joined: 28 Apr 2020, 02:18
- x 274
Re: Zel's Fleet Blog - BX, Jag XJ-S, Sinclair C5, Mercedes 208D & 230TE, AC Model 70.
Same size as used by DSs - here's a recent discussion on Aussie Frogs re. tyres of that size:
https://www.aussiefrogs.com/forum/index ... in.150419/
As you've found, there aren't many options, although it may be worth following up on Hankook and Nankang. Just be glad you don't have to pay freight to Australia!
https://www.aussiefrogs.com/forum/index ... in.150419/
As you've found, there aren't many options, although it may be worth following up on Hankook and Nankang. Just be glad you don't have to pay freight to Australia!
-
bobins

- (Donor 2025)
- Posts: 6824
- Joined: 05 Jul 2012, 18:07
- x 3544
Re: Zel's Fleet Blog - BX, Jag XJ-S, Sinclair C5, Mercedes 208D & 230TE, AC Model 70.
Whilst I'm in no way suggesting you have a funny 5 minutes and throw caution to the wind and your bank balance out the window and splash out on Michelins, if you did then they have an offer on that gives you a rebate and makes the pain almost imperceptibly slightly less. But not by much. 
https://www.michelin.co.uk/auto/promoti ... helin/auto
Edit:
....but it doesn't sem to apply to 15" tyres, so a bit of a dead end
https://www.michelin.co.uk/auto/promoti ... helin/auto
Edit:
....but it doesn't sem to apply to 15" tyres, so a bit of a dead end
Last edited by bobins on 07 Oct 2023, 13:13, edited 1 time in total.
-
MattBLancs
- Donor 2024
- Posts: 5004
- Joined: 25 Apr 2022, 09:03
- x 2189
Re: Zel's Fleet Blog - BX, Jag XJ-S, Sinclair C5, Mercedes 208D & 230TE, AC Model 70.
Good table of info in tyre widths that suit differing rim widths
https://www.tyres-pneus-online.co.uk/ty ... dvice.html
https://www.tyres-pneus-online.co.uk/ty ... dvice.html
-
Zelandeth
- Donor 2024
- Posts: 5265
- Joined: 16 Nov 2014, 23:36
- x 1583
Re: Zel's Fleet Blog - BX, Jag XJ-S, Sinclair C5, Mercedes 208D & 230TE, AC Model 70.
It's something I need to have a good think about. There's not a great deal of extra width available on either front or rear on the P6, especially on the rear where there's well less than an inch clearance between the tyre and wheel arch where it's recessed in the rear quarter.
There are a couple of cheaper options from budget sellers. One of which is fitted to the P4, and I don't think I'd really want to be fitting those. They seem to be quite a hard compound, and it's very easy to lock the brakes on a wet road, even given the braking system in the P4 is hardly what you'd call grabby. I don't particularly want to be going sideways around every roundabout every time the road is slightly damp.
I also just have an inherent distrust of budget tyres after having a couple of sets earlier in my driving career (when I was chronically broke) which were frankly lethal. I know they've come a long way in the last 20 years, but it's hard to shake doubts based on actual experience, no matter how outdated it may be. Which is why all of my cars generally wind up on Uniroyal tyres.
Some cars I'd be a bit more willing to experiment with, but with several people having specifically mentioned how well the P6 rides and for a car like this, handles I'm inclined to leave things as the designers intended. One of the aspects which makes me lean more towards the specifically classic oriented tyres is that even if they're the right (or very close) size, most modern tyres have so much stiffer sidewalls than was the norm back in the 70s/80s that it's likely to have a very noticeable effect on the ride. They do form the first part of the suspension after all.
We'll see. I'm not making any firm decisions right away and will be doing some further reading before making any decisions.
These definitely need to be changed before the car is properly put into use though.

That's a 1992 date code I believe. Plus we have some rather funky wear on the nearside front from the tracking being so far out.

The previous (or previous to previous) keeper has replaced one tyre, which dates from 2018 - and unfortunately has very visible ripples in the sidewall in a couple of places.

Yesterday I swapped out the old fuel filter as I'm not entirely convinced it wasn't starting to break down internally.
Don't have one the same side as the original one in stock so had to improvise a bit and ended up with something of a lash up. It's not going anywhere though or going to rub out on anything.

When I get some larger diameter filters in I'll return that to it's correct location. Going to see if I can find some with a right angled outlet as there would have been a right angled union on there originally. Also rerouted the hose from the fuel pump a little as it was curved backwards before and was virtually touching the exhaust manifold. You could see the fuel in the lines quite vigorously boiling off for several minutes after the engine was switched off, which it doesn't seem to do half as much now.
After an hour or so of run time, including a few circuits around our block (trying to get the kickdown cable adjusted properly as I was an idiot and didn't note where it was set before I took it to bits - rookie mistake), the filter still looks like this. Nice to see the fuel in the tank is clear and doesn't seem to be dragging debris through at least.

Of course today the carbs behaved impeccably, now the service kits have been ordered!
When I was working on those fuel lines it became immediately apparent that I could very easily spin the line at the carb end of the filter section - and indeed easily pull it off as the hose clip had been put too far from the end of the line so it wasn't gripping the hose fitting barb. That could have got "exciting" if it had let go. Now sorted.

A hunt around revealed one pretty significant vacuum leak at the brake servo. The loose zip tie pretending to be a hose clamp had a lot to do with that.

Replacing that with a proper hose clamp sorted that. Though that line really wants replacing as it's a good few inches too short really and has an unused T halfway along which has been blocked off with a screw.
While trying to tighten that hose clip I totally lost a screwdriver and spent about 20 minutes trying to figure out what I'd done with it. This isn't out of character as I have a true talent for misplacing tools. It turned up later in the day...

Note to self: Check down there next time you lose something before dismantling the entire work area looking for it.
Reason I wound up down there though is that we've developed a pretty noticeable oil leak.


This appears to be seeping out from the gasket between the oil filter housing and oil pump. A new gasket has been ordered - though looks like a couple of those bolts will be somewhat fun to get to.
Speaking of fun to get to, I'm scratching my head slightly on how to adjust the toe angle on the steering on this. I wanted to at least get a look at the adjusters to see what the odds of them cracking loose when I come to get it sorted were. However there were no visible adjustable links where I expected there to be.
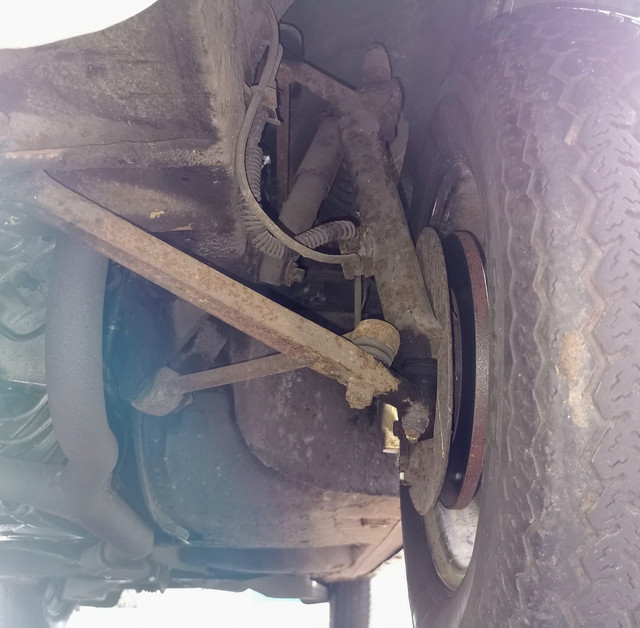

I'm guessing based on that that the adjustable section must be on the centre link, presumably at the steering box end, which I can't see without getting right under the car.
There are a couple of cheaper options from budget sellers. One of which is fitted to the P4, and I don't think I'd really want to be fitting those. They seem to be quite a hard compound, and it's very easy to lock the brakes on a wet road, even given the braking system in the P4 is hardly what you'd call grabby. I don't particularly want to be going sideways around every roundabout every time the road is slightly damp.
I also just have an inherent distrust of budget tyres after having a couple of sets earlier in my driving career (when I was chronically broke) which were frankly lethal. I know they've come a long way in the last 20 years, but it's hard to shake doubts based on actual experience, no matter how outdated it may be. Which is why all of my cars generally wind up on Uniroyal tyres.
Some cars I'd be a bit more willing to experiment with, but with several people having specifically mentioned how well the P6 rides and for a car like this, handles I'm inclined to leave things as the designers intended. One of the aspects which makes me lean more towards the specifically classic oriented tyres is that even if they're the right (or very close) size, most modern tyres have so much stiffer sidewalls than was the norm back in the 70s/80s that it's likely to have a very noticeable effect on the ride. They do form the first part of the suspension after all.
We'll see. I'm not making any firm decisions right away and will be doing some further reading before making any decisions.
These definitely need to be changed before the car is properly put into use though.
That's a 1992 date code I believe. Plus we have some rather funky wear on the nearside front from the tracking being so far out.
The previous (or previous to previous) keeper has replaced one tyre, which dates from 2018 - and unfortunately has very visible ripples in the sidewall in a couple of places.
Yesterday I swapped out the old fuel filter as I'm not entirely convinced it wasn't starting to break down internally.
Don't have one the same side as the original one in stock so had to improvise a bit and ended up with something of a lash up. It's not going anywhere though or going to rub out on anything.
When I get some larger diameter filters in I'll return that to it's correct location. Going to see if I can find some with a right angled outlet as there would have been a right angled union on there originally. Also rerouted the hose from the fuel pump a little as it was curved backwards before and was virtually touching the exhaust manifold. You could see the fuel in the lines quite vigorously boiling off for several minutes after the engine was switched off, which it doesn't seem to do half as much now.
After an hour or so of run time, including a few circuits around our block (trying to get the kickdown cable adjusted properly as I was an idiot and didn't note where it was set before I took it to bits - rookie mistake), the filter still looks like this. Nice to see the fuel in the tank is clear and doesn't seem to be dragging debris through at least.
Of course today the carbs behaved impeccably, now the service kits have been ordered!
When I was working on those fuel lines it became immediately apparent that I could very easily spin the line at the carb end of the filter section - and indeed easily pull it off as the hose clip had been put too far from the end of the line so it wasn't gripping the hose fitting barb. That could have got "exciting" if it had let go. Now sorted.
A hunt around revealed one pretty significant vacuum leak at the brake servo. The loose zip tie pretending to be a hose clamp had a lot to do with that.
Replacing that with a proper hose clamp sorted that. Though that line really wants replacing as it's a good few inches too short really and has an unused T halfway along which has been blocked off with a screw.
While trying to tighten that hose clip I totally lost a screwdriver and spent about 20 minutes trying to figure out what I'd done with it. This isn't out of character as I have a true talent for misplacing tools. It turned up later in the day...
Note to self: Check down there next time you lose something before dismantling the entire work area looking for it.
Reason I wound up down there though is that we've developed a pretty noticeable oil leak.
This appears to be seeping out from the gasket between the oil filter housing and oil pump. A new gasket has been ordered - though looks like a couple of those bolts will be somewhat fun to get to.
Speaking of fun to get to, I'm scratching my head slightly on how to adjust the toe angle on the steering on this. I wanted to at least get a look at the adjusters to see what the odds of them cracking loose when I come to get it sorted were. However there were no visible adjustable links where I expected there to be.
I'm guessing based on that that the adjustable section must be on the centre link, presumably at the steering box end, which I can't see without getting right under the car.
Last edited by Zelandeth on 08 Oct 2023, 14:04, edited 1 time in total.
Current fleet:
07 Volvo V70 SE D5, 85 Sinclair C5, 84 Trabant 601S, 73 AC Model 70, 62 Rover 110.
07 Volvo V70 SE D5, 85 Sinclair C5, 84 Trabant 601S, 73 AC Model 70, 62 Rover 110.
-
CitroJim
- A very naughty boy
- Posts: 54630
- Joined: 30 Apr 2005, 23:33
- x 8117
Re: Zel's Fleet Blog - BX, Jag XJ-S, Sinclair C5, Mercedes 208D & 230TE, AC Model 70.
A most excellent update Zel
Jim
A bit of a Citroen AX fan...
A bit of a Citroen AX fan...
-
Zelandeth
- Donor 2024
- Posts: 5265
- Joined: 16 Nov 2014, 23:36
- x 1583
Re: Zel's Fleet Blog - BX, Jag XJ-S, Sinclair C5, Mercedes 208D & 230TE, AC Model 70.
Nothing to report today aside from giving the seats another couple of applications of leather feed, which is definitely starting to do something now.


Further down the line I may look in to whether we can get some dye to restore the original colour a bit as they have faded quite a lot.
Further down the line I may look in to whether we can get some dye to restore the original colour a bit as they have faded quite a lot.
Current fleet:
07 Volvo V70 SE D5, 85 Sinclair C5, 84 Trabant 601S, 73 AC Model 70, 62 Rover 110.
07 Volvo V70 SE D5, 85 Sinclair C5, 84 Trabant 601S, 73 AC Model 70, 62 Rover 110.
-
c16rkc

- (Donor 2023)
- Posts: 357
- Joined: 31 Aug 2023, 12:38
- x 104
Re: Zel's Fleet Blog - BX, Jag XJ-S, Sinclair C5, Mercedes 208D & 230TE, AC Model 70.
Those seats look pretty good, I bet they can be cleaned up well and then just "touched in" with dye rather than a complete re-dye.
I'd get a good leather cleaner and use a horse hair brush to work it in, then wipe away with a microfibre cloth. Do it three or four times and you'll probably get most out. But I find it's best to go over them perhaps twice, then let them dry out, then take a look a few days later, repeating if necessary. If you go over too much it tends to lift the dye as the seat becomes saturated. Hot water with the leather cleaner often works well too, used sparingly.
Some people like steam cleaners, but I find them too agressive.
-
Zelandeth
- Donor 2024
- Posts: 5265
- Joined: 16 Nov 2014, 23:36
- x 1583
Re: Zel's Fleet Blog - BX, Jag XJ-S, Sinclair C5, Mercedes 208D & 230TE, AC Model 70.
Something I had completely missed is that apparently this car has had different wheels fitted at some point. Correct tyre spec for this is actually 185R14, not 15. I spotted the cross section, but totally missed the diameter being different.

So the 15s currently on there were added at some point later. Originally from a P5 I'm guessing?
I was waiting for a telephone consultation with my GP this afternoon (which never happened...have only been trying to speak to someone about this since the end of March) so was just picking away at little things.
The plastic surround for the gear selector has at some point been broken into three pieces. That got glued back together so it no longer falls to pieces every time you put the car into park.
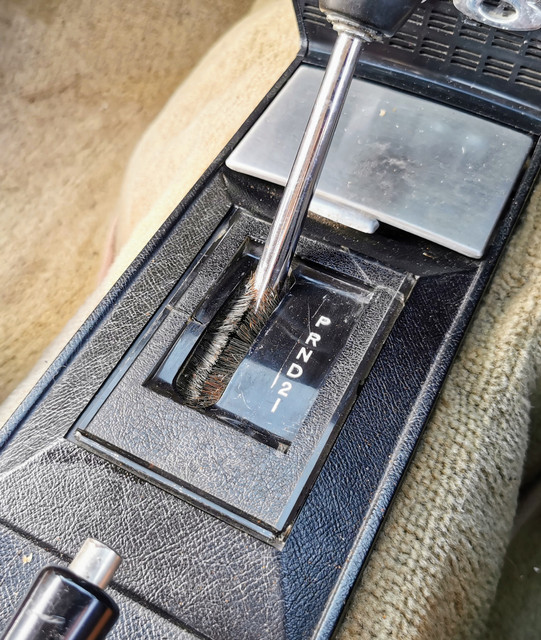
Not perfect as you can clearly still see the cracks, but at least it's one piece now. This is the sort of random thing I'll keep my eyes open for down the road as it's hardly a major issue.
Similarly on the "completely pointless but visually annoying" list was the rusty end covers on the dash.

Never got a good before photo of that, but on both ends the black paint was coming off in sheets.
These have been rubbed down and given a coat of hammered finish black paint.
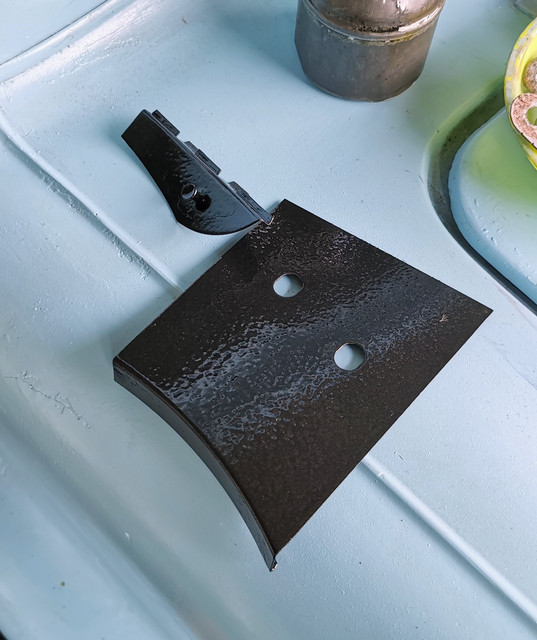
Still very slightly tacky so I'll refit them tomorrow. Not perfect, but shouldn't draw the eye any more at least.
A very obvious issue with things since the carbs have more or less woken up from their slumber and seem to have quit peeing fuel everywhere is that the idle was ridiculously high - nearly 1500rpm in neutral once warmed up fully. I had a feeling that and the initially sluggish feeling throttle response were most likely linked. Sure enough, the left hand carb was near enough 1/4 open by the time the right hand one started moving. Probably the best part of 1/3" of slack taken out of the linkage between the two. The throttle stop screws were then also tweaked on both sides allowing the idle to come down to a slightly more sensible 600rpm.

When fully warmed up the engine was quite reluctant to turn over, in the sort of way that suggests to me that the timing was too advanced. The tendency for it to pink quite loudly when it did kick over further confirming that to me, so I set about checking it.
That would do it...having 26° of advance won't have been helping anything. A value I suspect someone has read from the under bonnet data plate - 26° is the DWELL angle, not the advance setting! Definitely explains why it was trying to spin itself backwards while being cranked over.

Interestingly that is actually about the only piece of routine maintenance data which isn't printed anywhere on the car, so I had to go check the handbook to find it.

I went back out and split the difference between those figures as I usually run on 99 Octane fuel where possible and dialled in 3°.

I can tweak that further either by ear or based on feedback as needed. It's almost amusingly easy to adjust on this engine - finding a 12V source for the timing light being by far the most difficult part. For now though it seems far happier. In the dark while what feels like half the country's population of midges are trying to eat you is not the time to be trying to find tune timing.
I'm fairly certain that at idle we were running pretty much entirely off the left hand carb before. They do want to be properly balanced and that will happen later on, but between them actually being synchronised so they're both contributing and the timing now being in vaguely the right ball park the engine sounds a lot happier at idle. Hard to describe, but it sounds more like a V8 now if that makes any sense. Idle does maybe want to come up just a touch as it will stumble a little in gear with the lights on if presented with an additional demand for power such as turning the steering sharply.
The engine bay fuel lines in the vicinity of the fuel pump I think may benefit from some thermal insulation (or seeing about rerouting the supply metal line which runs along the side of the engine between the block and exhaust manifold) as this is visible in the filter at idle when everything is fully up to temperature at idle.
This isn't air being drawn into the line - the fuel is actively boiling off. It continues bubbling for a good five or ten minutes after the engine stops. The fuel outlet on the tank on this is from the bottom - so any holes in the fuel supply result in all your fuel exiting the vehicle rather than air being drawn in.

This is one of the design features of this car I'm not such a fan of as it makes working on the fuel system a pain. I discovered that the hard way when I initially went to rebuild the fuel pump - fuel came out with a great deal of enthusiasm as soon as I loosened the inlet connection (I hadn't established that the tank was basically full back then either). This is also why I haven't investigated the non functional fuel gauge any further yet. There are 15 gallons of fuel on top of it!
The oil leak noted yesterday has been vastly, vadtly reduced by nipping the bolts up a bit - at least three were noticeably loose. It is still weeping very slightly, but we're talking a small drop every minute or two with the engine held at 1500rpm when fully warm rather than a drip or two every second we had yesterday. Gasket has been ordered though and it will be replaced as time allows.
Pretty sure that this is the adjustment point for the steering toe angle I was looking for.

So I have started to liberally dose that in PlusGas with a view to getting that adjusted properly sooner than later. Hopefully being relatively high up in the engine bay rather than right next to the wheels means it's less likely to be totally disinterested in moving.
Going to do a few (a lot) more runs round the block to test things first, but if they can fit me in to look at the wheel alignment, this might be the P6's first very careful, very nerve wracking run tomorrow all being well.

3.3 miles. We've already done more than that going round in circles. However never being more than 500 yards from home! Going somewhere actually out of our neighborhood seems a lot more scary!
They're good guys over there though, and I'm sure they'll give me a chance to have a good look underneath it on the ramp which will be really useful.
So the 15s currently on there were added at some point later. Originally from a P5 I'm guessing?
I was waiting for a telephone consultation with my GP this afternoon (which never happened...have only been trying to speak to someone about this since the end of March) so was just picking away at little things.
The plastic surround for the gear selector has at some point been broken into three pieces. That got glued back together so it no longer falls to pieces every time you put the car into park.
Not perfect as you can clearly still see the cracks, but at least it's one piece now. This is the sort of random thing I'll keep my eyes open for down the road as it's hardly a major issue.
Similarly on the "completely pointless but visually annoying" list was the rusty end covers on the dash.
Never got a good before photo of that, but on both ends the black paint was coming off in sheets.
These have been rubbed down and given a coat of hammered finish black paint.
Still very slightly tacky so I'll refit them tomorrow. Not perfect, but shouldn't draw the eye any more at least.
A very obvious issue with things since the carbs have more or less woken up from their slumber and seem to have quit peeing fuel everywhere is that the idle was ridiculously high - nearly 1500rpm in neutral once warmed up fully. I had a feeling that and the initially sluggish feeling throttle response were most likely linked. Sure enough, the left hand carb was near enough 1/4 open by the time the right hand one started moving. Probably the best part of 1/3" of slack taken out of the linkage between the two. The throttle stop screws were then also tweaked on both sides allowing the idle to come down to a slightly more sensible 600rpm.
When fully warmed up the engine was quite reluctant to turn over, in the sort of way that suggests to me that the timing was too advanced. The tendency for it to pink quite loudly when it did kick over further confirming that to me, so I set about checking it.
That would do it...having 26° of advance won't have been helping anything. A value I suspect someone has read from the under bonnet data plate - 26° is the DWELL angle, not the advance setting! Definitely explains why it was trying to spin itself backwards while being cranked over.
Interestingly that is actually about the only piece of routine maintenance data which isn't printed anywhere on the car, so I had to go check the handbook to find it.
I went back out and split the difference between those figures as I usually run on 99 Octane fuel where possible and dialled in 3°.
I can tweak that further either by ear or based on feedback as needed. It's almost amusingly easy to adjust on this engine - finding a 12V source for the timing light being by far the most difficult part. For now though it seems far happier. In the dark while what feels like half the country's population of midges are trying to eat you is not the time to be trying to find tune timing.
I'm fairly certain that at idle we were running pretty much entirely off the left hand carb before. They do want to be properly balanced and that will happen later on, but between them actually being synchronised so they're both contributing and the timing now being in vaguely the right ball park the engine sounds a lot happier at idle. Hard to describe, but it sounds more like a V8 now if that makes any sense. Idle does maybe want to come up just a touch as it will stumble a little in gear with the lights on if presented with an additional demand for power such as turning the steering sharply.
The engine bay fuel lines in the vicinity of the fuel pump I think may benefit from some thermal insulation (or seeing about rerouting the supply metal line which runs along the side of the engine between the block and exhaust manifold) as this is visible in the filter at idle when everything is fully up to temperature at idle.
This isn't air being drawn into the line - the fuel is actively boiling off. It continues bubbling for a good five or ten minutes after the engine stops. The fuel outlet on the tank on this is from the bottom - so any holes in the fuel supply result in all your fuel exiting the vehicle rather than air being drawn in.
This is one of the design features of this car I'm not such a fan of as it makes working on the fuel system a pain. I discovered that the hard way when I initially went to rebuild the fuel pump - fuel came out with a great deal of enthusiasm as soon as I loosened the inlet connection (I hadn't established that the tank was basically full back then either). This is also why I haven't investigated the non functional fuel gauge any further yet. There are 15 gallons of fuel on top of it!
The oil leak noted yesterday has been vastly, vadtly reduced by nipping the bolts up a bit - at least three were noticeably loose. It is still weeping very slightly, but we're talking a small drop every minute or two with the engine held at 1500rpm when fully warm rather than a drip or two every second we had yesterday. Gasket has been ordered though and it will be replaced as time allows.
Pretty sure that this is the adjustment point for the steering toe angle I was looking for.
So I have started to liberally dose that in PlusGas with a view to getting that adjusted properly sooner than later. Hopefully being relatively high up in the engine bay rather than right next to the wheels means it's less likely to be totally disinterested in moving.
Going to do a few (a lot) more runs round the block to test things first, but if they can fit me in to look at the wheel alignment, this might be the P6's first very careful, very nerve wracking run tomorrow all being well.
3.3 miles. We've already done more than that going round in circles. However never being more than 500 yards from home! Going somewhere actually out of our neighborhood seems a lot more scary!
They're good guys over there though, and I'm sure they'll give me a chance to have a good look underneath it on the ramp which will be really useful.
Current fleet:
07 Volvo V70 SE D5, 85 Sinclair C5, 84 Trabant 601S, 73 AC Model 70, 62 Rover 110.
07 Volvo V70 SE D5, 85 Sinclair C5, 84 Trabant 601S, 73 AC Model 70, 62 Rover 110.
-
MattBLancs
- Donor 2024
- Posts: 5004
- Joined: 25 Apr 2022, 09:03
- x 2189
Re: Zel's Fleet Blog - BX, Jag XJ-S, Sinclair C5, Mercedes 208D & 230TE, AC Model 70.
Can understand completely why you spent time "meaninglessly" painting that rusty bit of trim. Right in your eye line every time you fit it the driving seat, that would niggle at me something shocking!
Hammered finish looks the part, spray or brush on stuff?
Good progress on improving the running, like the "more like a V8. For some reason despite you not phrasing it as "more vee eight-y" my mind jumped to "more tractor-y"
Hammered finish looks the part, spray or brush on stuff?
Good progress on improving the running, like the "more like a V8. For some reason despite you not phrasing it as "more vee eight-y" my mind jumped to "more tractor-y"
Last edited by myglaren on 10 Oct 2023, 08:39, edited 1 time in total.
Reason: Video link
Reason: Video link