
An earlier incarnation sold last year at Historics Ascot Racecourse for £4528
viewtopic.php?p=711008#p711008
and out of interest all Mercedes limo's sold at auction in UK and overseas from Glenmarch records listed here:
https://www.glenmarch.com/cars/results? ... old_cars=1
Regard Neil
Zel's Fleet Blog - BX, Jag XJ-S, Sinclair C5, Mercedes 208D & 230TE, AC Model 70.
-
NewcastleFalcon

- Posts: 26399
- Joined: 25 Feb 2009, 10:40
- x 7162
Re: Zel's Fleet Blog - BX, Jag XJ-S, Sinclair C5, Mercedes 208D & 230TE, AC Model 70.
Only One AA Box left
687 Trinity, Jersey
687 Trinity, Jersey
-
Gibbo2286
- (Donor 2020)
- Posts: 8170
- Joined: 08 Jun 2011, 18:04
- x 2943
Re: Zel's Fleet Blog - BX, Jag XJ-S, Sinclair C5, Mercedes 208D & 230TE, AC Model 70.
Doing estimates like that I would double it and add ten percent to get a more realistic figure of what you would end up with. 
Anyone who has never made a mistake has never tried anything new. (Albert Einstein)
-
Zelandeth

- Donor 2024
- Posts: 5265
- Joined: 16 Nov 2014, 23:36
- x 1583
Re: Zel's Fleet Blog - BX, Jag XJ-S, Sinclair C5, Mercedes 208D & 230TE, AC Model 70.
Oh absolutely! It's just useful to get a baseline to start from. Which given the values of prior sales on the previous auction link really does show how far from a logical proposition taking this one on is. My five grand estimate for a sorted car seems to have been optimistic. Looks like £2-3 grand was maybe more realistic.Gibbo2286 wrote: 04 Mar 2022, 09:40 Doing estimates like that I would double it and add ten percent to get a more realistic figure of what you would end up with.
Nobody in their right mind would take this on as a project with anything in mind other than splitting it for parts and scrapping the remains.
Current fleet:
07 Volvo V70 SE D5, 85 Sinclair C5, 84 Trabant 601S, 73 AC Model 70, 62 Rover 110.
07 Volvo V70 SE D5, 85 Sinclair C5, 84 Trabant 601S, 73 AC Model 70, 62 Rover 110.
-
bobins

- (Donor 2025)
- Posts: 6812
- Joined: 05 Jul 2012, 18:07
- x 3536
Re: Zel's Fleet Blog - BX, Jag XJ-S, Sinclair C5, Mercedes 208D & 230TE, AC Model 70.
Zelandeth wrote: 04 Mar 2022, 11:24
Nobody in their right mind would take this on as a project with anything in mind other than splitting it for parts and scrapping the remains.
Will you add the punchline....... or should I ?
-
Zelandeth
- Donor 2024
- Posts: 5265
- Joined: 16 Nov 2014, 23:36
- x 1583
Re: Zel's Fleet Blog - BX, Jag XJ-S, Sinclair C5, Mercedes 208D & 230TE, AC Model 70.
Well we all know I'm not in my right mind anyway!
Had planned to get quite a bit of investigate work done yesterday. On account of the weather though it was just a very quick visit to get the spare window fitted.
Also threw the forward row of seating back into place just to confirm everything was in fact still there. Need to bash one bracket back into shape but yes everything is present and correct. The front cover for the instrument panel turned up in the back as well so that's something which could be crossed off the "needs replacement" list as it should be repairable.
No real progress other than that as it was pouring with rain so I wasn't about to go crawling around on the ground examining rust. We'll arrange something next week when the weather is hopefully a bit better.
Current fleet:
07 Volvo V70 SE D5, 85 Sinclair C5, 84 Trabant 601S, 73 AC Model 70, 62 Rover 110.
07 Volvo V70 SE D5, 85 Sinclair C5, 84 Trabant 601S, 73 AC Model 70, 62 Rover 110.
-
mickthemaverick

- Moderating Team
- Posts: 20213
- Joined: 11 May 2019, 17:56
- x 7819
Re: Zel's Fleet Blog - BX, Jag XJ-S, Sinclair C5, Mercedes 208D & 230TE, AC Model 70.
I used to be indecisive, now I'm not so sure!
I used to ride on two wheels, but now I need all four!
I used to ride on two wheels, but now I need all four!
-
Zelandeth
- Donor 2024
- Posts: 5265
- Joined: 16 Nov 2014, 23:36
- x 1583
Re: Zel's Fleet Blog - BX, Jag XJ-S, Sinclair C5, Mercedes 208D & 230TE, AC Model 70.
It looks like we've come to the end of the road with this V123. Simply because the current owner is looking for around £1500 for it. I don't doubt for a second that on the open market someone will probably have their arm off at that price to break it for parts as it's worth a lot more than that in bits. However I made it quite clear what I was willing to get into this for, and dropping another grand on top of that just wasn't going to happen.
We're still on amicable terms though. I fully understand that this situation with the car being vandalised has left them way out of pocket and they need to try to recoup at least some of their costs. I just can't justify spending that much. I'm grateful they took the time to contact me and let me spend a few hours crawling over it. They're grateful I've given them a bit of an insight into the reality of the situation with it. I got to do one of my favourite bits though, and that's actually breathing life back into something that everyone assumed was a completely lifeless hulk. At the very least they now know that with a jump start she will start and drive onto a trailer just fine.
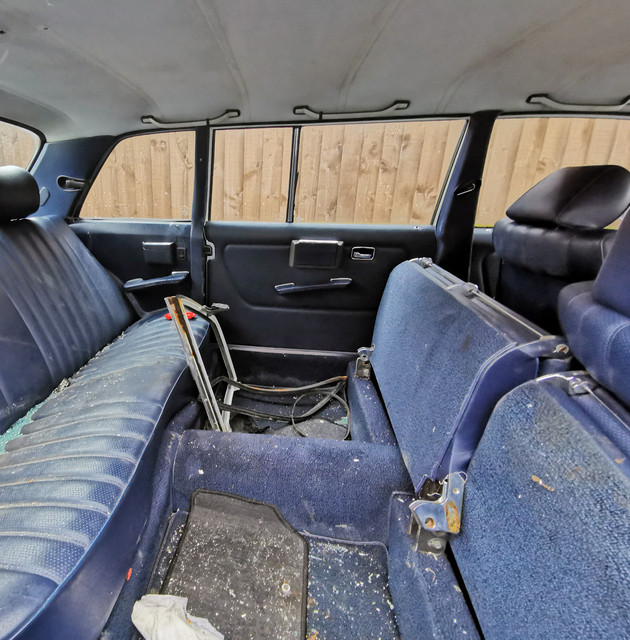
I had been planning to take a better look at it last week, but with the weather being so dismal I only dived over very briefly the one day to get the replacement window installed and to do a real quick stock take to confirm that all the bits of the forward rear seating row were there.
Fasteners scattered all over the floor and one support needs a whack with a hammer to get it back into shape, but yes everything was there.
Looks a mess there, but I could absolutely transform that in a couple of hours. That rear seat is so, so comfy. Given we as a family actually do quite often want to transport four adults plus luggage and occasionally two dogs, especially on holiday runs the layout could actually be really well suited to our needs...for all I initially looked at the car and thought "what on earth would I do with that?!?" It's not unusably large either - being well over a metre shorter than the camper, which I quite happily used as a daily driver for a period last year when the S123 had an engine in bits and the Jag lacked a charging system. If you're not comfortable driving bigger things, yes it's one to avoid. I'm not bothered about that though so reckon I could use it daily no bother. Guess that's the difference with it being a factory built car designed to transport people in the real world rather than movie stars from one glitzy hotel with a purpose built collection point to another. In actual car terms, it's a smidge over 10cm longer than a Rolls-Royce Silver Shadow/Spirit. I've done plenty of miles behind the wheel of one of those, so it doesn't put me off.
I returned today to take a closer look at it. I wanted to get the engine running long enough to get some heat into it and make a proper list of what worked and what didn't, and see if we could move it away from the fence to get a better look at the nearside. Oh, and to attack the crusty bits with some violence to see how much bigger I could make the holes.
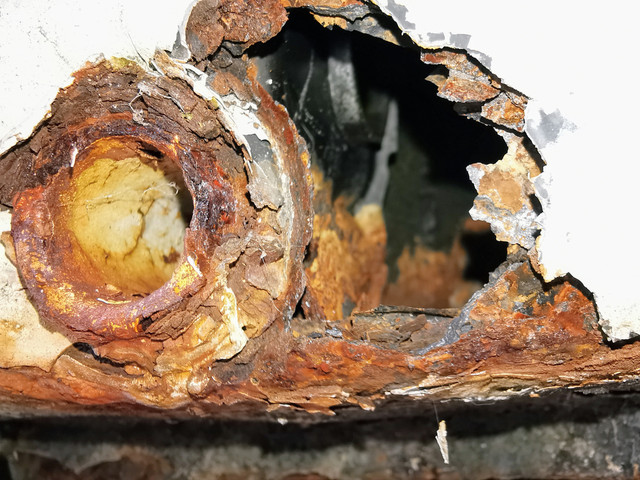
The inner arches under the bonnet were pretty much exactly as they looked. I was able to punch a pinhole in the offside one in one spot, the nearside didn't go through but they both want that bit cut out and new metal let in as it's obviously thin. There's nothing in the way though save for needing to cut a few cable ties to get the wiring loom out the way. I'm calling that about a 1.5 out of 10 on the difficulty to fix scale.
The bit of most concern was obviously the B pillar. I was kind of expecting a substantial portion of the surrounding metalwork to vanish and to find myself staring into the void where the inner sill used to be. I was quite surprised that I only poked one hole in the actual sill structure and peering through there with a torch showed everything in there to look fine. So while it's still quite an involved repair it doesn't seem to be as drastic as I was honestly expecting. I was kind of expecting to end up going halfway along both door apertures.
The camera always makes rust look way more dramatic than it does in person.

Don't get me wrong, it's bad...but not nearly as catastrophic as it might have been.
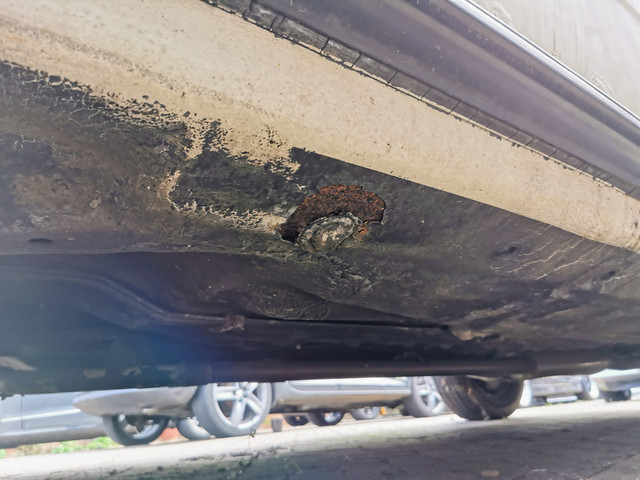
The hole by the rest jacking point was pretty much exactly as expected. Not the worst I've seen by a long shot.
Pretty standard "old car rust" there I think. Unlike the B pillar though repair panels for the sills are readily available.
Same spot on the nearside isn't nearly as bad, though I was able to punch a tiny hole right next to the jacking point tube so it'll want a repair in the same place.

That slightly wider shot shows what the underside looks like though. There's a bit of rust around one of the bungs (again it resisted being bludgeoned by a screwdriver) but by and large the underbody protection seems to have done a pretty good job.
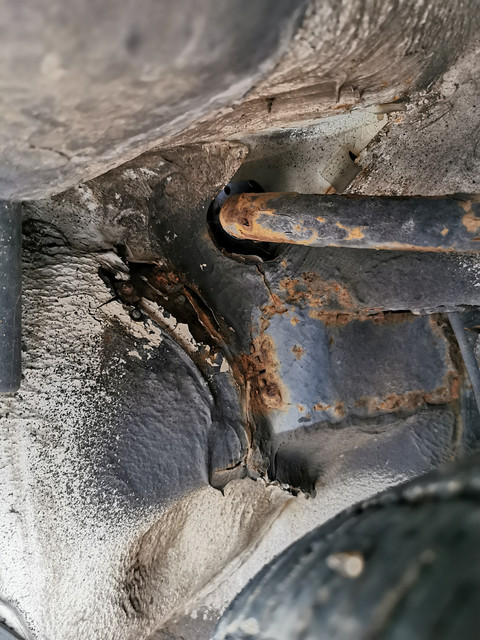
The nearside I originally thought needed the same repair to the bottom of the B pillar from what I could see when trying to view it sandwiched up against the fence, but it turns out there's not actually a hole there. Was a lot of flaky stuff along the seam (which is obviously the offending water trap), but despite getting quite aggressive I didn't manage to poke any holes in it.

A little more grot was found along the edge of the boot closure on the one side, so that'll explain where the water that's rotted out the boot floor came from.

Fiddly but not unexpected as they often go there.
I was worried spotting this in the nearside front wheel arch, but after some digging it honestly does just seem to be the seam sealer having got to that age where it starts failing.

I knew the offside had a repair done here for a previous MOT...not thrilled by that so a good session with the flap disc would definitely be in the future of this corner. I'd be budgeting on cutting this out and redoing it.
Mechanically given the car was running and driving fine when the break-in happened I had no reason to expect any issues - but that *was* in 2016.
Having it idling like this with precisely zero work beyond reattaching one fuel hose which had been dislodged wasn't expected.
That's on six plus year old fuel, not touched the carb, and started first touch today.
Speaking of the carb, this thing seems somewhat overkill for a 2.5 litre engine. Hard to convey as there's nothing really for scale in the photo. It's a big old beast though.

She sounds a bit rough there because the exhaust has been damaged, I'm guessing from the looks of things from when the thieves dropped it off the truck they carted it off on, as the whole system has been pulled back by a couple of inches - which also has mangled the rear valance.

The pipe leading to the rear manifold has pulled out of a slip joint, the forward one however is responsible for the racket.

Yep, that would do it!
Despite the noise she's running beautifully smoothly, throttle response is instant and showing zero smoke or anything. Which also meant I was able to confirm we had drive. Smoothly engaging gear, and even more surprisingly given the handbrake has been on since it was parked up, after a brief blip of throttle the brakes freed off - and then also worked. Not much you can really test on a driveway but definitely seems like a good start.
At the very least that will make loading it when it comes to move easier.
Aside from the windscreen wipers everything (including the electric radio antenna) seemed to work - though I didn't try the windows as that seemed like tempting fate.
This is where we part ways though. I'm sure a lot of parts from this car will see further service on other 123s, but if they're wanting that sort of money for it I really can't see anyone taking it on as a project. Even if they delivered it to my doorstep for free it still wouldn't make sense anyway!
Does now mean that the V123 is very much on my radar as something to possibly consider in the future though. So even though it looks like this one will be going elsewhere another may pop up here one day.
Which I'm okay with to be honest. If that one had *just* the damage from the break in, the rust or had been sitting since 2016 I'd be happy enough to just dive in...but having all of those things against it really does make it more of a project than I wanted to get into this year. Especially as I've already got one lined up.
It's been a fun little diversion though and I've enjoyed my brief encounter with it. I think we've come to the right outcome at the end of the day.
We're still on amicable terms though. I fully understand that this situation with the car being vandalised has left them way out of pocket and they need to try to recoup at least some of their costs. I just can't justify spending that much. I'm grateful they took the time to contact me and let me spend a few hours crawling over it. They're grateful I've given them a bit of an insight into the reality of the situation with it. I got to do one of my favourite bits though, and that's actually breathing life back into something that everyone assumed was a completely lifeless hulk. At the very least they now know that with a jump start she will start and drive onto a trailer just fine.
I had been planning to take a better look at it last week, but with the weather being so dismal I only dived over very briefly the one day to get the replacement window installed and to do a real quick stock take to confirm that all the bits of the forward rear seating row were there.
Fasteners scattered all over the floor and one support needs a whack with a hammer to get it back into shape, but yes everything was there.
Looks a mess there, but I could absolutely transform that in a couple of hours. That rear seat is so, so comfy. Given we as a family actually do quite often want to transport four adults plus luggage and occasionally two dogs, especially on holiday runs the layout could actually be really well suited to our needs...for all I initially looked at the car and thought "what on earth would I do with that?!?" It's not unusably large either - being well over a metre shorter than the camper, which I quite happily used as a daily driver for a period last year when the S123 had an engine in bits and the Jag lacked a charging system. If you're not comfortable driving bigger things, yes it's one to avoid. I'm not bothered about that though so reckon I could use it daily no bother. Guess that's the difference with it being a factory built car designed to transport people in the real world rather than movie stars from one glitzy hotel with a purpose built collection point to another. In actual car terms, it's a smidge over 10cm longer than a Rolls-Royce Silver Shadow/Spirit. I've done plenty of miles behind the wheel of one of those, so it doesn't put me off.
I returned today to take a closer look at it. I wanted to get the engine running long enough to get some heat into it and make a proper list of what worked and what didn't, and see if we could move it away from the fence to get a better look at the nearside. Oh, and to attack the crusty bits with some violence to see how much bigger I could make the holes.
The inner arches under the bonnet were pretty much exactly as they looked. I was able to punch a pinhole in the offside one in one spot, the nearside didn't go through but they both want that bit cut out and new metal let in as it's obviously thin. There's nothing in the way though save for needing to cut a few cable ties to get the wiring loom out the way. I'm calling that about a 1.5 out of 10 on the difficulty to fix scale.
The bit of most concern was obviously the B pillar. I was kind of expecting a substantial portion of the surrounding metalwork to vanish and to find myself staring into the void where the inner sill used to be. I was quite surprised that I only poked one hole in the actual sill structure and peering through there with a torch showed everything in there to look fine. So while it's still quite an involved repair it doesn't seem to be as drastic as I was honestly expecting. I was kind of expecting to end up going halfway along both door apertures.
The camera always makes rust look way more dramatic than it does in person.
Don't get me wrong, it's bad...but not nearly as catastrophic as it might have been.
The hole by the rest jacking point was pretty much exactly as expected. Not the worst I've seen by a long shot.
Pretty standard "old car rust" there I think. Unlike the B pillar though repair panels for the sills are readily available.
Same spot on the nearside isn't nearly as bad, though I was able to punch a tiny hole right next to the jacking point tube so it'll want a repair in the same place.
That slightly wider shot shows what the underside looks like though. There's a bit of rust around one of the bungs (again it resisted being bludgeoned by a screwdriver) but by and large the underbody protection seems to have done a pretty good job.
The nearside I originally thought needed the same repair to the bottom of the B pillar from what I could see when trying to view it sandwiched up against the fence, but it turns out there's not actually a hole there. Was a lot of flaky stuff along the seam (which is obviously the offending water trap), but despite getting quite aggressive I didn't manage to poke any holes in it.
A little more grot was found along the edge of the boot closure on the one side, so that'll explain where the water that's rotted out the boot floor came from.
Fiddly but not unexpected as they often go there.
I was worried spotting this in the nearside front wheel arch, but after some digging it honestly does just seem to be the seam sealer having got to that age where it starts failing.
I knew the offside had a repair done here for a previous MOT...not thrilled by that so a good session with the flap disc would definitely be in the future of this corner. I'd be budgeting on cutting this out and redoing it.
Mechanically given the car was running and driving fine when the break-in happened I had no reason to expect any issues - but that *was* in 2016.
Having it idling like this with precisely zero work beyond reattaching one fuel hose which had been dislodged wasn't expected.
That's on six plus year old fuel, not touched the carb, and started first touch today.
Speaking of the carb, this thing seems somewhat overkill for a 2.5 litre engine. Hard to convey as there's nothing really for scale in the photo. It's a big old beast though.
She sounds a bit rough there because the exhaust has been damaged, I'm guessing from the looks of things from when the thieves dropped it off the truck they carted it off on, as the whole system has been pulled back by a couple of inches - which also has mangled the rear valance.
The pipe leading to the rear manifold has pulled out of a slip joint, the forward one however is responsible for the racket.
Yep, that would do it!
Despite the noise she's running beautifully smoothly, throttle response is instant and showing zero smoke or anything. Which also meant I was able to confirm we had drive. Smoothly engaging gear, and even more surprisingly given the handbrake has been on since it was parked up, after a brief blip of throttle the brakes freed off - and then also worked. Not much you can really test on a driveway but definitely seems like a good start.
At the very least that will make loading it when it comes to move easier.
Aside from the windscreen wipers everything (including the electric radio antenna) seemed to work - though I didn't try the windows as that seemed like tempting fate.
This is where we part ways though. I'm sure a lot of parts from this car will see further service on other 123s, but if they're wanting that sort of money for it I really can't see anyone taking it on as a project. Even if they delivered it to my doorstep for free it still wouldn't make sense anyway!
Does now mean that the V123 is very much on my radar as something to possibly consider in the future though. So even though it looks like this one will be going elsewhere another may pop up here one day.
Which I'm okay with to be honest. If that one had *just* the damage from the break in, the rust or had been sitting since 2016 I'd be happy enough to just dive in...but having all of those things against it really does make it more of a project than I wanted to get into this year. Especially as I've already got one lined up.
It's been a fun little diversion though and I've enjoyed my brief encounter with it. I think we've come to the right outcome at the end of the day.
Current fleet:
07 Volvo V70 SE D5, 85 Sinclair C5, 84 Trabant 601S, 73 AC Model 70, 62 Rover 110.
07 Volvo V70 SE D5, 85 Sinclair C5, 84 Trabant 601S, 73 AC Model 70, 62 Rover 110.
-
mickthemaverick
- Moderating Team
- Posts: 20213
- Joined: 11 May 2019, 17:56
- x 7819
Re: Zel's Fleet Blog - BX, Jag XJ-S, Sinclair C5, Mercedes 208D & 230TE, AC Model 70.
Zel, i have seen your ad for the BX and realised it is a 1983 car. When was it first registered? It will reach 40 years old next year and become tax and mot exempt which, together with its 1.4 engine and the way petrol prices are going, could make it an attractive daily driver for someone. Sadly it won't be me because of the manual box but it is food for thought!
I used to be indecisive, now I'm not so sure!
I used to ride on two wheels, but now I need all four!
I used to ride on two wheels, but now I need all four!
-
mickthemaverick
- Moderating Team
- Posts: 20213
- Joined: 11 May 2019, 17:56
- x 7819
Re: Zel's Fleet Blog - BX, Jag XJ-S, Sinclair C5, Mercedes 208D & 230TE, AC Model 70.
Maybe one for your collection Zel?
https://www.the-saleroom.com/en-gb/auct ... 5a00d683de
https://www.the-saleroom.com/en-gb/auct ... 5a00d683de
I used to be indecisive, now I'm not so sure!
I used to ride on two wheels, but now I need all four!
I used to ride on two wheels, but now I need all four!
-
Zelandeth
- Donor 2024
- Posts: 5265
- Joined: 16 Nov 2014, 23:36
- x 1583
Re: Zel's Fleet Blog - BX, Jag XJ-S, Sinclair C5, Mercedes 208D & 230TE, AC Model 70.
Of interest, definitely. Sadly I'd be very surprised if that doesn't go for many times what I can really justify throwing at a hobby. They're worth strong money these days.mickthemaverick wrote: 17 Mar 2022, 11:53 Maybe one for your collection Zel?
https://www.the-saleroom.com/en-gb/auct ... 5a00d683de
Current fleet:
07 Volvo V70 SE D5, 85 Sinclair C5, 84 Trabant 601S, 73 AC Model 70, 62 Rover 110.
07 Volvo V70 SE D5, 85 Sinclair C5, 84 Trabant 601S, 73 AC Model 70, 62 Rover 110.
-
Zelandeth
- Donor 2024
- Posts: 5265
- Joined: 16 Nov 2014, 23:36
- x 1583
Re: Zel's Fleet Blog - BX, Jag XJ-S, Sinclair C5, Mercedes 208D & 230TE, AC Model 70.
Well there hasn't been much by way of updates since the inspection of the V123, simply because there hasn't been much going on. Between the weather being pretty dismal and my just generally lacking energy it's been difficult to find the enthusiasm to really do much. With the better weather over the last couple of days though I managed to kick myself into actually do something useful.
I really wanted to get this lot fitted to the Invacar.

I had no intention of having this turn into a complete carb rebuild given that it had been for the most part behaving itself. I just wanted to try to get rid of the habit it had of dribbling fuel all over itself and the inlet manifold. The main culprits for this I was pretty certain were the gaskets under the top cover and accelerator pump housing. Plenty of access to both of these with the carb in situ, just need to detach the choke cable and unthread the linkage between the choke flap and the throttle arm.

I took the opportunity to blow the float bowl out with the air line and to clean the main jet while the float bowl was empty. There was a fair bit of scaly residue on the jet which wouldn't have been helping anything. This is a pretty good demonstration of how even with a completely new fuel system over time just the normal evaporation of fuel will leave residues. Given how small the jets in this carb are it doesn't take much to cause issues.
When comparing the new and old gaskets next to each other it was pretty obvious visually how much the original top cover gasket had shrunk and distorted with age.

The new gasket is about twice the thickness of the old one too.
The gasket on the accelerator pump housing definitely shows evidence of the fact that it's the one thing I didn't take apart when I cleaned the carb (as I didn't have a replacement gasket or any gasket paper on hand). There was quite a bit of gunk in there.

That was blown out with substantial amounts of carb cleaner and compressed air before I put the cover back on.
With it all back together it was immediately apparent that this had made a difference. The engine started much more easily than usual from cold and the idle was more even. My hunch is that there was an air leak around that tiny drilling near the centre.
A quick test run round the block showed we had definitely improved the fuel seepage issue. The whole carb would have been wet before.

Still a little bit damp around the base of the carb which I think must be coming through the throttle shaft itself. There doesn't seem to be any excessive play in there so I'm inclined to just leave it alone for now.
I decided this was a good time to bust out this bit of kit and to see if I could get the idle mixture set a bit more accurately.


Imagine this can only be slightly newer than the car.
I've found this is a tricky one to set up by ear. There are two reasons for this: One is that there's about half a turn on the idle air screw between stinking rich and so lean it falls on its face and stalls if you so much as breathe on the throttle. Secondly is that because of the length of the intake path for such a small engine (I'm sure the hard 90 degree bend right after the carb does wonders for gas flow...) means that there's quite a substantial delay between you making an adjustment and the engine reacting. I also found that the idle tended to wander enough on its own to make it hard to judge. So "good enough" was where I left it before.
The hope was that this would allow me to see better what I was actually doing.

Turns out that at idle she was waaaaaaaaay lean, at about 2% CO. Which for an injected car wouldn't be far off, but for an old school engine like this is way off.
A bit of experimentation revealed that she seemed happiest with it set to around 5.5% - which if memory serves is about where my old Metros were happiest too (hence the ritual of having to back the mixture off a couple of turns before the MOT every year).
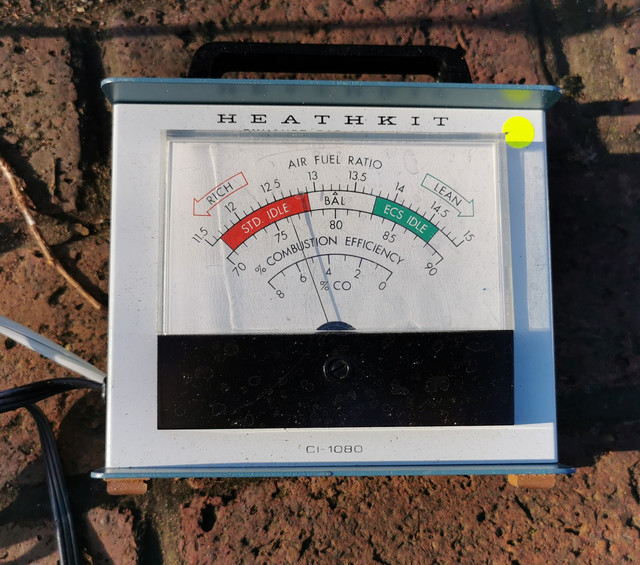
The emissions test for an engine of this age is simply a visual smoke check, the 4.5% limit not applying until a few years later. Though I will need to check after a couple of hundred miles to make sure we're not risking fouling plugs.
Throttle response off idle seems to be a lot snappier now - though still a bit slow compared to most engines simply on account of the heavy flywheel.
Something this car has always had a substantial dislike for was driving on a very light throttle, for example at a steady 30-40mph. This would tend to be interspersed now and then with a brief loss of power, a sneeze back through the carb then normal service being resumed. Even though I'm used to it it's something which never stopped being unnerving. It has tended to result in me using something of an "coast and burn" approach when driving at these speeds so as to avoid that behaviour.
Well I did upwards of 50 miles yesterday under various conditions and didn't have that happen once. Not calling it fixed yet, but definitely improved.
I think mainly due to the better sealed carb than my twiddling of things (which shouldn't affect anything much once the engine is under enough load to be drawing from the main rather than idle circuit in the carb, though there is some interaction) it definitely *feels* like she is able to maintain 50-60mph more easily. I guess the best test there will be to take a run up the hill towards Olney and see how far it drops. Absolutely feels zippier up to 40 or so though, despite I'm absolutely sure the difference on paper being minuscule.
One thing that is visible is that trundling around town she is definitely running a touch cooler, which ties in with the indication from the exhaust gas analyser that the engine was running lean.
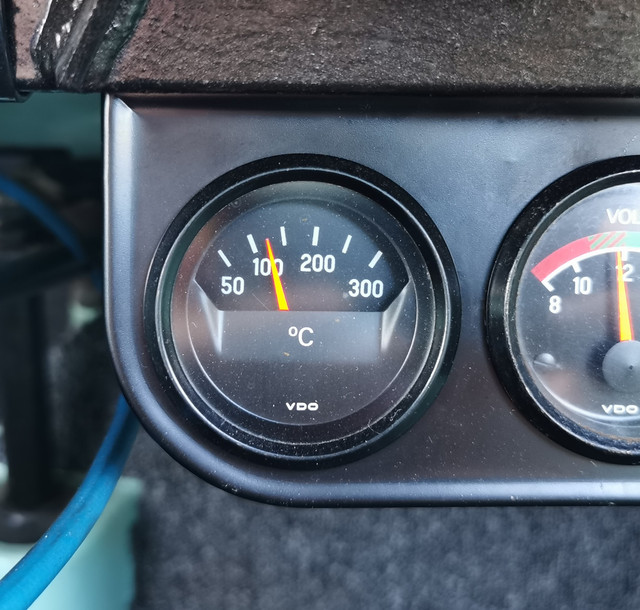
Reckon we've knocked maybe 20C or so off, haven't been out on a longer high speed run to see if that's carried over to that sort of situation too - though expecting less change there.
One of my main jobs for this weekend definitely needs to be sourcing the missing bits for my air cleaner. I'm absolutely not proud of this bodge fest.

I've had two separate people who likely have one who have gone totally unresponsive for a couple of weeks now so I'm giving up and just going to pick one up from a commercial outfit. Have to admit I'm curious to try one of the "normal" air cleaner housings anyway and see if they tame down the induction noise a bit. It is quite obtrusive anywhere above 50 or so and is the sort of noise that gets quite tiresome after a while. I figure the larger internal volume of the normal housing might act as a bit of a muffler. We have never been able to figure out why TPA (well, KPL actually as that's the car the engine came from) was fitted with a shorter than standard air cleaner housing - nor have we ever found another car with the same one, though it doesn't *look* like it's been modified.
Was really nice to get the car out again though, spent too long just sitting in the garage.


Couple of hundred miles off the 3000 mile mark now. The current list of things in my head to be included with the service that will come up at that point.
[] Resecure nearside rear wheel tub to the chassis. I've noted that whole corner wobbles about a fair bit and I'm sure that's not helping with the amount of bodywork rattling going on.
[] Sort out the damage to the rear of said wheel tub to prevent the ignition coil getting drenched every time I hit a vaguely damp bit of road. How it's not protested yet I have no idea.
[] Go over the car end to end checking basically every fastener I can find - if the air cleaner worked itself loose there's every chance other things may have too. I'd rather not have mission critical things randomly falling off.
[] Adjust the valve clearances. I put that off at the last service because the weather was horrible...no excuse there other than pure laziness.
[] End-to-end check of the brake lines. I spotted one bit up front where one had been rubbing against the frame, I'd rather not have that going on. Deploy additional clips as necessary.
[] Adjust brake free play.
[] Order another indicator flasher unit. The one I fitted recently had a really annoying "feature" in that there was a good 2 second delay between you turning the indicators on and them doing anything...this made signalling on roundabouts an exercise in forward planning. So I nicked the one off the C5. I need to replace it now of course.
[] Actually check to see what my ignition timing is set to (not that I can do anything about it), but it would just be nice to know what the initial and total timing I have is set to. Really do wonder how much difference having vacuum advance available would make. Know it's something that 2CV folks suggest makes quite a big difference there. Moot point really given my distributor seems precisely as stuck in place in the block as seems to be standard on these engines.
[] Investigate an electronic voltage regulator for the charging system. I know the system is never going to be great just given the limitations of the dynastart, but I've heard a few people say the modern regulators have vastly improved the behaviour of systems on cars with traditional generators, so seems worth a look.
[] She really could do with a wash...honestly can't remember when that last happened! Hoping to get to at least one or two shows this year so would be nice to have the car clean at least.
I really wanted to get this lot fitted to the Invacar.
I had no intention of having this turn into a complete carb rebuild given that it had been for the most part behaving itself. I just wanted to try to get rid of the habit it had of dribbling fuel all over itself and the inlet manifold. The main culprits for this I was pretty certain were the gaskets under the top cover and accelerator pump housing. Plenty of access to both of these with the carb in situ, just need to detach the choke cable and unthread the linkage between the choke flap and the throttle arm.
I took the opportunity to blow the float bowl out with the air line and to clean the main jet while the float bowl was empty. There was a fair bit of scaly residue on the jet which wouldn't have been helping anything. This is a pretty good demonstration of how even with a completely new fuel system over time just the normal evaporation of fuel will leave residues. Given how small the jets in this carb are it doesn't take much to cause issues.
When comparing the new and old gaskets next to each other it was pretty obvious visually how much the original top cover gasket had shrunk and distorted with age.
The new gasket is about twice the thickness of the old one too.
The gasket on the accelerator pump housing definitely shows evidence of the fact that it's the one thing I didn't take apart when I cleaned the carb (as I didn't have a replacement gasket or any gasket paper on hand). There was quite a bit of gunk in there.
That was blown out with substantial amounts of carb cleaner and compressed air before I put the cover back on.
With it all back together it was immediately apparent that this had made a difference. The engine started much more easily than usual from cold and the idle was more even. My hunch is that there was an air leak around that tiny drilling near the centre.
A quick test run round the block showed we had definitely improved the fuel seepage issue. The whole carb would have been wet before.
Still a little bit damp around the base of the carb which I think must be coming through the throttle shaft itself. There doesn't seem to be any excessive play in there so I'm inclined to just leave it alone for now.
I decided this was a good time to bust out this bit of kit and to see if I could get the idle mixture set a bit more accurately.
Imagine this can only be slightly newer than the car.
I've found this is a tricky one to set up by ear. There are two reasons for this: One is that there's about half a turn on the idle air screw between stinking rich and so lean it falls on its face and stalls if you so much as breathe on the throttle. Secondly is that because of the length of the intake path for such a small engine (I'm sure the hard 90 degree bend right after the carb does wonders for gas flow...) means that there's quite a substantial delay between you making an adjustment and the engine reacting. I also found that the idle tended to wander enough on its own to make it hard to judge. So "good enough" was where I left it before.
The hope was that this would allow me to see better what I was actually doing.
Turns out that at idle she was waaaaaaaaay lean, at about 2% CO. Which for an injected car wouldn't be far off, but for an old school engine like this is way off.
A bit of experimentation revealed that she seemed happiest with it set to around 5.5% - which if memory serves is about where my old Metros were happiest too (hence the ritual of having to back the mixture off a couple of turns before the MOT every year).
The emissions test for an engine of this age is simply a visual smoke check, the 4.5% limit not applying until a few years later. Though I will need to check after a couple of hundred miles to make sure we're not risking fouling plugs.
Throttle response off idle seems to be a lot snappier now - though still a bit slow compared to most engines simply on account of the heavy flywheel.
Something this car has always had a substantial dislike for was driving on a very light throttle, for example at a steady 30-40mph. This would tend to be interspersed now and then with a brief loss of power, a sneeze back through the carb then normal service being resumed. Even though I'm used to it it's something which never stopped being unnerving. It has tended to result in me using something of an "coast and burn" approach when driving at these speeds so as to avoid that behaviour.
Well I did upwards of 50 miles yesterday under various conditions and didn't have that happen once. Not calling it fixed yet, but definitely improved.
I think mainly due to the better sealed carb than my twiddling of things (which shouldn't affect anything much once the engine is under enough load to be drawing from the main rather than idle circuit in the carb, though there is some interaction) it definitely *feels* like she is able to maintain 50-60mph more easily. I guess the best test there will be to take a run up the hill towards Olney and see how far it drops. Absolutely feels zippier up to 40 or so though, despite I'm absolutely sure the difference on paper being minuscule.
One thing that is visible is that trundling around town she is definitely running a touch cooler, which ties in with the indication from the exhaust gas analyser that the engine was running lean.
Reckon we've knocked maybe 20C or so off, haven't been out on a longer high speed run to see if that's carried over to that sort of situation too - though expecting less change there.
One of my main jobs for this weekend definitely needs to be sourcing the missing bits for my air cleaner. I'm absolutely not proud of this bodge fest.
I've had two separate people who likely have one who have gone totally unresponsive for a couple of weeks now so I'm giving up and just going to pick one up from a commercial outfit. Have to admit I'm curious to try one of the "normal" air cleaner housings anyway and see if they tame down the induction noise a bit. It is quite obtrusive anywhere above 50 or so and is the sort of noise that gets quite tiresome after a while. I figure the larger internal volume of the normal housing might act as a bit of a muffler. We have never been able to figure out why TPA (well, KPL actually as that's the car the engine came from) was fitted with a shorter than standard air cleaner housing - nor have we ever found another car with the same one, though it doesn't *look* like it's been modified.
Was really nice to get the car out again though, spent too long just sitting in the garage.
Couple of hundred miles off the 3000 mile mark now. The current list of things in my head to be included with the service that will come up at that point.
[] Resecure nearside rear wheel tub to the chassis. I've noted that whole corner wobbles about a fair bit and I'm sure that's not helping with the amount of bodywork rattling going on.
[] Sort out the damage to the rear of said wheel tub to prevent the ignition coil getting drenched every time I hit a vaguely damp bit of road. How it's not protested yet I have no idea.
[] Go over the car end to end checking basically every fastener I can find - if the air cleaner worked itself loose there's every chance other things may have too. I'd rather not have mission critical things randomly falling off.
[] Adjust the valve clearances. I put that off at the last service because the weather was horrible...no excuse there other than pure laziness.
[] End-to-end check of the brake lines. I spotted one bit up front where one had been rubbing against the frame, I'd rather not have that going on. Deploy additional clips as necessary.
[] Adjust brake free play.
[] Order another indicator flasher unit. The one I fitted recently had a really annoying "feature" in that there was a good 2 second delay between you turning the indicators on and them doing anything...this made signalling on roundabouts an exercise in forward planning. So I nicked the one off the C5. I need to replace it now of course.
[] Actually check to see what my ignition timing is set to (not that I can do anything about it), but it would just be nice to know what the initial and total timing I have is set to. Really do wonder how much difference having vacuum advance available would make. Know it's something that 2CV folks suggest makes quite a big difference there. Moot point really given my distributor seems precisely as stuck in place in the block as seems to be standard on these engines.
[] Investigate an electronic voltage regulator for the charging system. I know the system is never going to be great just given the limitations of the dynastart, but I've heard a few people say the modern regulators have vastly improved the behaviour of systems on cars with traditional generators, so seems worth a look.
[] She really could do with a wash...honestly can't remember when that last happened! Hoping to get to at least one or two shows this year so would be nice to have the car clean at least.
Current fleet:
07 Volvo V70 SE D5, 85 Sinclair C5, 84 Trabant 601S, 73 AC Model 70, 62 Rover 110.
07 Volvo V70 SE D5, 85 Sinclair C5, 84 Trabant 601S, 73 AC Model 70, 62 Rover 110.
-
Zelandeth
- Donor 2024
- Posts: 5265
- Joined: 16 Nov 2014, 23:36
- x 1583
Re: Zel's Fleet Blog - BX, Jag XJ-S, Sinclair C5, Mercedes 208D & 230TE, AC Model 70.
Time to do a bit more investigation into the EGR system issue we've been having with the Caddy.
A friend came over with a half decent diagnostic tool a while ago and we confirmed that there were two codes stored.
01283 - Motor for intake manifold flap (V157) - Sporadic - Open/short circuit to ground.
Also P1441 - EGR Valve (N18) Open circuit or short to ground...but that's because I have unplugged it as the system is plainly misbehaving at the moment. So that code is expected.
Not expecting it to make any difference but it seemed worth cleaning up the intake manifold throttle valve which I'm assuming is something to do with the EGR system as I can't see why else you would have a throttle on the intake path on a diesel. Well other than the flapper on the old Detroit 2-strokes - but that was an emergency stop feature rather than something used in normal day to day operation.
If anyone knows these SDI engines inside out I'd be curious to know what the theory of operation for this and the whole EGR etc is. I've virtually zero experience with diesels involving any real level of electronic control and even less with direct injection systems...so I'm interested to learn.
The one thing I do know though is that diesel EGR systems make a horrible mess...like this.
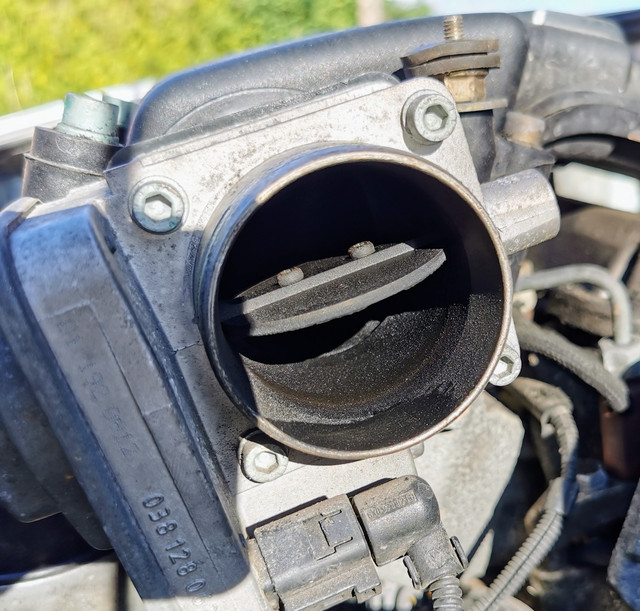
Intake manifold itself looks somewhat grim too compared to what I'm used to, but to be honest isn't that bad - I've seen cars where there's like a half inch thick crust on all sides.

I will probably pull this at some point and give it a thorough clean as I want to give the top of the engine a good clean and the inlet manifold is kind of in the way.
I noticed when pulling the throttle assembly that it rather conspicuously rattles which is rarely a good sign.
I wouldn't really call it clean but it's a whole lot better than it was.

Unsurprisingly absolutely no different. The once-per-second engine speed "twitch" is back, and huge clouds of unburned diesel out the back on light throttle.

Until I unplug the EGR solenoid, at which point it goes into whatever fallback mode it has, just leaves that intake throttle open and idles smoothly and stops smoking.
Given that we have a definite fault code stored for this assembly I think it's the first thing we need to try to sort. One other reason I pulled it out was to find a part number, helpfully stamped on the front...but I completely missed and thought it was underneath. Derp.

A quick look at the internet did turn up a few immediately matches.

Ouch.
A bit further digging turned up a (supposedly) good used one for £30. We'll try that first I think. If that doesn't at least change the behaviour a bit of further digging will be needed. This may end up being a "get a specialist involved" job at that point, though at least VWs are reasonably well catered for in that department.
For now the EGR solenoid has been unplugged again to eliminate the James Bond style smoke screen - though obviously that's not a long term solution and I'm not a fan of running like that anyway.
One of the very first thing that happens to virtually every car to arrive on my driveway is a decent clean...the poor Caddy was washed for the first time since I got it this afternoon, two and a half months and nearly 3000 miles in. I feel guilty!

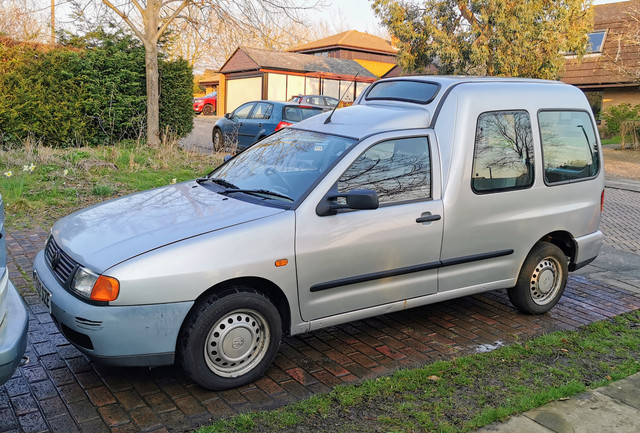

Getting a bit of paint on the wheels and the front bumper will make a big difference I reckon.
I don't think areas like the door shuts had ever been cleaned since the day it left the factory. Still needs properly wiped down in there, but looks a lot better.


There's a lot of light scratches in the paint all over, but I'm not too bothered about that given my intention once the few rusty bits have been attended to I'd like to get it either wrapped or painted anyway. The Harlequin idea is still my favourite. I'm still really quite liking the little van too so that's still very much on the cards.
This was the first real test for the new pressure washer.
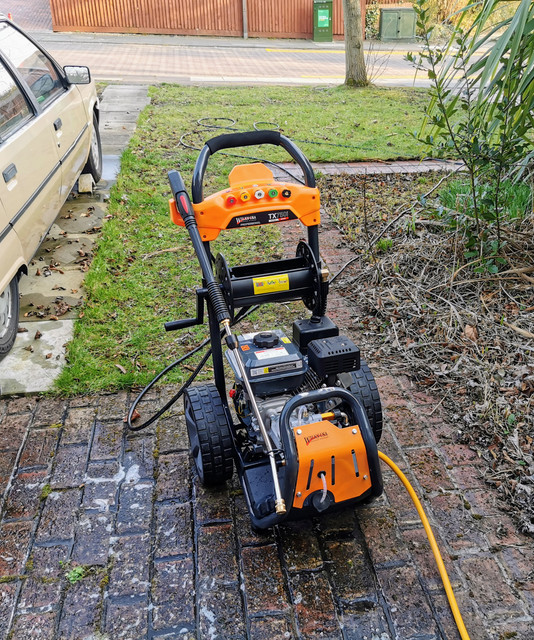
I really wish I'd bought this thing about 15 years sooner. So, so much better than the cheap electric ones. Aside from the power available from an 8hp petrol engine, just having 20 odd metres of hose to work with makes life so much easier. Also doesn't matter if the odd bit of spray goes towards it, I don't have to worry about extension cables getting wet and our overly twitchy RCD plunging half the house into darkness.
The onboard detergent tank is definitely on the list of things you don't need but is really nice to have too. Especially if cleaning something the size of the camper where just drowning the whole thing in snowfoam is basically step one after a rinse.
I'm glad to report that having blasted a substantial amount of moss and organic slime out of the seal between the windscreen pillar and driver's door closure that the annoying whistling noise at speed from that general area has vanished. Wish I'd done that *before* driving all the way to Glasgow and back...
A friend came over with a half decent diagnostic tool a while ago and we confirmed that there were two codes stored.
01283 - Motor for intake manifold flap (V157) - Sporadic - Open/short circuit to ground.
Also P1441 - EGR Valve (N18) Open circuit or short to ground...but that's because I have unplugged it as the system is plainly misbehaving at the moment. So that code is expected.
Not expecting it to make any difference but it seemed worth cleaning up the intake manifold throttle valve which I'm assuming is something to do with the EGR system as I can't see why else you would have a throttle on the intake path on a diesel. Well other than the flapper on the old Detroit 2-strokes - but that was an emergency stop feature rather than something used in normal day to day operation.
If anyone knows these SDI engines inside out I'd be curious to know what the theory of operation for this and the whole EGR etc is. I've virtually zero experience with diesels involving any real level of electronic control and even less with direct injection systems...so I'm interested to learn.
The one thing I do know though is that diesel EGR systems make a horrible mess...like this.
Intake manifold itself looks somewhat grim too compared to what I'm used to, but to be honest isn't that bad - I've seen cars where there's like a half inch thick crust on all sides.
I will probably pull this at some point and give it a thorough clean as I want to give the top of the engine a good clean and the inlet manifold is kind of in the way.
I noticed when pulling the throttle assembly that it rather conspicuously rattles which is rarely a good sign.
I wouldn't really call it clean but it's a whole lot better than it was.
Unsurprisingly absolutely no different. The once-per-second engine speed "twitch" is back, and huge clouds of unburned diesel out the back on light throttle.
Until I unplug the EGR solenoid, at which point it goes into whatever fallback mode it has, just leaves that intake throttle open and idles smoothly and stops smoking.
Given that we have a definite fault code stored for this assembly I think it's the first thing we need to try to sort. One other reason I pulled it out was to find a part number, helpfully stamped on the front...but I completely missed and thought it was underneath. Derp.
A quick look at the internet did turn up a few immediately matches.
Ouch.
A bit further digging turned up a (supposedly) good used one for £30. We'll try that first I think. If that doesn't at least change the behaviour a bit of further digging will be needed. This may end up being a "get a specialist involved" job at that point, though at least VWs are reasonably well catered for in that department.
For now the EGR solenoid has been unplugged again to eliminate the James Bond style smoke screen - though obviously that's not a long term solution and I'm not a fan of running like that anyway.
One of the very first thing that happens to virtually every car to arrive on my driveway is a decent clean...the poor Caddy was washed for the first time since I got it this afternoon, two and a half months and nearly 3000 miles in. I feel guilty!
Getting a bit of paint on the wheels and the front bumper will make a big difference I reckon.
I don't think areas like the door shuts had ever been cleaned since the day it left the factory. Still needs properly wiped down in there, but looks a lot better.
There's a lot of light scratches in the paint all over, but I'm not too bothered about that given my intention once the few rusty bits have been attended to I'd like to get it either wrapped or painted anyway. The Harlequin idea is still my favourite. I'm still really quite liking the little van too so that's still very much on the cards.
This was the first real test for the new pressure washer.
I really wish I'd bought this thing about 15 years sooner. So, so much better than the cheap electric ones. Aside from the power available from an 8hp petrol engine, just having 20 odd metres of hose to work with makes life so much easier. Also doesn't matter if the odd bit of spray goes towards it, I don't have to worry about extension cables getting wet and our overly twitchy RCD plunging half the house into darkness.
The onboard detergent tank is definitely on the list of things you don't need but is really nice to have too. Especially if cleaning something the size of the camper where just drowning the whole thing in snowfoam is basically step one after a rinse.
I'm glad to report that having blasted a substantial amount of moss and organic slime out of the seal between the windscreen pillar and driver's door closure that the annoying whistling noise at speed from that general area has vanished. Wish I'd done that *before* driving all the way to Glasgow and back...
Current fleet:
07 Volvo V70 SE D5, 85 Sinclair C5, 84 Trabant 601S, 73 AC Model 70, 62 Rover 110.
07 Volvo V70 SE D5, 85 Sinclair C5, 84 Trabant 601S, 73 AC Model 70, 62 Rover 110.
-
Zelandeth
- Donor 2024
- Posts: 5265
- Joined: 16 Nov 2014, 23:36
- x 1583
Re: Zel's Fleet Blog - BX, Jag XJ-S, Sinclair C5, Mercedes 208D & 230TE, AC Model 70.
A suggestion was made on another forum that the issue I was having with the Caddy could be down to that throttle unit having lost track of its home position so was closing too far, choking off too much of the air supply. That fit pretty well with the symptoms I was seeing. The tinge of blue to the smoke as well, as it's basically resulting in a shedload of vacuum being applied to both the EGR and PCV systems.
The suggestion to try in that case was to physically remove the throttle plate from the assembly...figured I'd nothing to lose really as it will be getting replaced anyway.
What do you know? It only went and worked. We now have a non-surging, non-smoking engine even with this connected back up.

Which is nice as it means the engine is running the correct timing curve again. It was really obvious that when it was disconnected that the injection timing was significantly altered, making the engine far more clattery at idle/light throttle. When the new throttle assembly arrives we'll see if it behaves as the designer intended.
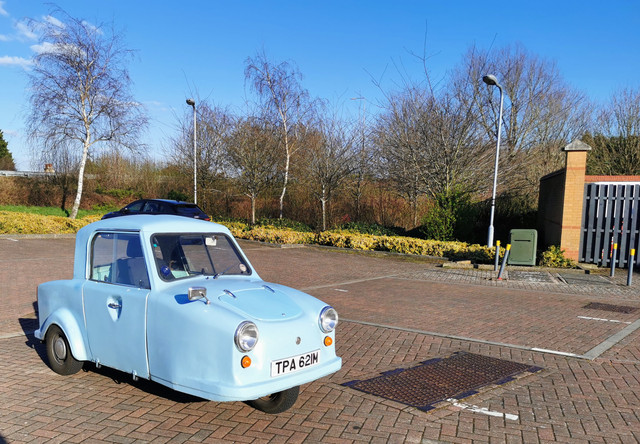
As the weather was nice today I had TPA out again. Probably the most unusual thing to pop up on the ANPR camera used for charging in the Brunel Centre car park today.

It really does seem that having tweaked the mixture more towards the rich side of things has got rid of the occasional tendency for the car to spit back through the carb. That's two afternoons of use now without it happening once, and I'd usually have expected it to have done it at least once or twice in that time. Throttle response under very light load feels far more predictable too (though the CVT always makes it feel a bit "strange" compared to a car with a conventional drive setup). So I'm tentatively calling that a win I think.
Before I put the car back in the garage I decided to satisfy my curiosity and see what the timing is actually set to. For all the time this takes there's really no reason for me not to have checked this before.
Dab of paint marker to make the marks easier to see. Especially as there's a nick in the outer pulley from me having to cut off the old engine mount which does a good job of looking like a timing mark.

Then out with the timing light.
Our results show that at idle we have 15° advance.

By sheer fluke I managed to catch the marks aligned in that photo if you look closely.
Rising to a maximum of 43° at somewhere around 4000rpm. I didn't actually have the tach set up so that's based purely on Mark I Ear. That actual number is less critical anyway as I recalled the manual didn't actually give a total timing measurement anyway, but it was a good opportunity to make sure the centrifugal advance mechanism was working smoothly.

That 15° is rather a lot more advanced than the manual calls for...

Especially as the amendment there seems to suggest they were basically setting things up for zero advance...I know they were running on two star fuel, but even so...
15° sounds a reasonable number to me, though I've not a huge amount of experience messing with this sort of thing. Definitely sounds better than zero!
Not a lot I can do by way of adjustment anyway given the distributor housing is well seized into the crankcase, but nice to know the timing is in a sane looking ballpark. Given she seems to be running well I don't see much reason to worry about that bit of the system any further other than keeping tabs on maintaining it.
The suggestion to try in that case was to physically remove the throttle plate from the assembly...figured I'd nothing to lose really as it will be getting replaced anyway.
What do you know? It only went and worked. We now have a non-surging, non-smoking engine even with this connected back up.
Which is nice as it means the engine is running the correct timing curve again. It was really obvious that when it was disconnected that the injection timing was significantly altered, making the engine far more clattery at idle/light throttle. When the new throttle assembly arrives we'll see if it behaves as the designer intended.
As the weather was nice today I had TPA out again. Probably the most unusual thing to pop up on the ANPR camera used for charging in the Brunel Centre car park today.
It really does seem that having tweaked the mixture more towards the rich side of things has got rid of the occasional tendency for the car to spit back through the carb. That's two afternoons of use now without it happening once, and I'd usually have expected it to have done it at least once or twice in that time. Throttle response under very light load feels far more predictable too (though the CVT always makes it feel a bit "strange" compared to a car with a conventional drive setup). So I'm tentatively calling that a win I think.
Before I put the car back in the garage I decided to satisfy my curiosity and see what the timing is actually set to. For all the time this takes there's really no reason for me not to have checked this before.
Dab of paint marker to make the marks easier to see. Especially as there's a nick in the outer pulley from me having to cut off the old engine mount which does a good job of looking like a timing mark.
Then out with the timing light.
Our results show that at idle we have 15° advance.
By sheer fluke I managed to catch the marks aligned in that photo if you look closely.
Rising to a maximum of 43° at somewhere around 4000rpm. I didn't actually have the tach set up so that's based purely on Mark I Ear. That actual number is less critical anyway as I recalled the manual didn't actually give a total timing measurement anyway, but it was a good opportunity to make sure the centrifugal advance mechanism was working smoothly.
That 15° is rather a lot more advanced than the manual calls for...
Especially as the amendment there seems to suggest they were basically setting things up for zero advance...I know they were running on two star fuel, but even so...
15° sounds a reasonable number to me, though I've not a huge amount of experience messing with this sort of thing. Definitely sounds better than zero!
Not a lot I can do by way of adjustment anyway given the distributor housing is well seized into the crankcase, but nice to know the timing is in a sane looking ballpark. Given she seems to be running well I don't see much reason to worry about that bit of the system any further other than keeping tabs on maintaining it.
Current fleet:
07 Volvo V70 SE D5, 85 Sinclair C5, 84 Trabant 601S, 73 AC Model 70, 62 Rover 110.
07 Volvo V70 SE D5, 85 Sinclair C5, 84 Trabant 601S, 73 AC Model 70, 62 Rover 110.
-
Zelandeth
- Donor 2024
- Posts: 5265
- Joined: 16 Nov 2014, 23:36
- x 1583
Re: Zel's Fleet Blog - BX, Jag XJ-S, Sinclair C5, Mercedes 208D & 230TE, AC Model 70.
Can you spot what's different in this picture?
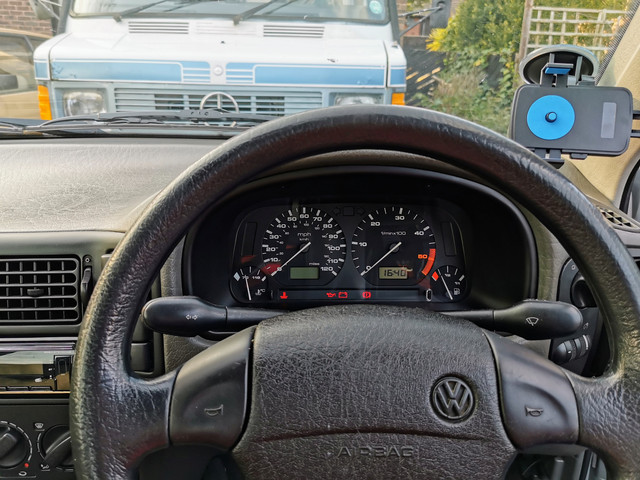
Probably not...I finally went and got the tracking reset so the steering wheel is now straight. This also means I'm not fighting continually with the indicator self cancelling mechanism every time I'm trying to turn right at a roundabout.
Thanks to VW's genius decision to position all the warning lights along the very bottom edge of the instrument panel that also meant I couldn't see any of them to the left of the brake warning light before when travelling straight ahead. Given that included things like the oil pressure and coolant temperature warnings I was somewhat enthusiastic to sort that. While I hope I never see those while driving, if they ever were to pop up I'd far rather see them than miss them.
This also gave me my first chance to get a proper look at the underside of the van. It's actually astonishingly fresh under there for the most part. The only area that's crusty unsurprisingly for a wheelchair conversion is the dropped floor section which needs some TLC.

Those rear axle brake hoses are looking quite crusty on the ferrules as well, kind of surprised they didn't get at least a mention on the last MOT.
Definitely need to get that rear area cleaned back and protected, but overall I'm quite happy with how she looked underneath.
The design of the modified exhaust is daft though. All of the hangers are just of the straight bar type rather than hooks, so there's nothing to stop it from sliding left to right - which is why it does clank against the floor sometimes, especially turning sharp left. Have to have a think about that somewhere down the line (as I'll probably want to drop the tailpipe at least to deal with the rust around it), just heating up and bending the hangers a little to put a bit of preload on it should do it I think.
Probably not...I finally went and got the tracking reset so the steering wheel is now straight. This also means I'm not fighting continually with the indicator self cancelling mechanism every time I'm trying to turn right at a roundabout.
Thanks to VW's genius decision to position all the warning lights along the very bottom edge of the instrument panel that also meant I couldn't see any of them to the left of the brake warning light before when travelling straight ahead. Given that included things like the oil pressure and coolant temperature warnings I was somewhat enthusiastic to sort that. While I hope I never see those while driving, if they ever were to pop up I'd far rather see them than miss them.
This also gave me my first chance to get a proper look at the underside of the van. It's actually astonishingly fresh under there for the most part. The only area that's crusty unsurprisingly for a wheelchair conversion is the dropped floor section which needs some TLC.
Those rear axle brake hoses are looking quite crusty on the ferrules as well, kind of surprised they didn't get at least a mention on the last MOT.
Definitely need to get that rear area cleaned back and protected, but overall I'm quite happy with how she looked underneath.
The design of the modified exhaust is daft though. All of the hangers are just of the straight bar type rather than hooks, so there's nothing to stop it from sliding left to right - which is why it does clank against the floor sometimes, especially turning sharp left. Have to have a think about that somewhere down the line (as I'll probably want to drop the tailpipe at least to deal with the rust around it), just heating up and bending the hangers a little to put a bit of preload on it should do it I think.
Current fleet:
07 Volvo V70 SE D5, 85 Sinclair C5, 84 Trabant 601S, 73 AC Model 70, 62 Rover 110.
07 Volvo V70 SE D5, 85 Sinclair C5, 84 Trabant 601S, 73 AC Model 70, 62 Rover 110.
-
mickthemaverick
- Moderating Team
- Posts: 20213
- Joined: 11 May 2019, 17:56
- x 7819
Re: Zel's Fleet Blog - BX, Jag XJ-S, Sinclair C5, Mercedes 208D & 230TE, AC Model 70.
Out of interest Zel, it sold for £260.00 !!Zelandeth wrote: 17 Mar 2022, 17:55Of interest, definitely. Sadly I'd be very surprised if that doesn't go for many times what I can really justify throwing at a hobby. They're worth strong money these days.mickthemaverick wrote: 17 Mar 2022, 11:53 Maybe one for your collection Zel?
https://www.the-saleroom.com/en-gb/auct ... 5a00d683de
I used to be indecisive, now I'm not so sure!
I used to ride on two wheels, but now I need all four!
I used to ride on two wheels, but now I need all four!