
REgards Neil
Zel's Fleet Blog - BX, Jag XJ-S, Sinclair C5, Mercedes 208D & 230TE, AC Model 70.
-
NewcastleFalcon

- Posts: 26399
- Joined: 25 Feb 2009, 10:40
- x 7162
Re: Zel's Fleet Blog - Xantia Activa, Jag XJ-S, Sinclair C5, Mercedes 208D, AC Model 70.
I always liked the shape of the Lancia Beta Coupe, and had one in something like Finlandia Green with the most garish Yellow seats. After a Mini and a Triumph GT6 it was my first aluminium head, first recessed spark plugs in deep holes, and first cross-threaded spark plug 
REgards Neil
REgards Neil
Only One AA Box left
687 Trinity, Jersey
687 Trinity, Jersey
-
Zelandeth

- Donor 2024
- Posts: 5260
- Joined: 16 Nov 2014, 23:36
- x 1580
Re: Zel's Fleet Blog - Xantia Activa, Jag XJ-S, Sinclair C5, Mercedes 208D, AC Model 70.
All right, been keeping myself busy in what would otherwise have been free time with the Trevi. The poor thing has definitely been crying out for some TLC...Not really surprising given it was basically dragged out of many years of disuse and prepped for an MOT, then driven. Plus as with many 80s Lancias, it has obviously seen a fair amount of bodgery during its years before it was parked up and forgotten about.
Couple of day's worth of updates here on this subject...Here's yesterday's first.
-- -- --
On my first wander around I came up with the following to do list.
[] Heater inoperable. Fan would run, but while it made noise there was no airflow.
[] Spurious offside tail light failure indication.
[] Offside indicators slow down when tail or brake lights are lit.
[] Several dash illumination lamps out or intermittent.
[] Switchgear illumination very dim.
[] Heater air distribution control lighting inoperable (not actually sure it's meant to be lit).
[] Dash warning lights for parking brake & rear fog lights inoperable.
[] Horrendously rough idle.
I started out intending to look at the tail lights as I reckon a dodgy ground is probably to blame. There's signs of water ingress in the clusters, probably because the lenses are quite badly crazed and there are a few actual cracks.

Didn't actually get as far as looking at the clusters and their wiring closer as I noticed the moment that I opened the boot that there was a significant amount of water in there. This is because the rain is literally pouring into the boot through a rust hole in the surround. Did I mention that this car was very early in the days of restoration?

Bodywork isn't really my forte and I don't want to get involved in plastering a car that's not mine with filler or anything. I did want to do something quick to keep at least some of the weather out though. So I grabbed the ally foil tape and made a temporary patch.

It can just be peeled off and any residue removed with some solvent cleaner when a more permanent repair is done. This should keep at least most of the rain out though in the interim which was my main concern.
Seeing that I'll need to strip quite a bit of trim out of the back of the boot to get to the tail light wiring I decided to come back to that and see if I could find any obvious candidates for the lumpy idle.
Straight off the bat I found a vacuum line which had started to decompose. It didn't look too bad in situ but once looked at more closely...

Thirty second job to replace.
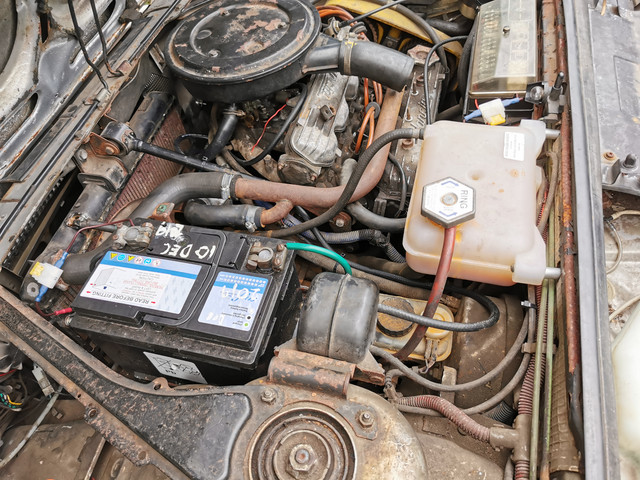
Sadly it didn't sort the horrible idle. However I spotted a very likely candidate for the dead heater.

That black cylinder is a vacuum accumulator and is part of the heating system...and one end should be connected to the inlet manifold. That vacuum line (and anywhere for it to go) was completely absent. My guess is that back when this car had twin carbs (the previous owner kept the twin carbs and associated manifold) there would have been a dedicated tap on the manifold for it. There was an additional attachment for it available though, just needed the blanking cap to be removed. I could then route a vacuum line for it.
Once this was hooked up I was happy to see that the push buttons controlling the air distribution now work correctly, and the heater seems to be mighty effective.
The party trick of the system has to the fact that when you switch it to cooling mode (which would probably bring the A/C on if the car was so equipped) that it automatically returns the temperature control to full cold.
That is something which will no doubt provide plenty of entertainment when stuck in traffic in the future.
Once I had confirmed this was working I tidied up the hoses I'd just routed a bit. When I went to restart the car I was met with a single click and a complete loss of electricity.
Tracking down the cause of that took about thirty seconds...the screws in the negative battery terminal were barely finger tight and the lead was totally free to float around in the terminal.
The end of the cable was pretty mangled as it had obviously been getting hot for a while so I trimmed it back and remade the connection.
When I had done that, I spotted the positive terminal smoking when the engine was cranking! Turns out the starter lead was connected to the terminal by three or four strands and was ready to break away. Fine...took that apart and remade the connections too.
I tweaked the alignment a bit so that neither the main feed to the car systems or the starter were jammed against the battery itself.

In the general neighbourhood of the battery I found this wire floating around in the nearside wing waiting to short out on something. No idea what it used to be, but it is long gone.

The barrel connector it was connected to is still there in the loom so it can easily be reconnected if necessary in the future, but doesn't this look better?

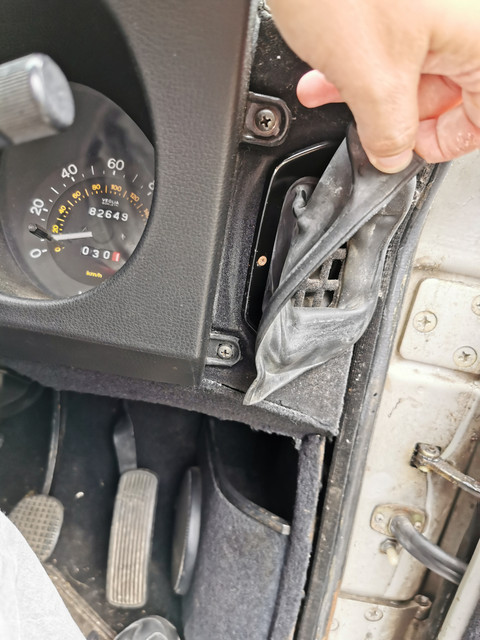
That's about all I had time for yesterday other than having taken five minutes to track down where the screws holding the dash together are. Looks like this shouldn't be too hard to get into to change the dash lamps...the main task I originally set out to do!

I've got a hunch about the running issue. I note that there's a solenoid on the carb - a solenoid which is currently connected to nothing...and which appears to have an open circuit coil. If that's something to do with the idle circuit (i.e. an anti-dieselling system to cut fuel when the ignition is turned off) this could be causing all sorts of trouble.
I'm not going to waste too much time on this just now as the car is perfectly drivable. A bit of vibration through the car at idle is the only sign anything is awry really. I'm also not about to go twiddling things on the carb as I recall it being mentioned that it wasn't easy to get it set up in the first place. If I can diagnose a possible issue though I'd like to have a clear recommendation to give. I will stick it on the gas analyser tomorrow though so I can see if it's rich or lean...smells rich, but I've been wrong before.
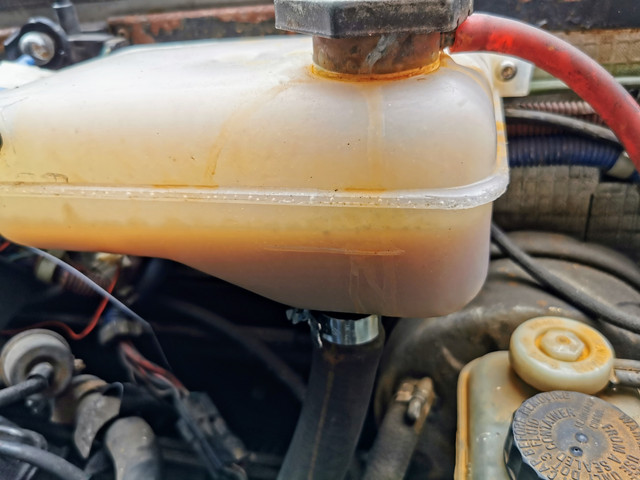
Only other things I noted down on my notepad from today we're regarding the cooling system. The radiator is weeping from a couple of spots. One around the base of the bleed line to the header tank, the other appears to be along the actual seam between the top plastic header and the core itself.


That connection to the expansion tank in particular makes me uneasy as it's clearly already been subjected to an epoxy or similar repair.
On the same subject, the coolant has turned to rust soup again (it spat it all out a week or so back in Tesco carpark in Buckingham).
It doesn't smell of fuel and there isn't any in the oil, so I reckon it's still just flushing old crud from years of neglect out the system.
I wonder if the incident in Buckingham the other day where it barfed a lot of coolant out was due to a chunk of gunge getting flushed out of somewhere. We'll get a couple of flushes done on the system and see how things go.
Final task before I locked up and went to cook dinner was to reset the wonderfully 80s clock to the right time following the battery removal earlier.

-- -- --
Fast forward to today!
Closer examination of the carburettor revealed that someone has definitely been in here before me when I removed the solenoid to see what was going on...

There should be a pin in here with some form of fuel metering device on it! It's *possible* that it's wedged in the carb body, but I'll need a mirror on a stick to confirm that. It doesn't feel like there's anything in the hole in the carb body though.
I'll need to tweak things a bit anyway though as having now fixed a not insignificant vacuum leak the idle speed has dropped to the point that it's a 50/50 game of chance every time you stop as to whether the engine will stall.
Looking at the coolant today before the engine was started shows that it looks like there is a distinct separate concentration of sediment floating around which has settled out overnight. So hopefully a decent flush through will help things in that department.

Will get that changed later and try to get as much flushed out as I can, hopefully befor this lovely new header tank gets any more stained.
Also noted that there is a worrying absence of hose clips on the fuel tank return line...and original fuel hose on the pump feed line.

The return line isn't a particularly tight fit on the rigid line either... I'll get a hose clamp on there!
I don't have any line in stock the correct size to replace this or I'd do it as a matter of course (especially as it's identical to the vacuum line I found falling to bits yesterday). Definitely doesn't appear to be a fuel filter fitted either. That at least I do have the parts in stock to remedy.
A slight problem generated by having fixed the vacuum leak found yesterday was that it had dropped the idle speed a touch - which given how badly the car was missing at idle resulted in there basically being a 50/50 chance of the engine stalling every time you came off the throttle. I tweaked the idle speed up a little to compensate for this. I need to look up the details for the carb to confirm that I've done that the correct way...but either way it worked and has stopped the stalling nonsense I had yesterday.
Here's the details of the carb, courtesy of my phone as I couldn't get my head into the necessary location to read this!

Hopefully those in the know will be able to confirm whether this is reasonably well suited to the car or not.
If that solenoid is meant to have a needle or other metering device attached to it I suspect that's going to be the source of our problem as it appears that the entire plunger assembly and whatever was once attached to it is missing. This makes sense as the main jet side of things seems to be working just fine - when you give her some beans she picks up smoothly and especially at the top end feels nicely punchy as you'd expect from a Lancia TC engine. It's just the idle that's screwed up.
I'm not going to delve too far into this issue as it's kind of beyond the scope of what I was planning on - but I'd like to be able to at least give an idea of what's going on for the final report I'll hand back with the car. One key bit of information I wanted was to see whether she was overfuelling or underfuelling at idle. Out with the gas analyser.

Well that won't be helping matters. The red section on the gauge is the general range expected for carb fed engines...I have a sneaking feeling that the whole idle circuit is fouled up and it's running from dregs from the main jet. Especially as adjusting what appears to be the idle fuel screw has absolutely zero effect on anything - so I put it right back where it started out and left it well alone.
It's obviously a fuel mixture issue as you CAN make the car idle smoothly by manually choking the carb with your hand (carefully). She sounds really lovely then actually! Is just starving for fuel if left to its own devices.
Unless when I look up the service/adjustment guide for the carb there's some blindingly obvious adjustment that I've missed I'm leaving this well alone and simply noting down "Carb needs attention" and leaving it at that. She starts, drives, stops and doesn't stall every time you stop at a junction - basically back to how she was behaving when she arrived here. Just with all the air now entering the engine via the carb rather than sneaking in through leaks.
Right...Enough faffing around with running issues I wasn't told to look into! Onto lighting issues the car actually arrived on my drive to sort!
First one was a nice easy fix!

Dirty lamp holder contacts. Sixty second fix.
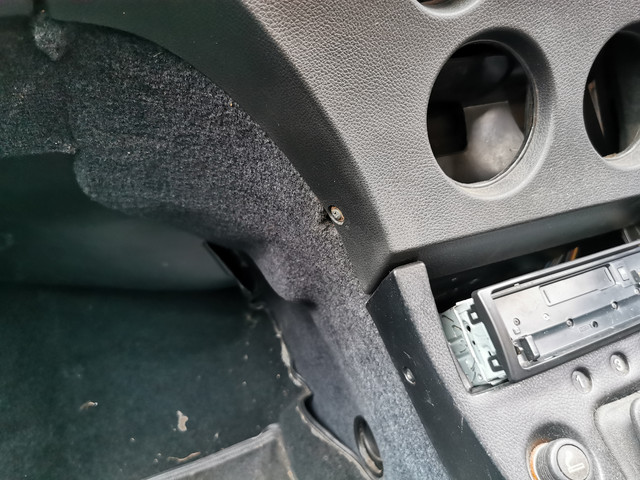
Next up I needed to start pulling the dash to bits.
To be honest this has to be one of the easiest cars I've had to tackle a job like this on. Half a dozen easily accessible screws and the whole face just lifts off the dash.


A further four release the panel which holds the warning lights and switchgear, likewise four release the instrument cluster.
There's even bags of slack in the wiring harness and speedometer cable so disconnecting them is a doddle, and with the steering wheel adjustment dropped down to the lowest level it just lifts out.
Before I started on the instrumentation though I wanted to take a closer look at the heater air distribution controls, which I wasn't sure if had any provision for illumination.

Hey look a that! It even highlights which mode it's in.

Neat. That's one more thing ticked off then.
Again just a dirty lampholder. Not even any slight blackening of the bulb so I left that be.
While peering at things back there I was able to confirm that the main swithgear was in fact lit by a single light source and fibre optics. I'll dig my way in to that tomorrow and look to replace the lamp in it to see if we can get a bit more light out of them.
On to the dash proper. Getting at a few of the lamps on that is a bit of a pain as Lancia decided that it would be smart to position the control module for the gauge pack on top of several of them.

So you have to unscrew that to get to four of the lamps. Not the end of the world as it takes all of five minutes to remove and reattach, but it's still the sort of design decision that makes you roll your eyes a bit.
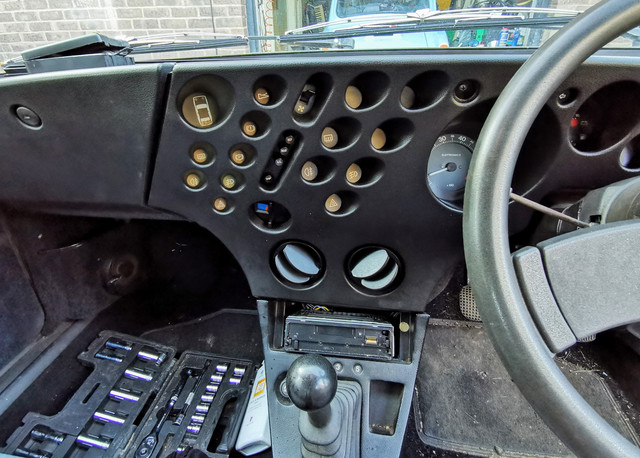
For reference, this is how the dash looked when we started.

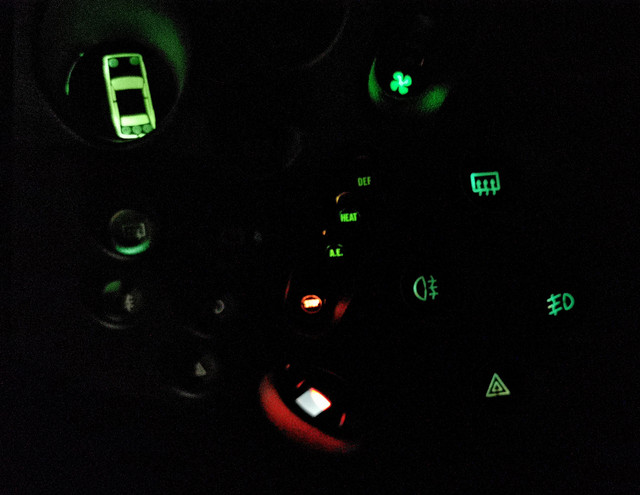
After an hour of cleaning contacts and testing things, this was the result.

Doesn't that look happier? It's actually a really nicely lit instrument panel, never mind by the standards of 1983.
Couple of close ups...Just because I really enjoy photos of instrument panels in the dark.


I did annoyingly managed to nudge the tripometer reset while I was manhandling the instruments in and out of the dash. Luckily however I had taken precautions against that and noted down the reading before that. If that reading is being used to track fuel economy, the owner will simply need to add 34.2 miles to the reading.
In addition to the illumination, the fuel warning light apparently was also out beforehand, it now lights as part of the test sequence at startup.

What I didn't realise was that the car *knows* when there is a light out on the dash. The big red warning light which I'd assumed was simply Lancia's answer to the "stop" light on PSA cars, now lights up green when you turn the ignition on rather than red!

Shouldn't be a problem to get this finished and back together tomorrow then tackle the remaining to do/investigation list.
[] Investigate fibre optic illumination to see if there's any improvement to be made.
[] Investigate non-functioning rear fog lights.
[] Reassemble dash.
[] Attack a few key areas with Vactan.
[] Cooling system drain, flush and refill with proper coolant (it's had water in for the last week following the coolant loss incident).
[] Get a proper photo of the dash once everything's working.
Oh...Pretty sure I found all the necessary bits in the glove box to reassemble the lower heater vents on the dash as well so will put those back together before screwing the dash back together.
Plus it will get an interior valet before it goes back to the owner...because I'm me and that's how I operate.
I've really been enjoying getting to do these little jobs on this motor, these are the sorts of things I really enjoy and find satisfying. Plus getting to work on such a rare and interesting motor is a privilege I feel.
The question I've got on my mind having had a chance to briefly drive this and having been a passenger in a Gamma Berlina...How on earth did Lancia manage to make cars ride like this with conventional springs? Both of these cars seem to hover along a few inches over the surface of the road without ever actually touching the tarmac...it's uncannily smooth, and so quiet!
Have I added another car to my wish list? Um...Yes.
Couple of day's worth of updates here on this subject...Here's yesterday's first.
-- -- --
On my first wander around I came up with the following to do list.
[] Heater inoperable. Fan would run, but while it made noise there was no airflow.
[] Spurious offside tail light failure indication.
[] Offside indicators slow down when tail or brake lights are lit.
[] Several dash illumination lamps out or intermittent.
[] Switchgear illumination very dim.
[] Heater air distribution control lighting inoperable (not actually sure it's meant to be lit).
[] Dash warning lights for parking brake & rear fog lights inoperable.
[] Horrendously rough idle.
I started out intending to look at the tail lights as I reckon a dodgy ground is probably to blame. There's signs of water ingress in the clusters, probably because the lenses are quite badly crazed and there are a few actual cracks.
Didn't actually get as far as looking at the clusters and their wiring closer as I noticed the moment that I opened the boot that there was a significant amount of water in there. This is because the rain is literally pouring into the boot through a rust hole in the surround. Did I mention that this car was very early in the days of restoration?
Bodywork isn't really my forte and I don't want to get involved in plastering a car that's not mine with filler or anything. I did want to do something quick to keep at least some of the weather out though. So I grabbed the ally foil tape and made a temporary patch.
It can just be peeled off and any residue removed with some solvent cleaner when a more permanent repair is done. This should keep at least most of the rain out though in the interim which was my main concern.
Seeing that I'll need to strip quite a bit of trim out of the back of the boot to get to the tail light wiring I decided to come back to that and see if I could find any obvious candidates for the lumpy idle.
Straight off the bat I found a vacuum line which had started to decompose. It didn't look too bad in situ but once looked at more closely...
Thirty second job to replace.
Sadly it didn't sort the horrible idle. However I spotted a very likely candidate for the dead heater.
That black cylinder is a vacuum accumulator and is part of the heating system...and one end should be connected to the inlet manifold. That vacuum line (and anywhere for it to go) was completely absent. My guess is that back when this car had twin carbs (the previous owner kept the twin carbs and associated manifold) there would have been a dedicated tap on the manifold for it. There was an additional attachment for it available though, just needed the blanking cap to be removed. I could then route a vacuum line for it.
Once this was hooked up I was happy to see that the push buttons controlling the air distribution now work correctly, and the heater seems to be mighty effective.
The party trick of the system has to the fact that when you switch it to cooling mode (which would probably bring the A/C on if the car was so equipped) that it automatically returns the temperature control to full cold.
That is something which will no doubt provide plenty of entertainment when stuck in traffic in the future.
Once I had confirmed this was working I tidied up the hoses I'd just routed a bit. When I went to restart the car I was met with a single click and a complete loss of electricity.
Tracking down the cause of that took about thirty seconds...the screws in the negative battery terminal were barely finger tight and the lead was totally free to float around in the terminal.
The end of the cable was pretty mangled as it had obviously been getting hot for a while so I trimmed it back and remade the connection.
When I had done that, I spotted the positive terminal smoking when the engine was cranking! Turns out the starter lead was connected to the terminal by three or four strands and was ready to break away. Fine...took that apart and remade the connections too.
I tweaked the alignment a bit so that neither the main feed to the car systems or the starter were jammed against the battery itself.
In the general neighbourhood of the battery I found this wire floating around in the nearside wing waiting to short out on something. No idea what it used to be, but it is long gone.
The barrel connector it was connected to is still there in the loom so it can easily be reconnected if necessary in the future, but doesn't this look better?
That's about all I had time for yesterday other than having taken five minutes to track down where the screws holding the dash together are. Looks like this shouldn't be too hard to get into to change the dash lamps...the main task I originally set out to do!
I've got a hunch about the running issue. I note that there's a solenoid on the carb - a solenoid which is currently connected to nothing...and which appears to have an open circuit coil. If that's something to do with the idle circuit (i.e. an anti-dieselling system to cut fuel when the ignition is turned off) this could be causing all sorts of trouble.
I'm not going to waste too much time on this just now as the car is perfectly drivable. A bit of vibration through the car at idle is the only sign anything is awry really. I'm also not about to go twiddling things on the carb as I recall it being mentioned that it wasn't easy to get it set up in the first place. If I can diagnose a possible issue though I'd like to have a clear recommendation to give. I will stick it on the gas analyser tomorrow though so I can see if it's rich or lean...smells rich, but I've been wrong before.
Only other things I noted down on my notepad from today we're regarding the cooling system. The radiator is weeping from a couple of spots. One around the base of the bleed line to the header tank, the other appears to be along the actual seam between the top plastic header and the core itself.
That connection to the expansion tank in particular makes me uneasy as it's clearly already been subjected to an epoxy or similar repair.
On the same subject, the coolant has turned to rust soup again (it spat it all out a week or so back in Tesco carpark in Buckingham).
It doesn't smell of fuel and there isn't any in the oil, so I reckon it's still just flushing old crud from years of neglect out the system.
I wonder if the incident in Buckingham the other day where it barfed a lot of coolant out was due to a chunk of gunge getting flushed out of somewhere. We'll get a couple of flushes done on the system and see how things go.
Final task before I locked up and went to cook dinner was to reset the wonderfully 80s clock to the right time following the battery removal earlier.
-- -- --
Fast forward to today!
Closer examination of the carburettor revealed that someone has definitely been in here before me when I removed the solenoid to see what was going on...
There should be a pin in here with some form of fuel metering device on it! It's *possible* that it's wedged in the carb body, but I'll need a mirror on a stick to confirm that. It doesn't feel like there's anything in the hole in the carb body though.
I'll need to tweak things a bit anyway though as having now fixed a not insignificant vacuum leak the idle speed has dropped to the point that it's a 50/50 game of chance every time you stop as to whether the engine will stall.
Looking at the coolant today before the engine was started shows that it looks like there is a distinct separate concentration of sediment floating around which has settled out overnight. So hopefully a decent flush through will help things in that department.
Will get that changed later and try to get as much flushed out as I can, hopefully befor this lovely new header tank gets any more stained.
Also noted that there is a worrying absence of hose clips on the fuel tank return line...and original fuel hose on the pump feed line.
The return line isn't a particularly tight fit on the rigid line either... I'll get a hose clamp on there!
I don't have any line in stock the correct size to replace this or I'd do it as a matter of course (especially as it's identical to the vacuum line I found falling to bits yesterday). Definitely doesn't appear to be a fuel filter fitted either. That at least I do have the parts in stock to remedy.
A slight problem generated by having fixed the vacuum leak found yesterday was that it had dropped the idle speed a touch - which given how badly the car was missing at idle resulted in there basically being a 50/50 chance of the engine stalling every time you came off the throttle. I tweaked the idle speed up a little to compensate for this. I need to look up the details for the carb to confirm that I've done that the correct way...but either way it worked and has stopped the stalling nonsense I had yesterday.
Here's the details of the carb, courtesy of my phone as I couldn't get my head into the necessary location to read this!
Hopefully those in the know will be able to confirm whether this is reasonably well suited to the car or not.
If that solenoid is meant to have a needle or other metering device attached to it I suspect that's going to be the source of our problem as it appears that the entire plunger assembly and whatever was once attached to it is missing. This makes sense as the main jet side of things seems to be working just fine - when you give her some beans she picks up smoothly and especially at the top end feels nicely punchy as you'd expect from a Lancia TC engine. It's just the idle that's screwed up.
I'm not going to delve too far into this issue as it's kind of beyond the scope of what I was planning on - but I'd like to be able to at least give an idea of what's going on for the final report I'll hand back with the car. One key bit of information I wanted was to see whether she was overfuelling or underfuelling at idle. Out with the gas analyser.
Well that won't be helping matters. The red section on the gauge is the general range expected for carb fed engines...I have a sneaking feeling that the whole idle circuit is fouled up and it's running from dregs from the main jet. Especially as adjusting what appears to be the idle fuel screw has absolutely zero effect on anything - so I put it right back where it started out and left it well alone.
It's obviously a fuel mixture issue as you CAN make the car idle smoothly by manually choking the carb with your hand (carefully). She sounds really lovely then actually! Is just starving for fuel if left to its own devices.
Unless when I look up the service/adjustment guide for the carb there's some blindingly obvious adjustment that I've missed I'm leaving this well alone and simply noting down "Carb needs attention" and leaving it at that. She starts, drives, stops and doesn't stall every time you stop at a junction - basically back to how she was behaving when she arrived here. Just with all the air now entering the engine via the carb rather than sneaking in through leaks.
Right...Enough faffing around with running issues I wasn't told to look into! Onto lighting issues the car actually arrived on my drive to sort!
First one was a nice easy fix!
Dirty lamp holder contacts. Sixty second fix.
Next up I needed to start pulling the dash to bits.
To be honest this has to be one of the easiest cars I've had to tackle a job like this on. Half a dozen easily accessible screws and the whole face just lifts off the dash.
A further four release the panel which holds the warning lights and switchgear, likewise four release the instrument cluster.
There's even bags of slack in the wiring harness and speedometer cable so disconnecting them is a doddle, and with the steering wheel adjustment dropped down to the lowest level it just lifts out.
Before I started on the instrumentation though I wanted to take a closer look at the heater air distribution controls, which I wasn't sure if had any provision for illumination.
Hey look a that! It even highlights which mode it's in.
Neat. That's one more thing ticked off then.
Again just a dirty lampholder. Not even any slight blackening of the bulb so I left that be.
While peering at things back there I was able to confirm that the main swithgear was in fact lit by a single light source and fibre optics. I'll dig my way in to that tomorrow and look to replace the lamp in it to see if we can get a bit more light out of them.
On to the dash proper. Getting at a few of the lamps on that is a bit of a pain as Lancia decided that it would be smart to position the control module for the gauge pack on top of several of them.
So you have to unscrew that to get to four of the lamps. Not the end of the world as it takes all of five minutes to remove and reattach, but it's still the sort of design decision that makes you roll your eyes a bit.
For reference, this is how the dash looked when we started.
After an hour of cleaning contacts and testing things, this was the result.
Doesn't that look happier? It's actually a really nicely lit instrument panel, never mind by the standards of 1983.
Couple of close ups...Just because I really enjoy photos of instrument panels in the dark.
I did annoyingly managed to nudge the tripometer reset while I was manhandling the instruments in and out of the dash. Luckily however I had taken precautions against that and noted down the reading before that. If that reading is being used to track fuel economy, the owner will simply need to add 34.2 miles to the reading.
In addition to the illumination, the fuel warning light apparently was also out beforehand, it now lights as part of the test sequence at startup.
What I didn't realise was that the car *knows* when there is a light out on the dash. The big red warning light which I'd assumed was simply Lancia's answer to the "stop" light on PSA cars, now lights up green when you turn the ignition on rather than red!
Shouldn't be a problem to get this finished and back together tomorrow then tackle the remaining to do/investigation list.
[] Investigate fibre optic illumination to see if there's any improvement to be made.
[] Investigate non-functioning rear fog lights.
[] Reassemble dash.
[] Attack a few key areas with Vactan.
[] Cooling system drain, flush and refill with proper coolant (it's had water in for the last week following the coolant loss incident).
[] Get a proper photo of the dash once everything's working.
Oh...Pretty sure I found all the necessary bits in the glove box to reassemble the lower heater vents on the dash as well so will put those back together before screwing the dash back together.
Plus it will get an interior valet before it goes back to the owner...because I'm me and that's how I operate.
I've really been enjoying getting to do these little jobs on this motor, these are the sorts of things I really enjoy and find satisfying. Plus getting to work on such a rare and interesting motor is a privilege I feel.
The question I've got on my mind having had a chance to briefly drive this and having been a passenger in a Gamma Berlina...How on earth did Lancia manage to make cars ride like this with conventional springs? Both of these cars seem to hover along a few inches over the surface of the road without ever actually touching the tarmac...it's uncannily smooth, and so quiet!
Have I added another car to my wish list? Um...Yes.
Current fleet:
07 Volvo V70 SE D5, 85 Sinclair C5, 84 Trabant 601S, 73 AC Model 70, 62 Rover 110.
07 Volvo V70 SE D5, 85 Sinclair C5, 84 Trabant 601S, 73 AC Model 70, 62 Rover 110.
-
CitroJim

- A very naughty boy
- Posts: 54543
- Joined: 30 Apr 2005, 23:33
- x 8078
Re: Zel's Fleet Blog - Xantia Activa, Jag XJ-S, Sinclair C5, Mercedes 208D, AC Model 70.
Zel, that's magic 
 Really enjoyed reading your epic Lancia adventure! That dash, when illuminated, is simply awesome Love it
I can fully understand why one is now on your wish list!

 Really enjoyed reading your epic Lancia adventure! That dash, when illuminated, is simply awesome Love it
I can fully understand why one is now on your wish list!
Jim
A bit of a Citroen AX fan...
A bit of a Citroen AX fan...
-
myglaren

- Forum Admin Team
- Posts: 28430
- Joined: 02 Mar 2008, 13:30
- x 5579
Re: Zel's Fleet Blog - Xantia Activa, Jag XJ-S, Sinclair C5, Mercedes 208D, AC Model 70.
While compared with the current crop of cars, many would find that crude, it is in fact fare better aesthetically that anything recent.
I deplore the iPhone aesthetic and all the touch screens. My Civic is bad enough. The Lancia is perfect.
I deplore the iPhone aesthetic and all the touch screens. My Civic is bad enough. The Lancia is perfect.
-
Gibbo2286
- (Donor 2020)
- Posts: 8170
- Joined: 08 Jun 2011, 18:04
- x 2943
Re: Zel's Fleet Blog - Xantia Activa, Jag XJ-S, Sinclair C5, Mercedes 208D, AC Model 70.
The electrics on the Lancias suffered a lot because they used steel spade terminals including on all the ground connections, might have been ok in sunny Italy but quickly built up rust in our wonderful climate.
Anyone who has never made a mistake has never tried anything new. (Albert Einstein)
-
Zelandeth
- Donor 2024
- Posts: 5260
- Joined: 16 Nov 2014, 23:36
- x 1580
Re: Zel's Fleet Blog - Xantia Activa, Jag XJ-S, Sinclair C5, Mercedes 208D, AC Model 70.
Part ...Three...I think of the Trevi Tales.
The owner had been in touch with the garage who last did work on it and was given a pointer as to where they thought the plunger from the carb shut off solenoid was. This allowed me to find it...just!

A few miles more I'm sure that would have vanished through that scuttle drain and never been seen again.

With this fitted (bearing in mind that the solenoid coil is open circuit) unsurprisingly the car idles even worse. So for now it's been stashed in the bag of "leftovers" which I've removed so far (in a separate labelled bag so it doesn't get binned accidentally!).
I'm not likely to be messing around much more with the carb on this visit, though I'm not saying she won't return in future for more mechanically centred tinkering one day but that's not the main focus of this one.
The dash work was mostly done yesterday, I just needed to put it back together for the most part. I did need to replace one part though, the stripped out screw from the instrument panel. This was just a standard M6 thread so a bolt was roped in. Some folks might consider this a bodge...but I didn't have a machine screw that big to hand, and it's not as though you can see it so it's good enough for me!

On the subject of the instrument panel etc...it's worth noting that this didn't actually end up being a bulb replacement project. None of the bulbs were in the slightest blackened, and all but one of the failures it turned out were down to dirty lamp holders (three of which I had to replace). The only blown lamp I found was in the fuel light, which was totally black and obviously dead. Given how..."variable" the quality of modern lamps can be in a case like this where they all look fine I'll stick to the originals. This usually winds up being the least hassle in the long run. This is a pretty easy dash to get in to as well.
I had a look at the light source for the fibre optics (sorry, forgot to photograph that), and it looked like new and everything in there is properly seated and perfectly clean. The switch illumination is just a bit dim when in the off position. Putting a more powerful lamp in here is a bad, bad idea as it will just A: Melt the housing and B: Burn the tips of the fibres. The only really practical way to get more light out of there is an LED conversion. Something to come back to in the future.
Before I actually started putting the dash back together there were a few more things I wanted to check:
[] The lamps in the parking brake/rear fog light indicators as they don't work (they were fine - the issue is upstream).
[] Clean everything that the dash is normally in the way of the edges of. The instrument panel in particular is awkward to clean normally as it's so deeply recessed. Out with the Autoglym Fast Glass (which despite the name is also suitable for clear plastics).

All of the warning lights, buttons etc were also scrubbed up to get rid of the ring of decades old grime that was on them. The heater air distribution control buttons in particular were absolutely caked.
[] Lower dash heater vents. I found the vent grills for these in the glove box. Turns out that there were several broken ones, one complete and one half broken vent in there...Because the design is stupid. The whole lot hangs off a pair of spring clips which hold a LOT of tension on a tiny little plastic bridge.
The one complete vent I put on with ONE rather than two spring clips, and using a bolt rather than the plastic clip setup allowed me to space it out a good deal further to massively reduce the amount of tension on it. I would rather have used larger washers but simply don't have any in stock right now.

This should be absolutely fine so long as you don't have a five year old trying to pull the vent out of the dash.
The second one however was already half broken so I had to improvise a bit.
I've cable tied the "bridge" to the rod which connects the two parts of the vent direction fins together. This means the vent can't now be fully closed...but given that the opposite is a gaping hole in the dash, it seems like an improvement to me.
Given a bit of time I don't doubt for a second that I could engineer a better solution than this...but this was the best I could come up with in half an hour and the fact of the matter is that it does the job. It's a really poorly thought out design.
Before I started to reassemble it, I absolutely drowned the dash moulding in Autoglym's Plastic & Rubber Care spray and just left it soak for half an hour or so.
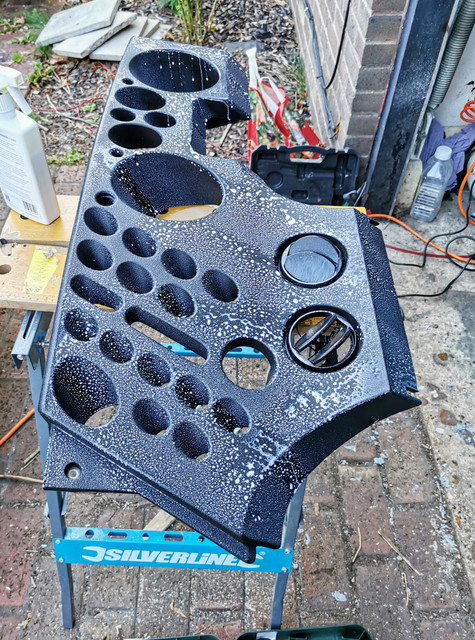
[] This means we can get onto the fun bit...Reassembly!
I think the first picture here speaks for itself...you can almost hear the dash surface screaming the thanks for seeing some care products for the first time in probably a couple of decades.

Sadly the effect is slightly spoiled by my dusty hand prints down by the heater outlets from putting stuff back together!

The vent which can't be closed is the one on the passenger side - I figured giving the driver full control over the ventilation was the most important.
The rev counter in particular used to be quite cloudy before it was cleaned. Looks rather better now.
Oh, and the previously distinctly crusty heater controls are a bit less of a biohazard now.

Much better.
You can see the difference in the surface compared to the glove compartment lid. The glove compartment isn't fully closed there by the way, that's why the lid is sitting at an angle.
Have another gratuitous Trevi dash warning light photo just because the design is so unique.

These are actually frosted plastic lenses rather than the silk screened plastic film that is normally used on instrument panels etc.
They're all completely separate with the exception of the sidelights/main beam indicator which has two butted up next to each other using half of a circle (because what other shape would it be in this interior?!).

Of course the real question was whether once I had bolted and screwed everything back together all the lights would still work.
Drumroll please...

I'll take that!
Here's a wider shot with the ignition on so you can get the clock in shot as well.

Really need to have a play around with the camera settings to see if I can get things like warnings lights to stop washing out so much. Also obviously still need to address the bulb failure warning which also brings on the Big Red Light of Doom.

That's probably the most accurate representation of how brightly the gauges are lit and the colour at least.
Would be rude not to get some close ups wouldn't it?
Right to left...

Sorry this one is a bit out of focus.


Even the power window switches are properly lit now...I've not dared try the actual windows though. That has the potential for letting myself into a world of pain I can do without.

It really bugs me these are lit white when everything else in the car is green.
Tomorrow's to do list.
[] Tail light bulb replacement & ground chasing.
[] Vactan.
[] Coolant flush. Looks like we may need to re-seal the neck on the expansion bottle too - though given the state of the radiator I'm tempted to leave this be for now. I'd rather have the system bleeding a bit of pressure off here than blowing the equalising line stub out of the radiator...
[] See if I can figure out why the rear fog lights don't work...Obvious candidate is the fuse box, given I've had to poke things in it half a dozen times so far. Including to get the indicator on the dash for the sidelights to work...After I'd had the bulb out and checked it three times.
[] Interior cleanup.
The owner had been in touch with the garage who last did work on it and was given a pointer as to where they thought the plunger from the carb shut off solenoid was. This allowed me to find it...just!
A few miles more I'm sure that would have vanished through that scuttle drain and never been seen again.
With this fitted (bearing in mind that the solenoid coil is open circuit) unsurprisingly the car idles even worse. So for now it's been stashed in the bag of "leftovers" which I've removed so far (in a separate labelled bag so it doesn't get binned accidentally!).
I'm not likely to be messing around much more with the carb on this visit, though I'm not saying she won't return in future for more mechanically centred tinkering one day but that's not the main focus of this one.
The dash work was mostly done yesterday, I just needed to put it back together for the most part. I did need to replace one part though, the stripped out screw from the instrument panel. This was just a standard M6 thread so a bolt was roped in. Some folks might consider this a bodge...but I didn't have a machine screw that big to hand, and it's not as though you can see it so it's good enough for me!
On the subject of the instrument panel etc...it's worth noting that this didn't actually end up being a bulb replacement project. None of the bulbs were in the slightest blackened, and all but one of the failures it turned out were down to dirty lamp holders (three of which I had to replace). The only blown lamp I found was in the fuel light, which was totally black and obviously dead. Given how..."variable" the quality of modern lamps can be in a case like this where they all look fine I'll stick to the originals. This usually winds up being the least hassle in the long run. This is a pretty easy dash to get in to as well.
I had a look at the light source for the fibre optics (sorry, forgot to photograph that), and it looked like new and everything in there is properly seated and perfectly clean. The switch illumination is just a bit dim when in the off position. Putting a more powerful lamp in here is a bad, bad idea as it will just A: Melt the housing and B: Burn the tips of the fibres. The only really practical way to get more light out of there is an LED conversion. Something to come back to in the future.
Before I actually started putting the dash back together there were a few more things I wanted to check:
[] The lamps in the parking brake/rear fog light indicators as they don't work (they were fine - the issue is upstream).
[] Clean everything that the dash is normally in the way of the edges of. The instrument panel in particular is awkward to clean normally as it's so deeply recessed. Out with the Autoglym Fast Glass (which despite the name is also suitable for clear plastics).
All of the warning lights, buttons etc were also scrubbed up to get rid of the ring of decades old grime that was on them. The heater air distribution control buttons in particular were absolutely caked.
[] Lower dash heater vents. I found the vent grills for these in the glove box. Turns out that there were several broken ones, one complete and one half broken vent in there...Because the design is stupid. The whole lot hangs off a pair of spring clips which hold a LOT of tension on a tiny little plastic bridge.
The one complete vent I put on with ONE rather than two spring clips, and using a bolt rather than the plastic clip setup allowed me to space it out a good deal further to massively reduce the amount of tension on it. I would rather have used larger washers but simply don't have any in stock right now.
This should be absolutely fine so long as you don't have a five year old trying to pull the vent out of the dash.
The second one however was already half broken so I had to improvise a bit.
I've cable tied the "bridge" to the rod which connects the two parts of the vent direction fins together. This means the vent can't now be fully closed...but given that the opposite is a gaping hole in the dash, it seems like an improvement to me.
Given a bit of time I don't doubt for a second that I could engineer a better solution than this...but this was the best I could come up with in half an hour and the fact of the matter is that it does the job. It's a really poorly thought out design.
Before I started to reassemble it, I absolutely drowned the dash moulding in Autoglym's Plastic & Rubber Care spray and just left it soak for half an hour or so.
[] This means we can get onto the fun bit...Reassembly!
I think the first picture here speaks for itself...you can almost hear the dash surface screaming the thanks for seeing some care products for the first time in probably a couple of decades.
Sadly the effect is slightly spoiled by my dusty hand prints down by the heater outlets from putting stuff back together!
The vent which can't be closed is the one on the passenger side - I figured giving the driver full control over the ventilation was the most important.
The rev counter in particular used to be quite cloudy before it was cleaned. Looks rather better now.
Oh, and the previously distinctly crusty heater controls are a bit less of a biohazard now.
Much better.
You can see the difference in the surface compared to the glove compartment lid. The glove compartment isn't fully closed there by the way, that's why the lid is sitting at an angle.
Have another gratuitous Trevi dash warning light photo just because the design is so unique.
These are actually frosted plastic lenses rather than the silk screened plastic film that is normally used on instrument panels etc.
They're all completely separate with the exception of the sidelights/main beam indicator which has two butted up next to each other using half of a circle (because what other shape would it be in this interior?!).
Of course the real question was whether once I had bolted and screwed everything back together all the lights would still work.
Drumroll please...
I'll take that!
Here's a wider shot with the ignition on so you can get the clock in shot as well.
Really need to have a play around with the camera settings to see if I can get things like warnings lights to stop washing out so much. Also obviously still need to address the bulb failure warning which also brings on the Big Red Light of Doom.
That's probably the most accurate representation of how brightly the gauges are lit and the colour at least.
Would be rude not to get some close ups wouldn't it?
Right to left...
Sorry this one is a bit out of focus.
Even the power window switches are properly lit now...I've not dared try the actual windows though. That has the potential for letting myself into a world of pain I can do without.
It really bugs me these are lit white when everything else in the car is green.
Tomorrow's to do list.
[] Tail light bulb replacement & ground chasing.
[] Vactan.
[] Coolant flush. Looks like we may need to re-seal the neck on the expansion bottle too - though given the state of the radiator I'm tempted to leave this be for now. I'd rather have the system bleeding a bit of pressure off here than blowing the equalising line stub out of the radiator...
[] See if I can figure out why the rear fog lights don't work...Obvious candidate is the fuse box, given I've had to poke things in it half a dozen times so far. Including to get the indicator on the dash for the sidelights to work...After I'd had the bulb out and checked it three times.
[] Interior cleanup.
Current fleet:
07 Volvo V70 SE D5, 85 Sinclair C5, 84 Trabant 601S, 73 AC Model 70, 62 Rover 110.
07 Volvo V70 SE D5, 85 Sinclair C5, 84 Trabant 601S, 73 AC Model 70, 62 Rover 110.
-
CitroJim
- A very naughty boy
- Posts: 54543
- Joined: 30 Apr 2005, 23:33
- x 8078
Re: Zel's Fleet Blog - Xantia Activa, Jag XJ-S, Sinclair C5, Mercedes 208D, AC Model 70.
Just one word Zel.... Awesome 

Jim
A bit of a Citroen AX fan...
A bit of a Citroen AX fan...
-
NewcastleFalcon
- Posts: 26399
- Joined: 25 Feb 2009, 10:40
- x 7162
Re: Zel's Fleet Blog - Xantia Activa, Jag XJ-S, Sinclair C5, Mercedes 208D, AC Model 70.
Or as Sid Waddell the darts commentator might put it
"Theres only one word for it......World Class Darts Fettling"
I am getting the impression that you are enjoying it
Regards Neil
"Theres only one word for it......World Class Darts Fettling"
I am getting the impression that you are enjoying it
Regards Neil
Only One AA Box left
687 Trinity, Jersey
687 Trinity, Jersey
-
Zelandeth
- Donor 2024
- Posts: 5260
- Joined: 16 Nov 2014, 23:36
- x 1580
Re: Zel's Fleet Blog - Xantia Activa, Jag XJ-S, Sinclair C5, Mercedes 208D, AC Model 70.
Yesterday I had forgotten to mention it, but the Invacar ticked over a bit of a milestone.

That's the first time the thousands indicator has moved in my ownership, and means that somewhere in the region of 700 miles covered. The rate of which has definitely increased in the last month...won't be long until I've covered the big 1K.
Seems to be a week for it as the van also rolled over a thousand less than 24 hours later.

Though that's less of a major deal as it's in regular use! Just amused me to see them both tick over a thousand so close together.
While I didn't want to get too find myself vanishing too deeply down the rabbit hole of poking the carb on the Lancia, as we had some idea what was going on now it would be nice to see if we could get it to run a bit better. There were a couple of things worth checking at least.
Firstly was seeing if we could make the solenoid stay retracted despite the coil being dead.

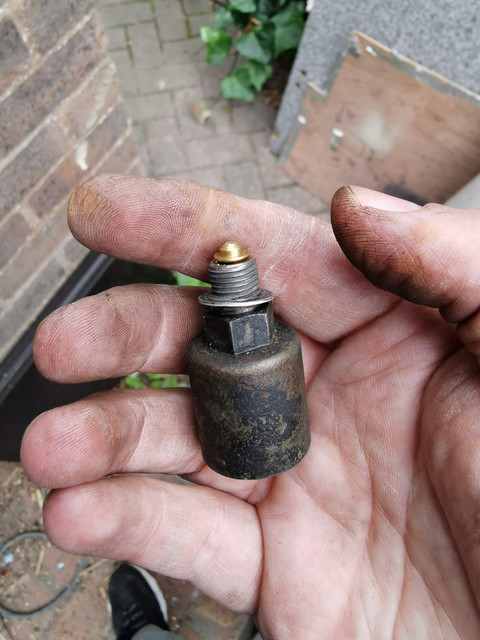
That'll work! Yes...That is an old hard drive head actuator magnet stuck to the back of the case. As a new solenoid is £50 odd, we wanted to do a bit of proving to find if the carb was totally shot before throwing more money at it. To make it a bit less unwieldy I snipped the electrical connector off...The coil is dead so there's no reason to keep it around.
With this reinstalled (you can clearly hear the solenoid clicking when the magnet is placed or removed so we know it is in the open position)...It made absolutely zero difference. Still no fuel getting through the idle circuit. This can be confirmed as when you fully seat the idle fuel screw (which under normal circumstances would stall the engine), absolutely nothing happens. So the engine is obviously managing to just about run on the dregs it's pulling through from the main jet(s).
The drilling this solenoid closes off has a reputation for getting clogged on these carbs. It's a completely blind passage so there's no way to physically rod out any debris and as it's actually the lowest point in the entire casting gunge tends to want to accumulate there. In the absence of compressed air (and having the jets out so I'm not just shuffling gunk around in the carb), I took the solenoid back out and absolutely blasted it with carb cleaner. I wasn't really expecting this to do anything - and absolutely not expecting any change there was to last as and crud is still in there somewhere.
Still a bit lumpy on natural idle - but things had been set up very quickly here (as all the carb adjustments were unsurprisingly COMPLETELY out of place), and I still couldn't get the idle mixture to anywhere near as rich as it should be...but that's hugely better. For reference, this is what we started with.
I went for a very brief test run...Oh my word...What a transformation. She pulled smoothly and strongly right through the rev band, though really coming alive at the top end as you'd expect for a Lancia Twin Cam. Suddenly the highly scruffy appearance felt totally at odds with how the car felt. She's smooth, she's quiet and while I only went round a couple of roundabouts, feels really nimble. The only issue I noted was that the speedometer was clicking...have to guess I've not seated the cable quite right. Giving it a bit of a wiggle from the engine bay side I heard a "clunk" and next time out it was no longer working. That will have been the cable dropping off then. Not the end of the world as it's only ten minutes work to get the dash back out, and that's why I hadn't refitted any of the blanking plugs over the screws yet. I'm not a complete rookie!
Unfortunately before I got the camera set up for a recorded test run (as I'd loved to have been able to show the owner the difference) the idle circuit clogged back up again.
I had a think at this point and a look at it. The only hassle about getting the carb off generally would be the need to break into the cooling system due to the automatic choke...but I want to flush the cooling system anyway so that's a non issue. Beyond that it's four nuts and a clip for the throttle linkage, and I've already got fluid in the ultrasonic cleaner for another job.
Fine...I'll pull the carb tomorrow, strip it down and leave it to stew in the ultrasonic cleaner for a while. It's a bit more work...but if I could hand the car back actually running nicely it would be a huge boost for us both I think.
Speaking of the ultrasonic cleaner, that currently has another Invacar carb stewing in it as the initial clean we did on that didn't seem to fully clear the idle circuit...Given the amount of crud we found packed into the idle jet this isn't a huge surprise as we reckon a bunch more scale came off within the passages after we cleaned the first lot out.
I decided that I couldn't in good conscience leave the manky looking bit of original fuel line and the missing fuel hose clips on the return line as they were. Just too big a safety issue, so I popped out and picked up some 8mm fuel hose and some hose clips. I needed to disturb this line anyway to install a fuel filter so it would have been plain idiotic not to replace it.

Much better. The old hose was...shall we say, "past its best."


It basically just fell off once I had taken about a quarter of a turn off the hose clips. One of which wasn't a proper fuel hose fitting either. It's a bit disappointing that the garage who did a fair bit of the recommissioning work on this car felt it was appropriate to leave that hose in place - especially as the replaced the one on the other side of the pump! I know they wouldn't be wanting to look for more jobs to do...but an additional ten minutes of work wouldn't really have been the end of the world after a bunch of welding, rebuilding 3/4 of the braking system etc...Granted this is the same garage who fitted this carb, so make of that what you will.
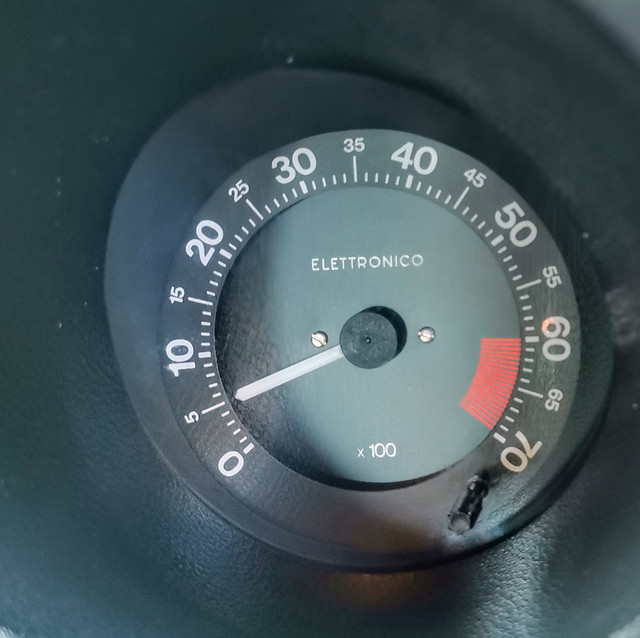
The last thing I wanted to check (this has been written a bit out of order - the fuel hose change was actually the first job I tackled today) while I had the engine running was running temperature as I didn't like the way that the fan kicked in after about 15 minutes and then stays running until a couple of minutes after the engine stops. The gauge sits just north of 1/2, showing about 80C...a look at the metal line running to the top radiator hose however shows things to be a bit warmer...

That's not quite in the red...but is pretty much sitting on the boundary of it. Definitely a good 3/4 on the gauge and is a lot warmer than I'd like to see. It doesn't feel like the radiator is rejecting a huge amount of heat either, so this will be a good baseline to compare to after I've given everything a really good flush tomorrow - though the radiator will be getting replaced as a matter of some urgency once a replacement has been sourced. I know a load of scale and gunk has probably just been released into the system as of yesterday anyway as the heater circuit was dead until then as the heater valve is vacuum operated, and the control system didn't have a vacuum supply until I reconnected it...so all the more reason to flush it.
This job has grown arms and legs a bit...but it will be worth it in the end I think, especially having had a brief glimpse of what a lovely driving car this has the potential to be.
It's not hard to see why despite their tendency to be somewhat fragile that Lancias do have such a loyal following. Just a shame the Trevi was always seen as something of an ugly duckling in the range and as such so few have survived. So many died an early death as cheap donors of a 2 litre Lancia TC engine for kit cars, Fiat/Lada upgrades and the like in the 90s.
That five minute drive today has definitely made me have one of those "Oh, *that's* what people meant when they said they feel special..." moments.
That's the first time the thousands indicator has moved in my ownership, and means that somewhere in the region of 700 miles covered. The rate of which has definitely increased in the last month...won't be long until I've covered the big 1K.
Seems to be a week for it as the van also rolled over a thousand less than 24 hours later.
Though that's less of a major deal as it's in regular use! Just amused me to see them both tick over a thousand so close together.
While I didn't want to get too find myself vanishing too deeply down the rabbit hole of poking the carb on the Lancia, as we had some idea what was going on now it would be nice to see if we could get it to run a bit better. There were a couple of things worth checking at least.
Firstly was seeing if we could make the solenoid stay retracted despite the coil being dead.
That'll work! Yes...That is an old hard drive head actuator magnet stuck to the back of the case. As a new solenoid is £50 odd, we wanted to do a bit of proving to find if the carb was totally shot before throwing more money at it. To make it a bit less unwieldy I snipped the electrical connector off...The coil is dead so there's no reason to keep it around.
With this reinstalled (you can clearly hear the solenoid clicking when the magnet is placed or removed so we know it is in the open position)...It made absolutely zero difference. Still no fuel getting through the idle circuit. This can be confirmed as when you fully seat the idle fuel screw (which under normal circumstances would stall the engine), absolutely nothing happens. So the engine is obviously managing to just about run on the dregs it's pulling through from the main jet(s).
The drilling this solenoid closes off has a reputation for getting clogged on these carbs. It's a completely blind passage so there's no way to physically rod out any debris and as it's actually the lowest point in the entire casting gunge tends to want to accumulate there. In the absence of compressed air (and having the jets out so I'm not just shuffling gunk around in the carb), I took the solenoid back out and absolutely blasted it with carb cleaner. I wasn't really expecting this to do anything - and absolutely not expecting any change there was to last as and crud is still in there somewhere.
Still a bit lumpy on natural idle - but things had been set up very quickly here (as all the carb adjustments were unsurprisingly COMPLETELY out of place), and I still couldn't get the idle mixture to anywhere near as rich as it should be...but that's hugely better. For reference, this is what we started with.
I went for a very brief test run...Oh my word...What a transformation. She pulled smoothly and strongly right through the rev band, though really coming alive at the top end as you'd expect for a Lancia Twin Cam. Suddenly the highly scruffy appearance felt totally at odds with how the car felt. She's smooth, she's quiet and while I only went round a couple of roundabouts, feels really nimble. The only issue I noted was that the speedometer was clicking...have to guess I've not seated the cable quite right. Giving it a bit of a wiggle from the engine bay side I heard a "clunk" and next time out it was no longer working. That will have been the cable dropping off then. Not the end of the world as it's only ten minutes work to get the dash back out, and that's why I hadn't refitted any of the blanking plugs over the screws yet. I'm not a complete rookie!
Unfortunately before I got the camera set up for a recorded test run (as I'd loved to have been able to show the owner the difference) the idle circuit clogged back up again.
I had a think at this point and a look at it. The only hassle about getting the carb off generally would be the need to break into the cooling system due to the automatic choke...but I want to flush the cooling system anyway so that's a non issue. Beyond that it's four nuts and a clip for the throttle linkage, and I've already got fluid in the ultrasonic cleaner for another job.
Fine...I'll pull the carb tomorrow, strip it down and leave it to stew in the ultrasonic cleaner for a while. It's a bit more work...but if I could hand the car back actually running nicely it would be a huge boost for us both I think.
Speaking of the ultrasonic cleaner, that currently has another Invacar carb stewing in it as the initial clean we did on that didn't seem to fully clear the idle circuit...Given the amount of crud we found packed into the idle jet this isn't a huge surprise as we reckon a bunch more scale came off within the passages after we cleaned the first lot out.
I decided that I couldn't in good conscience leave the manky looking bit of original fuel line and the missing fuel hose clips on the return line as they were. Just too big a safety issue, so I popped out and picked up some 8mm fuel hose and some hose clips. I needed to disturb this line anyway to install a fuel filter so it would have been plain idiotic not to replace it.
Much better. The old hose was...shall we say, "past its best."
It basically just fell off once I had taken about a quarter of a turn off the hose clips. One of which wasn't a proper fuel hose fitting either. It's a bit disappointing that the garage who did a fair bit of the recommissioning work on this car felt it was appropriate to leave that hose in place - especially as the replaced the one on the other side of the pump! I know they wouldn't be wanting to look for more jobs to do...but an additional ten minutes of work wouldn't really have been the end of the world after a bunch of welding, rebuilding 3/4 of the braking system etc...Granted this is the same garage who fitted this carb, so make of that what you will.
The last thing I wanted to check (this has been written a bit out of order - the fuel hose change was actually the first job I tackled today) while I had the engine running was running temperature as I didn't like the way that the fan kicked in after about 15 minutes and then stays running until a couple of minutes after the engine stops. The gauge sits just north of 1/2, showing about 80C...a look at the metal line running to the top radiator hose however shows things to be a bit warmer...
That's not quite in the red...but is pretty much sitting on the boundary of it. Definitely a good 3/4 on the gauge and is a lot warmer than I'd like to see. It doesn't feel like the radiator is rejecting a huge amount of heat either, so this will be a good baseline to compare to after I've given everything a really good flush tomorrow - though the radiator will be getting replaced as a matter of some urgency once a replacement has been sourced. I know a load of scale and gunk has probably just been released into the system as of yesterday anyway as the heater circuit was dead until then as the heater valve is vacuum operated, and the control system didn't have a vacuum supply until I reconnected it...so all the more reason to flush it.
This job has grown arms and legs a bit...but it will be worth it in the end I think, especially having had a brief glimpse of what a lovely driving car this has the potential to be.
It's not hard to see why despite their tendency to be somewhat fragile that Lancias do have such a loyal following. Just a shame the Trevi was always seen as something of an ugly duckling in the range and as such so few have survived. So many died an early death as cheap donors of a 2 litre Lancia TC engine for kit cars, Fiat/Lada upgrades and the like in the 90s.
That five minute drive today has definitely made me have one of those "Oh, *that's* what people meant when they said they feel special..." moments.
Current fleet:
07 Volvo V70 SE D5, 85 Sinclair C5, 84 Trabant 601S, 73 AC Model 70, 62 Rover 110.
07 Volvo V70 SE D5, 85 Sinclair C5, 84 Trabant 601S, 73 AC Model 70, 62 Rover 110.
-
Michel
Re: Zel's Fleet Blog - Xantia Activa, Jag XJ-S, Sinclair C5, Mercedes 208D, AC Model 70.
I hate that Trevi dash, it’s chaotic!
It also looks f@&king awesome.
#confused
It also looks f@&king awesome.
#confused

-
myglaren
- Forum Admin Team
- Posts: 28430
- Joined: 02 Mar 2008, 13:30
- x 5579
Re: Zel's Fleet Blog - Xantia Activa, Jag XJ-S, Sinclair C5, Mercedes 208D, AC Model 70.
The awesome part takes precedence.
Excellent bodge with the HD magnet. I have dozens of them pressed into many uses. One right in front of me holding a scalpel to the underside of a glass shelf, where it is perfectly visible, otherwise I would be scratting around on the shelf and doing a bit if impromptu autosurgery.
Excellent bodge with the HD magnet. I have dozens of them pressed into many uses. One right in front of me holding a scalpel to the underside of a glass shelf, where it is perfectly visible, otherwise I would be scratting around on the shelf and doing a bit if impromptu autosurgery.
-
Zelandeth
- Donor 2024
- Posts: 5260
- Joined: 16 Nov 2014, 23:36
- x 1580
Re: Zel's Fleet Blog - Xantia Activa, Jag XJ-S, Sinclair C5, Mercedes 208D, AC Model 70.
My first reaction when I set eyes on it was wondering what the designer had been smoking when they came up with it and how what was plainly a part of a concept car designed to capture the interest of the press and public at a major show had escaped into the retail market.Michel wrote: 11 Sep 2020, 07:50 I hate that Trevi dash, it’s chaotic!
It also looks f@&king awesome.
#confused
Despite looking utterly mental it actually works astonishingly well from the driver's seat. Not so much the passenger's seat though, they're basically completely cut off from any information about what's going on...
Current fleet:
07 Volvo V70 SE D5, 85 Sinclair C5, 84 Trabant 601S, 73 AC Model 70, 62 Rover 110.
07 Volvo V70 SE D5, 85 Sinclair C5, 84 Trabant 601S, 73 AC Model 70, 62 Rover 110.
-
Michel
Re: Zel's Fleet Blog - Xantia Activa, Jag XJ-S, Sinclair C5, Mercedes 208D, AC Model 70.
I drove a reasonably modern Alfa a few years ago with a similar, but not quite as extreme design and it was rather pleasing to use despite looking like it wouldn’t be!
-
NewcastleFalcon
- Posts: 26399
- Joined: 25 Feb 2009, 10:40
- x 7162
Re: Zel's Fleet Blog - Xantia Activa, Jag XJ-S, Sinclair C5, Mercedes 208D, AC Model 70.
Not very common the Trevi Zel, so I wouldnt be surprised if this is the one you are currently working on.
Sold for £250 at South West Vehicle Auctions (SWVA at Poole) 28 July, 2017
Sold for £250 at South West Vehicle Auctions (SWVA at Poole) 28 July, 2017
Regard NeilDetails Here https://swva.co.uk/classic-car/lancia-trevi-1983/
The current owner has had this vehicle for a period of 17 years. It has been to various motor shows to include Earls Court, NEC and tour day trips to the Trevi fountains rally with Lancia at St Peter’s, Italy.
This car is very rare and the current owner believes that there are only 2 remaining in this country. It has full service history, all the old MOT certificates and tax discs. It has had a new water pump replacement, timing belt and all receipts are available to be viewed.
It has been in dry storage for the past 15 years but needs some TLC saying this the current owner believes the vehicle to be very solid and all the electrics are in working order.
Auctioneers notes: All Lancias are great fun to drive and this is 1 of only 2 left.
Only One AA Box left
687 Trinity, Jersey
687 Trinity, Jersey
-
Zelandeth
- Donor 2024
- Posts: 5260
- Joined: 16 Nov 2014, 23:36
- x 1580
Re: Zel's Fleet Blog - Xantia Activa, Jag XJ-S, Sinclair C5, Mercedes 208D, AC Model 70.
That's the very one! Just a shame they held on to the twin carb setup when they sold it.NewcastleFalcon wrote: 11 Sep 2020, 18:07 Not very common the Trevi Zel, so I wouldnt be surprised if this is the one you are currently working on.
Sold for £250 at South West Vehicle Auctions (SWVA at Poole) 28 July, 2017
Regard NeilDetails Here https://swva.co.uk/classic-car/lancia-trevi-1983/
The current owner has had this vehicle for a period of 17 years. It has been to various motor shows to include Earls Court, NEC and tour day trips to the Trevi fountains rally with Lancia at St Peter’s, Italy.
This car is very rare and the current owner believes that there are only 2 remaining in this country. It has full service history, all the old MOT certificates and tax discs. It has had a new water pump replacement, timing belt and all receipts are available to be viewed.
It has been in dry storage for the past 15 years but needs some TLC saying this the current owner believes the vehicle to be very solid and all the electrics are in working order.
Auctioneers notes: All Lancias are great fun to drive and this is 1 of only 2 left.
Despite the somewhat frilly body, it is actually astonishingly solid underneath...Given there are even rust holes in the roof I was expecting to find a network of patches held together by some car, but no...it's had a few repairs over the years, but isn't bad at all!
Tragic they're so rare now.
I do note in the auction photos that they have carefully framed the photos to not show the holes in the driver's seat or the timber offcut used to hold the bonnet open!
-- -- --
First task for today was to reassemble the Invacar carb which has been in for a second cleaning session so it can be returned to its home tomorrow.
I can't seem to shift a lot of the discolouration. I know that this car was parked right next to a shed that burned down, so I'm not sure if some of it is something to do with that. Internally though it wasn't bad. The main difference between this and last time I rebuilt it though was that this time around I was able to utilise a serviceable secondhand gasket rather than having to make my own. Some of the passages in this gasket are tiny so I'm not 100% certain my one was up to the job really.
Fingers crossed once this is refitted it will get that car back up and running properly.
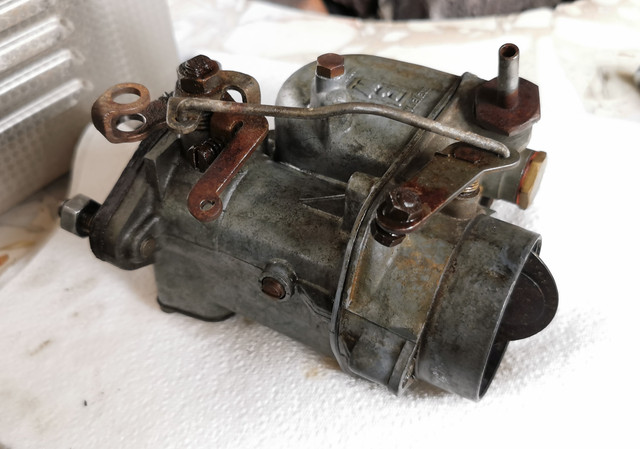
Back in the world of Trevi the first thing I wanted to do today was to pull the carb and dump it in the ultrasonic cleaner. While dismantling it became apparent that the line from the carb to the distributor advance unit was just starting to perish so I put a new hose on there in the interests of long term reliability.

For the sake of the cost of a tiny bit of hose it just seemed silly not to change it while I was in the area.
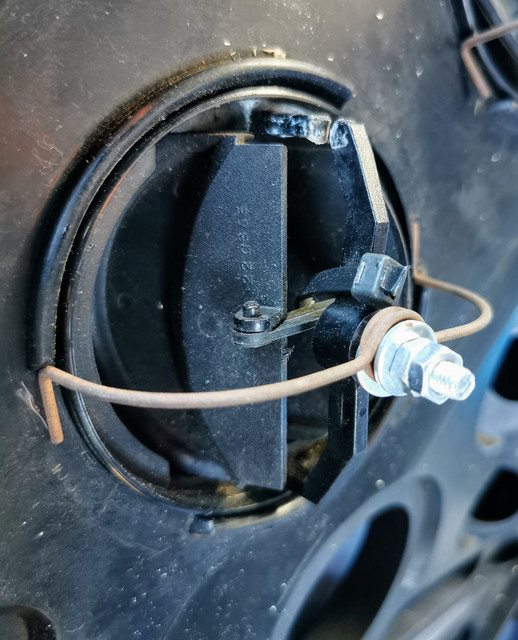
The solenoid was something I had a bit of a think about. The magnet was fine for a test, but I had visions of it falling off while driving so would rather come up with a less precarious solution to tide us over until a replacement solenoid could be sourced. My eventual solution? Wedge a bit of card down beside the armature so it stays retracted on its own. It can still be removed with a good pull but hopefully will stay put for now.
Once the carb was off it became immediately apparent that dumping it in the ultrasonic cleaner really wasn't going to be necessary. While the outside is a bit grubby everything inside was spotless. So I settled for removing all the jets/emulsion tubes and the idle fuel screw and blowing all the passages through and reassembling. Someone has obviously been in here before as the gasket appears to be made of something halfway between card and newspaper...So a new gasket definitely wouldn't go amiss as air leaks around the top plate definitely could be an issue.
That's an easy job to do later with the carb in situ though, so it was put back together for now.
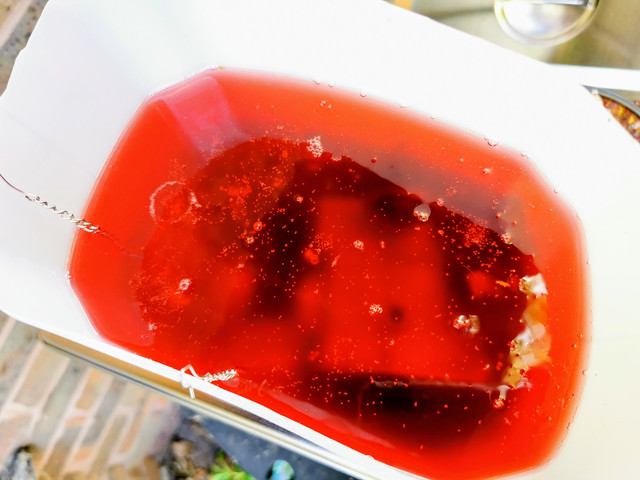
Next up was a coolant flush which I knew was rather urgently needed. Quite HOW desperately needed became apparent once I started draining the coolant. Rust soup anyone?
Yes, this is completely opaque and as neon orange as it looks.

I've split the bottom hose from where it attaches to the thermostat housing as the actual bottom hose connection on the radiator is almost entirely inaccessible without removing it from the car. Given we know the radiator is clinging to life by pretty much entirely by willpower alone at this point I wasn't going to go to lengths like that nor get too aggressive with it.
Given the poor access and the sheer number of things the water was bouncing off on the way out of the engine bay (the hose being directly above the front crossmember doesn't help for one things) it was no huge surprise that my attempts to capture the escaping coolant were about as successful as expected.

That hose shifted about ten seconds later when I wasn't looking and dumped an order of magnitude more water everywhere. This better shows how opaque the coolant was!

It's almost entirely just rust and water though, there's no sign of any antifreeze I can detect, so I sighed, shrugged and just made a point of thoroughly rinsing down the area afterwards to ensure that anything was sufficiently diluted to eliminate any risks to cats etc. This doesn't smell sweet like older antifreeze though - no, think "rank, stagnant pond water" in this case.
This is what was left in the (couple of week old) expansion tank after it was drained.

Yes that is about 1/8" of rusty slime.
After about an hour of hosing, poking, shaking, spraying myself in the face etc, we did get clean water running through everywhere.

Things were put back together...

The system refilled...

Then started up - and I spent five minutes simultaneously juggling getting the carb dialled in and feeding coolant in as the air burped its way out of the system. No prizes for guessing what the coolant looked like after about 30 seconds.

This cooling system is going to need some real time spent on it to flush all this gunk out. That's definitely a task for *after* there is a new radiator sitting next to the car waiting to be fitted though. I suspect if you flush all the crud out of this one it would probably disappear. Given the sheer amount of it in here I'd probably go for the dishwasher tab route here...but absolutely not until we've got a new radiator on standby!
To give some idea how much sediment I flushed out, here's the drive before I went after it with the hose to rinse it down - The water has all gone by this point. It's about 1/4" deep at the left hand side of the frame by the garage door. That's a lot of slime.
Oh, my OCD wouldn't let me leave the fuel lines as they were routed yesterday once I spotted where it looked like the little rubber bracket/guide seems like it's meant to live so I went back in and tidied that up. Gave me an opportunity to sort the alternator belt tension as well as that was really loose.

This little car really must not know what's happening to it right now!
Just hoping she's grateful for the attention rather than spiteful to have had the quiet slumber where she was slowly dissolving back to nature disturbed...
Either way I've enjoyed doing this work immensely (even if I was swearing at whoever decided where to position the thermostat and radiator bottom hose this afternoon!).
Current fleet:
07 Volvo V70 SE D5, 85 Sinclair C5, 84 Trabant 601S, 73 AC Model 70, 62 Rover 110.
07 Volvo V70 SE D5, 85 Sinclair C5, 84 Trabant 601S, 73 AC Model 70, 62 Rover 110.