The hose comes in a couple of sections, this is the top section (Part number 6439J1 or N4). I went for this one which is 6439L2. It's supposedly meant for the Chinese facelifts but it fits well enough. The pipe that reaches the far nozzle is longer than stock, but I just shoved the excess in one of the bonnet holes under the sound deadening. The bit that also goes into the bowels of the car is also longer, but I shoved the excess down there as well.
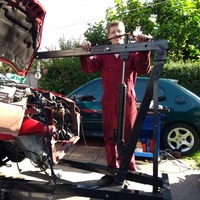
Unfortunately, I was too busy suffering and raging to take photos. So, the two that I did take paired with my shoddy explanation will have to suffice.
There's two ways to do this. One (the proper way) is to remove the scuttle plate (or part of it) and potentially the wiper motor. The other (if you can't get the wiper arm off) is to pull back the wheel arch liner. I was actually meant to be replacing my whole scuttle plate today, but the wiper arms had other plans for me (I'll have to nick some penetrating grease from work next week).
The proper way:
1 - Open the bonnet.
2 - The windscreen should have indicators for wiper alignment. Check yours, if you don't have the marks, use some masking tape to mark the position of the wiper.
3 - Use a 16mm socket to undo the nut on the wiper arm.
4 - Pull the wiper arm off. On a good day these should come right off. Chances are the car's not going to play nice. You might be able to use a wiper puller tool, but that failed in my case. My next try will involve penetrating grease and/or WD40. If you can't get your arm off, tighten the nut back on to 24 Nm and scroll down to the instructions for the other method.
5 - Remove the foam insulation bit at the end of the scuttle plate. Note there is a pin holding it on on the wing-side. The rest of it is just friction mounted.
6 - Gently unclip the scuttle plate by pulling it up towards the sky. There should be about 3 big clips "above" the hole for the wiper spindle.
7 - Now visually follow the washer hose into the bowels of the car and shine a bright torch into it to see where it goes. You should see it eventually reach a right-angled quick release joint. That's where you're ultimately going.
8 - I never got to this stage, so I don't know if it'll help but you can unscrew the wiper motor from its mounts (I don't know which size of bit you'd need).
9 - Hopefully you can now get your hand down there and unclip the joint. To unclip it, twist the little black clip around. These clips can also be found going to the nozzles on the bonnet. It's easier to see the one on the far nozzle if you want a practice run.
10 - Once released, start to extract the old pipe. Note, it is clipped to the inside of the front wing. Before you go any further, go back to the underside of the bonnet. There should be a ring clip mounting the pipe to the bonnet and the sound deadening right after the Y-junction. If you look closely, you'll see that the ring can be opened from one side with a flathead screwdriver. This is the exact same clip holding the pipe to the wing. If you're lucky, the opening side will be accessible to you. Just open it and release the pipe. If not, you'll have to use brute force to break the clip and then rip out its remains to free the hole.
11 - Now you should be at the bonnet hinge. The plastic cover is held in by a pair of plastic T30 (off the top of my head) screws. These screws each have a plastic grommet of some kind, watch you don't lose them when you pull the screws out as they fall out very easily.
12 - There's another ring clip in that plastic trim you need to release the pipe from.
13 - Release the rectangular bracket thing, it has a a clip on either side of the pipe. Some brute force and a spudger might be necessary.
14 - Now just follow the pipe to the two quick release joints before each nozzle. My new pipe had iffy joints, so I had to reuse the original ones. If you're going to pull the old joints out, release them from the nozzles and then pull what's left on the pipe. If you pull them from both sides without releasing them you'll actually pull out the nozzle valves too. This isn't an issue, just pay attention to orientation when putting them back in. Grey-ish goes to pipe, black goes to nozzle. If somehow you've released the joint and pulled the valve, you'll have a bit of trial and error ahead of you.
15 - The old pipe should now be out.
16 - Fit the new pipe, the rectangular bracket and ring clips were in the wrong positions on mine and I had to adjust them.
17 - First clip the nozzle joints and run the pipe until you reach the rectangular bracket (fit the bracket). You'll have to shove the excess pipe going to the far nozzle in one of the holes in the bonnet under the sound deadening.
18 - Fit the joint in the bowels of the car. You'll have excess pipe, leave it for now.
19 - Fit the pipe into the hinge trim, it might take several attempts to get the position right. Make sure there isn't excess tension in the section of pipe between the hinge trim and rectangular bracket.
20 - Screw the bracket back in, don't forget the grommets.
21 - If you removed it, refit the wiper motor. The screws should be tightened to 8 Nm.
22 - Now shove the excess pipe down into the car and fit the ring clip on the wing. Make sure you don't have it near the wiper spindle as it could tangle in the wiper or experience rubbing which will lead to early failure.
23 - Clip the scuttle plate back down and refit the foam bit.
24 - Refit the the wiper arm, note the alignment. Tighten the nut to 24 Nm.
25 - Close the bonnet, turn the engine over and see if the washers work.
The hard way (if you can't get the wiper off):
1 - Turn the engine over and set the steering to full-lock left
2 - If you have H3+, get the car into lift stage 2. If not, you may need to remove the front right wheel.
3 - Kill the engine and open the bonnet.
4 - Pull back the rear section of the wheel arch liner. At the very bottom (towards the outside) you'll find two T20 (off the top of my head) screws. Further in and up you'll find a plastic 11mm (off the top of my head) hex nut and a little further up another such nut. Finally directly in front of you in the arch you'll find a clip with a pull centre (like the ones under the bonnet near the light clusters) and the same clip at the apex of the arch towards the outside of the wing. Remove the two screws, two nuts and two clips. Note you'll probably want to use some goggles that seal around your eyes if you have them. There's loads of very fine soil / dust stored up there. I found that out the hard way.
7 - Release the joint. To unclip it, twist the little black clip around (which you'll only be able to feel). These clips can also be found going to the nozzles on the bonnet. It's easier to see the one on the far nozzle if you want a practice run.
8 - Remove the foam insulation bit at the end of the scuttle plate. Note there is a pin holding it on on the wing-side. The rest of it is just friction mounted.
9 - Gently unclip as much of the scuttle plate as possible in that corner without removing the wiper arm by pulling it up towards the sky. There should be about 3 big clips "above" the hole for the wiper spindle.
10 - Now under the bit you just unclipped, feel around for the pipe. You should feel that it's mounted to the wing by a ring clip. There should be an identical clip mounting the pipe to the bonnet and the sound deadening right after the Y-junction. If you look closely, you'll see that the ring can be opened from one side with a flathead screwdriver. This is the exact same clip holding the pipe to the wing. If you're lucky, the opening side will be accessible to you. Just open it and release the pipe. If not, read on.
11 - There's two ways to remove the clip. You can try and stick your hand up in the wheel arch if it's small enough to release it from the inside. Or you can use brute force to rip it out by pulling the pipe. I used brute force and the base of the clip was left in the car. I actually had to chisel it off which in itself meant I had to deliberately break part of the scuttle plate (I was fine doing this as I want to replace the whole plate). You might not have the space to pull the remains of the clip out. If that's the case, just leave it there, it's not the end of the world.
12 - You should be able to pull the pipe out of the bowels of the car.
13 - Now you're at the bonnet hinge. The plastic cover is held in by a pair of plastic T30 (off the top of my head) screws. These screws each have a plastic grommet of some kind, watch you don't lose them when you pull the screws out as they fall out very easily.
14 - There's another ring clip in that plastic trim you need to release the pipe from.
15 - Release the rectangular bracket thing, it has a a clip on either side of the pipe. Some brute force and a spudger might be necessary.
16 - Now just follow the pipe to the two quick release joints before each nozzle. My new pipe had iffy joints, so I had to reuse the original ones. If you're going to pull the old joints out, release them from the nozzles and then pull what's left on the pipe. If you pull them from both sides without releasing them you'll actually pull out the nozzle valves too. This isn't an issue, just pay attention to orientation when putting them back in. Grey-ish goes to pipe, black goes to nozzle. If somehow you've released the joint and pulled the valve, you'll have a bit of trial and error ahead of you.
17 - The old pipe should now be out. To make life less-hard, pull the right-angled joint (the one you unclipped blindly) from the end of the old pipe and replace it with the straight one on the end of the new pipe.
18 - Fit the new pipe, the rectangular bracket and ring clips were in the wrong positions on mine and I had to adjust them.
19 - First clip the nozzle joints and run the pipe until you reach the rectangular bracket (fit the bracket). You'll have to shove the excess pipe going to the far nozzle in one of the holes in the bonnet under the sound deadening.
20 - Fit the joint in the bowels of the car. You'll have to surrender your fingers to the car and use the force again. Feed the pipe (with the joint clip released) from the top and feel for it at the bottom. When you finally get the joint on, make sure it's as far down as possible before you close the clip again. You'll have excess pipe, leave it for now.
21 - Fit the pipe into the hinge trim, it might take several attempts to get the position right. Make sure there isn't excess tension in the section of pipe between the hinge trim and rectangular bracket.
22 - Screw the bracket back in, don't forget the grommets.
23 - Now shove the excess pipe down into the car. Make sure you don't have it near the wiper spindle as it could tangle in the wiper or experience rubbing which will lead to early failure. If you managed to extract the ring clip from the wing, fit the new one. If not, you'll have a ring clip flapping around or you could just take it off the pipe.
24 - Clip the scuttle plate back down, refit the foam bit and close the bonnet.
25 - Refit the arch liner. Tighten the screws and nuts and fit the clips back on. Screw and nut torque isn't specified, so just be sensible.
26 - If you removed the wheel, refit it and tighten the bolts to 100 Nm.
27 - Turn the engine over and straighten your steering. Lower the car to normal position if you have H3+.
28 - See if the washers work.