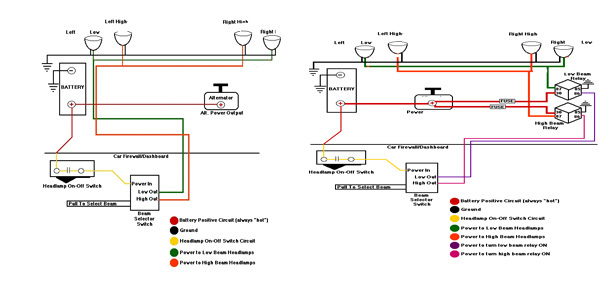
I have spent ages looking back through the old posts on this subject and i seem to recall that there was a relay mod to help with the voltage to the bulbs but cannot find it.
However i have spent the last few weeks driving the C5 and whilst i am not 100% happy with the headlights on it, the Xantia in comparison has candles for main beam
I have seen and remember some posts about cleaning the reflector but to be careful to not scratch the coating and i cannot find any new old stock parts anywhere.
I cannot upgrade to HID so the best option i can see are NightBreaker bulbs unless anyone has a better suggestion.
I know the windscreen needs to be replaced, it also is 20 years old and has lots of scratches etc and am looking into getting it replaced on the insurance but looking for a dry couple of days to plan it
It is the one issue that really bugs me with the Xantia, it is my daily driver and i have to be at work anytime from 4am onwards and can finish anytime so this time of year its going to and from work in the dark lol
If you've got the time, remove the headlight units, and drill a hole or two in the base, feed a wire in with a male spade connector and insert it into the connector that goes to the back of the bulb. Wire the other end to the +ve switch terminal of a relay.
Take a new new feed from the battery with an inline fuse to the relay and then from the relay into the headlight unit to the bulb.
Make an earth from the -ve switch terminal of the relay.
Now, for the other headlight, you can either do the same again, or just take another feed from the relay.
If you don't fancy removing the headlamps, you can cut back the sheath on the wires to the multiplug on the back of the headlight, then cut the orange wire closest to the passenger side making sure it's the one to the dipped bulb, splice in your relay from there, which is what I did, using a pukka relay holder in the fuse box.
This (from 2011) was/is a good, quick and informatve test... viewtopic.php?p=292898#p292898
to check out the potential gain from the relay mod.
The other bonus of a relay mod (for dipped or main beams, or both) is that it takes a high current load off the lighting/dip switch, which will prolong its life.
Worth checking, on PSA vehicles, whether headlight beam(s) are already fitted with a relay. Some, eg XM, have a relay for dip beam, but not one for main, which is odd.
Both Osram Nightbreaker and Philips X-treme - white versions - have had good reviews on our cars, especially on Xantia and XM where dip beam is a tad underwhelming. Bulb life comments seem to vary: some report shorter than standard bulbs (whatever they might be), others find no appreciable difference.
As well as relays (which should be installed reasonably close to the headlights), a good idea to be a bit more generous with the wiring size from battery to relay to bulbs. Suggest 1.5mm² stranded minimum, or 2.5mm² if supplying more than one bulb. Relays should be 12v coil, 30A or 40A rating.
Thankyou gentlemen for the replies, as you are probably well aware by now, electrics and myself are not best of friends, so this is going to take more than a few questions
I think i have the correct relays in stock, i believe they are the same as the 5 pin ones i bought for the triple relay fan layout
Link to the relays i have is Here
I have done a bit of digging on the web and think that This Cable will do the job.
Another question how close to the bulbs do the relays need to be, can i mount them near the engine fuse box or should i mount them closer ?
The 3mm² cable will be more than adequate for connection from battery > relay contacts > bulbs.
For the relay coil (from existing supply wiring, and to Ground), the 1mm² cable will do, and be less bulky.
For positioning the relay, anywhere within a 1m or so cable run will be fine; just somewhere away from direct heat and weather! Your 5-pin relay will be ok: use 30 and 87 for the switching, and ignore 87a.
Thanks Chris.
I will now look at the diagrams in the previous links and then come back with my understanding ( it will be wrong lol) of which wires and pins on the relays to connect to which wire etc.
As always i get confused with electrics, once i understand the process it becomes clear but ........
I have been looking at This Diagram and need some help to get my head around it
My simple thinking is this.
I need to take a + feed from the battery to the relay and then to the +bulb from the switched side of the relay.
I also need to have an earth from the relay to the chassis.
I believe i need to tap into the switch feed from the stalk to create the switching of the relay otherwise they would never get power from the relay.
Just not sure if i can remove the loom plug for the bulb and piggyback the relay + wire to the existing + wire or connect direct to the bulb.
Where do i tap into the stalk switch feed, would that be from the engine fuse box .
Sorry for the list of questions just not good with electrics
The relay job can be done without getting involved with the lighting/dipswitch, or anything in the cabin, which helps.
Not sure whether you want to add a relay to just dip beams, or to main beams as well. Either way, it's the same procedure for both. The work can be done at the front end, and just involves access to the headlight connectors, and the main battery supply:
Identify the dip beam supply cable, near to a headlight itself, and cut it.***
Do the same at the other headlight (dip beam again), and securely insulate the supply cable end on this one; it will not be needed again.
On the first headlight, connect the supply cable to one of the relay coil terminals, and the other end of the coil to a good Ground. This will allow the relay to turn on whenever dip beam is switched on.
Now to the relay main terminals (30 and 87)...
Connect one to Batt+, preferably via a 20A fuse.
Connect the other main relay terminal to the cable end that goes to the dip bulb, and also connect it to the other headlight's dip bulb. This will involve running a new cable between one headlight and the other, usually easy enough.
Use 2.5/3.0mm² stranded cable for all these main connections.
Now, when the relay closes, power will be routed direct from the battery to the dip beam bulbs, instead of having to take the long route via the dash lighting switch, along probably thinner cable.
For main beam, the fitting is the same, but obviously feeding the main beam bulbs.
I hope this text instruction might help, as an alternative to a circuit diagram.
The relay(s) can be mounted somewhere sheltered up-front, either together, on opposite sides, if doing two.
Use decent insulated crimp connectors for all connections, and make sure all connections are sound and safe.
*** If you can't visually identify a cable, you can check whether it goes live when switched on by carefully piercing the insulation with a sharp needle (use pliers to push the needle in), and using a 12v test lamp (or meter) between the needle and ground. This way, no real damage is done to the wiring if you need to make several checks.
Thanks Chris to me that makes much more sense than a wiring diagram alone.
Now i have the info you have provided in text version the wiring diagram makes sense .
Were you ever a Teacher in previous employment cos you got my understanding down to a T .
Will try this when i get the wire that i have ordered, will give everyone 24 hrs notice of fire damaged Xantia by inept wiring being for sale
Rumbled! My first career was as a teacher - 17 years at The Weald school in Billingshurst - as head of media resources and an AV unit. Got to age 40, and decided I really didn't want to do another 20 years in the job, and so a sideways move into the Print industry, first with Rotaprint for a brief spell, then a far more satisfying 14 years with Agfa UK, working on and leading the move to digital offset printing. Why printing? Ink had been under the fingernails since aged 8, with an Adana and lead type, and print and typography just never really went away. Even at the Weald, we eventually ran three small offset-litho presses, darkrooms and the beginnings of desktop publishing.
Chris it is a compliment to you not a case of being Rumbled
The best teachers always found a way to help people understand and i thank you for the explanation.
So my understanding is this as it is easier and closer to the battery.
Cut the switched feed to the n/s front dip beam and connect that to a terminal on the relay.
Connect the opposite pin on the relay to earth.
Connect pin 30 via a 20A in line fuse to the battery.
Connect pin 87 to the now cut switched wire to the n/s dip beam.
At the same time connect pin 87 to the o/s dip beam feed that has been cut and isolated so connect to the plug end.
I hope i am correct but looking at it in this basic form makes total sense to me
EDIT ** I would just like to say that everyone here understands that most of us are enthusiasts/owners with limited knowledge and as such the response from everyone makes this a real FCF family**
Colin
admiral51 wrote: 30 Dec 2020, 21:40
Cut the switched feed to the n/s front dip beam and connect that to a coil terminal on the relay.
Connect the opposite (coil) pin on the relay to earth.
Connect pin 30 via a 20A in line fuse to the battery.
Connect pin 87 to the now cut switched wire to the n/s dip beam.
At the same time connect pin 87 to the o/s dip beam that has been cut making connection to the wire leading to the bulb. Leave the original supply wire there unconnected and safely insulated.
Have ordered the wires so hopefully next weekend i will get round to sorting the issue out.
Just for clarity on the relay as i am using pin 30 ( + feed) and 87 to make the connection to the bulbs should i use 85 as the input from the original feed from the stalk switch and 86 as the earth or does it make no difference as either way when the stalk is switched on the coil between 85 and 86 will energise and thus causing 30 and 87 to connect ?
Sorry for repeating the obvious just want to make sure i do it right






 Sorry...