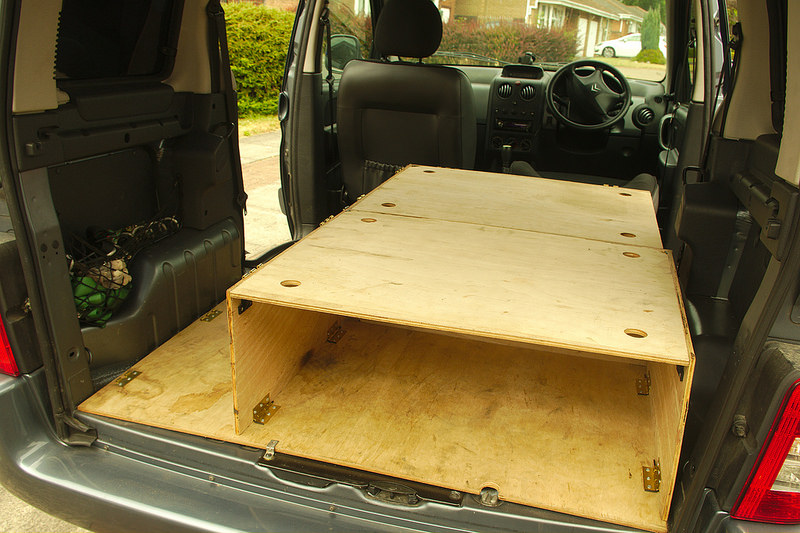
I rarely get round to documenting projects, but I made some time to take some photos of my day van/occasional camper/all-round useful vehicle system for my Citroen Berlingo Multispace.
I've previously had estate cars but thought I'd give one of these a go a year or so ago. I quickly realised that although there's more space than an average estate, because it's higher rather than longer, it needed dividing up to make best use of it. I'd had enough of piling stuff on the back seats (which rarely get used as seats in my car) in estates. I looked at several "boot jump" type systems, but apart from being expensive, they seem somewhat limited in use and take up quite a lot of storage space. Also I like playing with tools. So I set about creating and designing (in that order) a system which would...
Allow all the space to be used safely without things having to be lashed down
Carry a large dog safely and comfortably without the back seats in
Keep a muddy bike or two separate from everything else
Occasionally give a flat base to sleep two (or one and a bike)
Be quickly and easily reconfigurable to suit all these uses
Not take up masses of room to store
Not be massively heavy
Not use lots of expensive and hard to find materials.
I wanted to make it out of 12mm ply, but when I got 4 or 5 boards worth of 9mm in serviceable condition free from Gumtree from a recently refurbished cafe, that was one design decision made for me. I tried to come up with a full design before I started, but I realised there were so many different things to consider that the best thing to do was start chopping and see what happened. It's still a work in progess really, but I've got something I'm happy with for now.
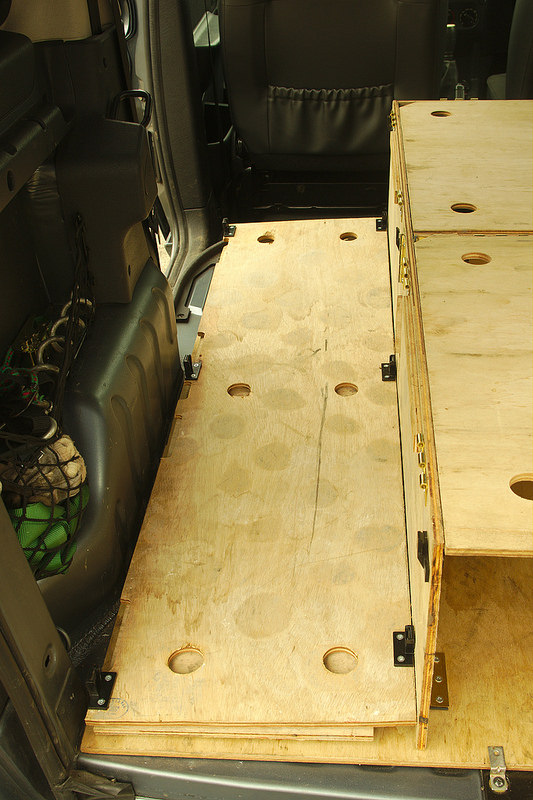
It starts with a base board covering the whole flat area, providing a base for everything else. It's attached by the four existing load lashing points (which are still there on top of the board), and a small bracket at the back that bolts into the tailgate latch. There are cut-outs for the seat hooks and feet (the base board doesn't have to be removed to use the seats), and the spare wheel carrier thing.


A two-part divider fits lengthways into a slot in the base board. This is positioned so that it'll go through the rear seat split if necessary (it's a bit of a squeeze but it works). This creates a space for long stuff on the nearside (i.e. bikes).

Next a lateral divider slots into the longitdudinal divider and the base board to divide the larger space up and stop stuff moving around.

A similar board at the front stops stuff trying to get into the front seats.

The rear compartment has a third side which isn't really necessary for enclosing that space, and is mainly there as a support for the board that will go on top.

With the front bed board on, you get an enclosed space, and a seat of sorts.

Put the back board in as well and you have two enclosed storage spaces, with space down the side for bikes. And if you take the driver's headrest off, and wind the seat back right down, you get a reasonably comfortable bed for one (with a mat of course), with plenty of space underneath for kit, and the bike inside.

A second level of dividers gives you a space to put stuff on top of the bottom storage areas without it sliding around (though nothing too heavy).

Taking the back bed board off makes room for the dog (modelled here by Rosie).

I made a set of side panels for the nearside - again not really necessary to enclose the space, but support a third bed board.

Said bed board can be used on its own, giving a kind of bench seat, e.g. for sheltering in the van with a cuppa when the weather turns.

With all the bed boards in, you've got compartmentalised storage underneath and a big space above, or again, if you put the front seats back, a sleeping area for two with space for kit underneath.

With the long bed board in, it's still possible to get a bike in with both wheels off on top, with storage space underneath.
The side panels can also be folded down flat and don't take up much room. The long bed board can go on top, so you can carry a bike, but then use the bench when it's out.

Similarly, the rear bed board can be carried underneath the dog, and then used with her out. This then makes a nice standing height work surface at the back, e.g. for cooking/making a brew.

The frontmost panel also folds down, which is occasionally useful to make use of the rear footwells (it might as well since it's hinged anyway).

Most of the panel joints are made from loose pin hinges, the main attraction being they're a qiud a pair from Toolstation, so cheap and easily replaceable. To make them easier to join and take apart, I replaced the pins (which have a sort of peened mushroom head which is impossible to remove without tools when under tension) with 3mm allen keys (£3.50 for 10, delivered from RS). I've cut these to length, rounded the ends on my grinder and given them a slight kink by hand with one end in a vice. This gives them just a little bit of tension even if the hinges are perfectly aligned (which most aren't), enough that they don't rattle or fall out, but not so much that they can't be pushed in and pulled out by hand.


The bed boards all have Keku fittings to hold them in place. These can take a bit of loading, but there are thin strips of ply on the dividing panels which are the main load bearers. I'm quite impressed with these. They hold together quite nicely, are surprisingly robust, and pull apart reasonably easily. Inevitably due to the way they stick out when apart, I have broken one however. Ultimately I'd like to come up with a better solution.


I can probably put the whole lot (apart from the base board) in and out in 10 minutes (and most of that is working out which bit goes where - I haven't come up with a marking scheme to help with this yet). When it's out, you have a stack of vertical panels and the three bed boards, so it's fairly easy to store.
Some things I might change or add in future are the Keku fittings (as I mentioned before); hatches, or possibly splits and hinges, in the bed boards to give access to the stuff below without pulling the whole board off; a way of dividing the bike space up better when it's not being used for bikes; a table arrangement for the side "bench". There's lots of stuff I could do, but I could end up spending more time working on it than using it.
