
On the C5 the lower rear wishbone bush is or should be a force fit onto the wishbone, Citroen recommend the use of a tool which sets the correct angular relationship between the bush and arm during the fitting operation, this is so that the bush is correctly torqued when the suspension is at correct ride height, presumably under these conditions there is close to zero "wind up" of the bush.
The Xantia while different in detail is very similar with similar Citroen tool set.
Question: does have anybody have a procedure to fit these bushes accurately without Citroens setting rig?
Cachaciero
Lower wishbone bushes C5 / Xantia
-
CitroJim

- A very naughty boy
- Posts: 54546
- Joined: 30 Apr 2005, 23:33
- x 8079
I have always carefully noted the position of the old bush before removing it and then putting the new bush on in the same position. It's not hard to do, just check and mark the angle the flat piece makes relative to the wishbone.
I do believe, although I've never seen it, that OEM bushes have an alignment mark which corresponds with a dot punched on the end of the wishbone.
You're right about them being set in a specific position to prevent excessive wind-up or pre-load on them when the suspension is at normal ride height.
I do believe, although I've never seen it, that OEM bushes have an alignment mark which corresponds with a dot punched on the end of the wishbone.
You're right about them being set in a specific position to prevent excessive wind-up or pre-load on them when the suspension is at normal ride height.
Jim
A bit of a Citroen AX fan...
A bit of a Citroen AX fan...
-
cachaciero
- Posts: 1407
- Joined: 13 Apr 2009, 07:24
- x 9
Hi Jim
Nice one, thanks for that, it has set the grey matter of on a different path to the one it was on:-)
I guess that I could use a steel straight edge clamped on the flat part of the old bush to scribe a line on the shaft then when fitting the new one it's only a question of clamping the straight edge on the new bush and aligning to the mark on the shaft.
Can the new bushes be driven on using an appropriate bit of tube and a hammer, and as importantly can the old ones be driven of the same way or would it be better to cobble up some kind of extractor / puller.
Cachaciero
-
andmcit
- Posts: 4299
- Joined: 03 Mar 2005, 17:59
- x 30
-
citronut
- Posts: 10937
- Joined: 29 Apr 2005, 00:46
- x 94
-
CitroJim
- A very naughty boy
- Posts: 54546
- Joined: 30 Apr 2005, 23:33
- x 8079
I use your method to replace them Malcolm but for me any cutting implement near the wishbone is risky. A nick could result in a stress-riser and one broken wishbone.
I've used a blunt cold chisel and club hammer to tap the bush off. Well, perhaps "tap" is the wrong word, eh Gareth? A better word would be wallop!
I've used a blunt cold chisel and club hammer to tap the bush off. Well, perhaps "tap" is the wrong word, eh Gareth?
Jim
A bit of a Citroen AX fan...
A bit of a Citroen AX fan...
-
andmcit
- Posts: 4299
- Joined: 03 Mar 2005, 17:59
- x 30
When grinding off the old inner bush sleeve you can just tell from the heat
pattern on the fresh face of the cut area where you're "thinning" down to
the original inner boss on the wishbone end.
I see nobody has dared even utter a word on the horrid little sh!t that is the
front mushroom bush! A Devil of a job to remove - I did discover grinding the
widest end shoulder off the heat transfer dropped the middle out when the
rubber gave up! Takes some getting out that's for sure and you'll need
a handy vice/press and big socket to press the new one in.
Andrew
Last edited by andmcit on 14 Oct 2009, 22:46, edited 1 time in total.
-
CitroJim
- A very naughty boy
- Posts: 54546
- Joined: 30 Apr 2005, 23:33
- x 8079
You're not wrong there Andrewandmcit wrote: I see nobody has dared even utter a word on the horrid little sh!t that is thefront mushroom bush! A Devil of a job to remove
A shame a press is very little use for removing a P bush but it's OK for replacing one though... Actually better than hammering it on. I hate hammering any bush or bearing if I can help it but when doing the job away from home it's necessary as a press is not exactly portable...
Jim
A bit of a Citroen AX fan...
A bit of a Citroen AX fan...
-
cachaciero
- Posts: 1407
- Joined: 13 Apr 2009, 07:24
- x 9
[quote="andmcit"]
I see nobody has dared even utter a word on the horrid little sh!t that is the
front mushroom bush! A Devil of a job to remove - I did discover grinding the
widest end shoulder off the heat transfer dropped the middle out when the
rubber gave up! Takes some getting out that's for sure and you'll need
a handy vice/press and big socket to press the new one in. Takes some
getting out that's for sure and you'll need a handy vice/press and big
socket to press the new one in.
Andrew
Gulp! and I thought looking at the drgs that the front one would be dead easy!
Cachaciero
-
andmcit
- Posts: 4299
- Joined: 03 Mar 2005, 17:59
- x 30
cachaciero wrote:andmcit wrote:
I see nobody has dared even utter a word on the horrid little sh!t that is the
front mushroom bush! A Devil of a job to remove - I did discover grinding the
widest end shoulder off the heat transfer dropped the middle out when the
rubber gave up! Takes some getting out that's for sure and you'll need
a handy vice/press and big socket to press the new one in. Takes some
getting out that's for sure and you'll need a handy vice/press and big
socket to press the new one in.
Andrew
Gulp! and I thought looking at the drgs that the front one would be dead easy!
Cachaciero
The flashbacks for the job were quite harrowing so that'd be the reason
for my losing the plot in my last post!
The perils of cut and paste!
Andrew
-
cachaciero
- Posts: 1407
- Joined: 13 Apr 2009, 07:24
- x 9
Sounds like some cobbled up pullers might be useful, anybody got any dimensioned drgs of the bushes?
Would it not be possible to use a three leg puller with a split collar behind the bush to pull the rear one off ?
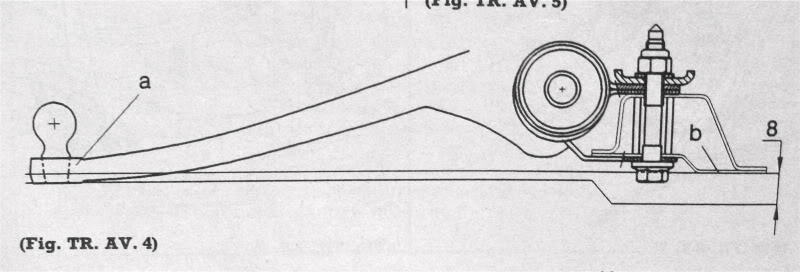
For the front one I thought a suitable sized length of threaded rod through the bush into a length of tubing couple of suitable sized washers and then screw the bush out into the tube but this does depend on the flange of the bush being smaller in diameter than the diameter of the metal it is going into. Certainly can't see why a length of threaded rod and some washers couldn't be used to press the new one in.
Just re-visited the CIt docs for this and that's exactly what they use. In fact looking closer I now see that what I have just worked out for myself is pretty much the way that Citroen do it albeit disguised in a jig.
Cachaciero
Would it not be possible to use a three leg puller with a split collar behind the bush to pull the rear one off ?
For the front one I thought a suitable sized length of threaded rod through the bush into a length of tubing couple of suitable sized washers and then screw the bush out into the tube but this does depend on the flange of the bush being smaller in diameter than the diameter of the metal it is going into. Certainly can't see why a length of threaded rod and some washers couldn't be used to press the new one in.
Just re-visited the CIt docs for this and that's exactly what they use. In fact looking closer I now see that what I have just worked out for myself is pretty much the way that Citroen do it albeit disguised in a jig.
Cachaciero
-
andmcit
- Posts: 4299
- Joined: 03 Mar 2005, 17:59
- x 30
I like neat clean (and quiet!!) engineering solutions if possible - I'd be
very surprised if a threaded rod and some nuts and washers will do the
job adequately but am quite happy to be proven wrong.
A decent vice and some big sockets got the new smaller front bush on
without too much problem but the torque needed in closing the vice
was immense. Please take some piccies of the job - I can see why folk
appear to wimp out and buy arms off ebay with the bushes already on
from new!
Andrew
-
XantiaMan
- Posts: 1604
- Joined: 12 Aug 2007, 18:47
- x 18
Nout wrong with walloping a bush just wear protection... (for your feetCitroJim wrote:I use your method to replace them Malcolm but for me any cutting implement near the wishbone is risky. A nick could result in a stress-riser and one broken wishbone.
I've used a blunt cold chisel and club hammer to tap the bush off. Well, perhaps "tap" is the wrong word, eh Gareth?
2020 Peugeot Partner
2017 Fiesta ST
2001 Ford Puma 1.7 VCT
2006 Ford Fiesta Zetec
http://www.facebook.com/kidmans" onclick="window.open(this.href);return false;
2017 Fiesta ST
2001 Ford Puma 1.7 VCT
2006 Ford Fiesta Zetec
http://www.facebook.com/kidmans" onclick="window.open(this.href);return false;
-
citronut
- Posts: 10937
- Joined: 29 Apr 2005, 00:46
- x 94
-
cachaciero
- Posts: 1407
- Joined: 13 Apr 2009, 07:24
- x 9