
HI
I've got hold of the seals necessary for the Bosch fuel pump and hope to start the job this weekend.
A question I have is that I have so many seals, but the instructions on the webpage http://www.eastment.net/Boschpump1.htm only deals with 4 of them.
I trust that changing those 4 will be sufficient and I dont need to change everything??? It does seem to be leaking only from two of those 4 places...
Any other tips on the job in general would be much appreciated, particularly in how to take off the fuel pump.. eg Haynes says to put in two M8 bolts, but then take them out and put them in again which I dont understand why they need to be taken out at all once in place ??
hope these questions make sense
many thanks
Larry
Bosch pump seals
-
lazza
- Posts: 234
- Joined: 08 Sep 2008, 09:04
Bosch pump seals
(1996 Citroen Xantia 1.9TD LX with aircon)
Living in exile in Spain
Running on 100% veggie in summer
Living in exile in Spain
Running on 100% veggie in summer
-
MikeT
- Posts: 4808
- Joined: 11 Jun 2007, 16:17
- x 232
Good man for attempting this, you'll be saving yourself a small fortune if it goes to plan. If you don't already have it, here's the overhaul parts list and diagram. http://www.vwdiesel.net/phpBB/viewtopic.php?t=39
-
CitroJim

- A very naughty boy
- Posts: 54535
- Joined: 30 Apr 2005, 23:33
- x 8075
That's a most useful link Mike. Thanks for posting it up. The VP20 is a little different on the Xantia but substantially the same.
Larry, my rule of thumb is if it isn't leaking then don't replace it. Fundamentally, the main seals are those on the top lid, O rings on the throttle shaft, cold start shaft and emergency stop shaft and the two O rings on the oval timing device covers. The semi electronic pumps have an additional O ring on the timing servo injector.
All those can be changed by following the guide on my web pages.
The only other seal is the big O ring behind the distributor head. May I caution you about trying to swap this one as there is a huge risk of breaking the main driveshaft and a mass of rollers and springs will leap out at you. Strictly, the whole pump needs to come to bits to do this seal. If this eal is leaking, bite the bullet and have it done by a pro.
The Oil seal on the drive end of the pump can be swapped like any other oil seal but it rarely gives trouble.
The two most important things is to work in clinically clean conditions and to mark everything so that it goes back exactly as it came apart.
To remove the pump, you'll need to fabricate a puller for the drive sprocket. Do you need the dimensions?
Jim
A bit of a Citroen AX fan...
A bit of a Citroen AX fan...
-
lazza
- Posts: 234
- Joined: 08 Sep 2008, 09:04
-
lazza
- Posts: 234
- Joined: 08 Sep 2008, 09:04
HI Jim
I have just put the pump back together only to read your post about the cold start and emergency stop O-rings.
I have changed all the others no probs. I was following your website instructions (superbly helpful btw), but those ones werent specifically mentioned.
What do you recommend.. that i dismantle it again and replace those, or just hope that they are fine?
cheers for all the help
Larry
(1996 Citroen Xantia 1.9TD LX with aircon)
Living in exile in Spain
Running on 100% veggie in summer
Living in exile in Spain
Running on 100% veggie in summer
-
CitroJim
- A very naughty boy
- Posts: 54535
- Joined: 30 Apr 2005, 23:33
- x 8075
Well done Larry!  You have done very well indeed!
If those seals were not leaking previously and they were undamaged, I'd leave them alone. They should still be good, especially as you did not need to disturb these seals in the work you did.
Glad the website info was helpful I'm going to expand it a bit now the dark nights are here and give instruction on further dismantling.
If those seals were not leaking previously and they were undamaged, I'd leave them alone. They should still be good, especially as you did not need to disturb these seals in the work you did.
Glad the website info was helpful
Jim
A bit of a Citroen AX fan...
A bit of a Citroen AX fan...
-
lazza
- Posts: 234
- Joined: 08 Sep 2008, 09:04
Hi Jim
Acutally that would be extremely useful. I changed those other two last night. As I could do it from the outside of the pump. One was definitely leaking.
However I've discovered today, when about to proudly put the pump carefully back in its place, that it has been leaking from the dreaded seal behind the distributor head .. i think basically all the seals were shot and hence why it was taking in so much air.
Not sure whether to trust myself to dismantle again and more, and change that one, take this pump to a specialist or get a second hand one
Good luck with dark nights.. one thing here that I dont need to worry about
cheers and thanks again
Larry
However I've discovered today, when about to proudly put the pump carefully back in its place, that it has been leaking from the dreaded seal behind the distributor head
Not sure whether to trust myself to dismantle again and more, and change that one, take this pump to a specialist or get a second hand one
Good luck with dark nights.. one thing here that I dont need to worry about
cheers and thanks again
Larry
(1996 Citroen Xantia 1.9TD LX with aircon)
Living in exile in Spain
Running on 100% veggie in summer
Living in exile in Spain
Running on 100% veggie in summer
-
CitroJim
- A very naughty boy
- Posts: 54535
- Joined: 30 Apr 2005, 23:33
- x 8075
Not only are they dark Larry, but cold too 
As luck would have it, a scrap pump has fallen into my hands today (it's seized nearly solid).
I shal, as a matter of priority, work out a safe method of dismantling the rotor-head to replace the seal. If you can hang on a day or tow, I'll get cracking on it. No time tonight but tomorrow I have to do other diesel pump work so I'll look into it.
It would be wise to go the whole way and replace your rotor head seal. I've just lokked at the old seal from Xantiaman583's pump and it was the cause of a lot of his woes. It had gone very hard. Watch this space and my web site!
Jim
A bit of a Citroen AX fan...
A bit of a Citroen AX fan...
-
CitroJim
- A very naughty boy
- Posts: 54535
- Joined: 30 Apr 2005, 23:33
- x 8075
Larry,
I'm happy to report that replacement of the rotor head seal is not too difficult as long as you work very carefully and methodically.
My apologies for the quality of some of the pictures
Rotate the pump so that it is between compressions (i.e. shaft free to turn a little)
Mount the pump in a strong vice with the rotor head upwards. This is vital. Seal the injector nozzles. I have some caps for this. Drain the pump whilst in this position by allowing diesel to leak from the fuel inlet union.
Remove the 12mm bolt in the middle of the rotor head. This is the timing access hole. If you do not remove this bolt to let air in, the rotor head will hydraulically lock to the shaft.
Remove the framework around the rotor head. Some of this framework is secured by rotor head mounting bolts. Only remove one at a time and replace it as soon as you can with a nut underneath to act as a spacer. The bolts will be too long otherwise. At least two rotor head bolts must be in place at all times (at a diagonal) to preven possible snapping of the distributor shaft.

When the framework is off, carefully loosen each rotor head bolt gradually and equally a turn at a time. There are two very strong springs under the rotor head and as you loosen the bolts, these springs will cause the head to rise. It must rise squarely and gently.


A point will come when all four bolts are loose and the head will have risen about 6mm. Remove the bolts completely.
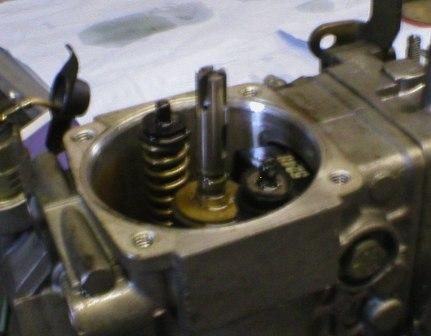
Carefully and squarely, lift off the rotor head. beware of two small springs that will fall into the pump internals.

These are the springs:

Do not touch anything beyond this. Replace the seal and reassemble. Generally, the reassembly is a reversal of diassembly but those two small springs will need holding in place with grease so they do not fall out as you place the head back on. Ensure the spigots of the two big springs engage in the holes in the head correctly. Tighten down the rotor evenly in a diagonal fashion as you would a cylinder head.
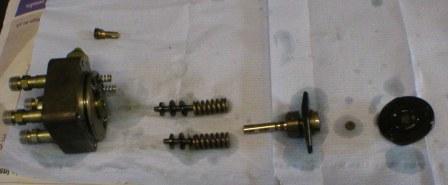
Here are some internal shots:

And a layout of the major parts just in case.
I'll post this up on my website later with better pictures.
The pump in question had a seizure in the rotor head and the whole pump was fully of nasty "gone off" brown fluid that smelt of
turps
The pump can be rescued but must come totally to bits to be cleaned up.
Hope that helps Larry.
I'm happy to report that replacement of the rotor head seal is not too difficult as long as you work very carefully and methodically.
My apologies for the quality of some of the pictures
Rotate the pump so that it is between compressions (i.e. shaft free to turn a little)
Mount the pump in a strong vice with the rotor head upwards. This is vital. Seal the injector nozzles. I have some caps for this. Drain the pump whilst in this position by allowing diesel to leak from the fuel inlet union.
Remove the 12mm bolt in the middle of the rotor head. This is the timing access hole. If you do not remove this bolt to let air in, the rotor head will hydraulically lock to the shaft.
Remove the framework around the rotor head. Some of this framework is secured by rotor head mounting bolts. Only remove one at a time and replace it as soon as you can with a nut underneath to act as a spacer. The bolts will be too long otherwise. At least two rotor head bolts must be in place at all times (at a diagonal) to preven possible snapping of the distributor shaft.
When the framework is off, carefully loosen each rotor head bolt gradually and equally a turn at a time. There are two very strong springs under the rotor head and as you loosen the bolts, these springs will cause the head to rise. It must rise squarely and gently.
A point will come when all four bolts are loose and the head will have risen about 6mm. Remove the bolts completely.
Carefully and squarely, lift off the rotor head. beware of two small springs that will fall into the pump internals.
These are the springs:
Do not touch anything beyond this. Replace the seal and reassemble. Generally, the reassembly is a reversal of diassembly but those two small springs will need holding in place with grease so they do not fall out as you place the head back on. Ensure the spigots of the two big springs engage in the holes in the head correctly. Tighten down the rotor evenly in a diagonal fashion as you would a cylinder head.
Here are some internal shots:
And a layout of the major parts just in case.
I'll post this up on my website later with better pictures.
The pump in question had a seizure in the rotor head and the whole pump was fully of nasty "gone off" brown fluid that smelt of
turps
The pump can be rescued but must come totally to bits to be cleaned up.
Hope that helps Larry.
Jim
A bit of a Citroen AX fan...
A bit of a Citroen AX fan...
-
lazza
- Posts: 234
- Joined: 08 Sep 2008, 09:04
hI Jim
thanks that´s great. Still umming and aahhing about it. But we'll see how brave I feel.
One problem is that I dont have a vice, well lots of vices, but not that kind
will let you know how I get on
cheers
Larry
thanks that´s great. Still umming and aahhing about it. But we'll see how brave I feel.
One problem is that I dont have a vice, well lots of vices, but not that kind
will let you know how I get on
cheers
Larry
(1996 Citroen Xantia 1.9TD LX with aircon)
Living in exile in Spain
Running on 100% veggie in summer
Living in exile in Spain
Running on 100% veggie in summer
-
red_dwarfers
- (Donor 2020)
- Posts: 2509
- Joined: 29 May 2008, 15:59
- x 58
-
CitroJim
- A very naughty boy
- Posts: 54535
- Joined: 30 Apr 2005, 23:33
- x 8075
-
lazza
- Posts: 234
- Joined: 08 Sep 2008, 09:04
HI Jim
Oops didnt do any lubrication after putting the distributor head back in... is that a problem? It was quite well lubed with diesel at the time i think.
Apart from that I changed that seal ok. Two things:
1. I found getting the head back on a bit tricky, as you say, the ring slips out easly from its ball connector (dowel), then the big springs decide to slip off etc etc. In the end I got the head back on by putting the spigots in the hole of the head beforehand (along with the two small springs) and slipping them into the large springs. Either a cool idea, or stupid.. let me know!
2. I nudged slightly the mechanism behind the big spring holder a couple of times (what you said I mustnt touch ). I dont think i dislodged anything, but slightly concerned.. no funny noises or anything, but it was quite loose so very hard not to wobble it. I'm sure everything above that is in place and it all went back on smoothly. Cause for concern?
As ever, i'm going to have to wait:
a. because the 45mm silver bolt of course TX30 head got mashed (i hate those TX things) and noone here seems to have that size of 45mm for any type of alan key.
b. off for a week back to the UK
but any advice in the meantime very much appreciated.
sorry i must be boring you all to tears by now.. listless lazza i'll be called
promise to be more interesting in future
cheers
L
Oops didnt do any lubrication after putting the distributor head back in... is that a problem? It was quite well lubed with diesel at the time i think.
Apart from that I changed that seal ok. Two things:
1. I found getting the head back on a bit tricky, as you say, the ring slips out easly from its ball connector (dowel), then the big springs decide to slip off etc etc. In the end I got the head back on by putting the spigots in the hole of the head beforehand (along with the two small springs) and slipping them into the large springs. Either a cool idea, or stupid.. let me know!
2. I nudged slightly the mechanism behind the big spring holder a couple of times (what you said I mustnt touch
As ever, i'm going to have to wait:
a. because the 45mm silver bolt of course TX30 head got mashed (i hate those TX things) and noone here seems to have that size of 45mm for any type of alan key.
b. off for a week back to the UK
but any advice in the meantime very much appreciated.
sorry i must be boring you all to tears by now.. listless lazza i'll be called
promise to be more interesting in future
cheers
L
(1996 Citroen Xantia 1.9TD LX with aircon)
Living in exile in Spain
Running on 100% veggie in summer
Living in exile in Spain
Running on 100% veggie in summer
-
lazza
- Posts: 234
- Joined: 08 Sep 2008, 09:04
forgot to ask
What´s the microswitch on my fuel pump for?
Looking at possible second-hand pumps.. .. i could do with knowing why i need one with a switch, or if i dont need a switch.
thanks
Larry
Looking at possible second-hand pumps.. .. i could do with knowing why i need one with a switch, or if i dont need a switch.
thanks
Larry
(1996 Citroen Xantia 1.9TD LX with aircon)
Living in exile in Spain
Running on 100% veggie in summer
Living in exile in Spain
Running on 100% veggie in summer