Zel's Fleet Blog - BX, Jag XJ-S, Sinclair C5, Mercedes 208D & 230TE, AC Model 70.
-
CitroJim
- A very naughty boy
- Posts: 54787
- Joined: 30 Apr 2005, 23:33
- x 8191
Re: Zel's Fleet Blog - BX, Jag XJ-S, Sinclair C5, Mercedes 208D & 230TE, AC Model 70.
Hugely enjoying all this pinball wizardry Zel
Keep those updates coming 
Jim
A bit of a Citroen AX fan...
-
CitroJim
- A very naughty boy
- Posts: 54787
- Joined: 30 Apr 2005, 23:33
- x 8191
Re: Zel's Fleet Blog - BX, Jag XJ-S, Sinclair C5, Mercedes 208D & 230TE, AC Model 70.
Saw this and thought of you Zel 
Made me chortle a bit...
Jim
A bit of a Citroen AX fan...
-
Zelandeth
- Donor 2024
- Posts: 5285
- Joined: 16 Nov 2014, 23:36
- x 1591
Re: Zel's Fleet Blog - BX, Jag XJ-S, Sinclair C5, Mercedes 208D & 230TE, AC Model 70.
In a shocking development earlier this week I actually got some car related work done and got stuck into the head gasket work on the Rover.
It's clear that someone has attempted to "fix" the problem before with K-Seal based on the distinctive coppery sparkle on the radiator cap.
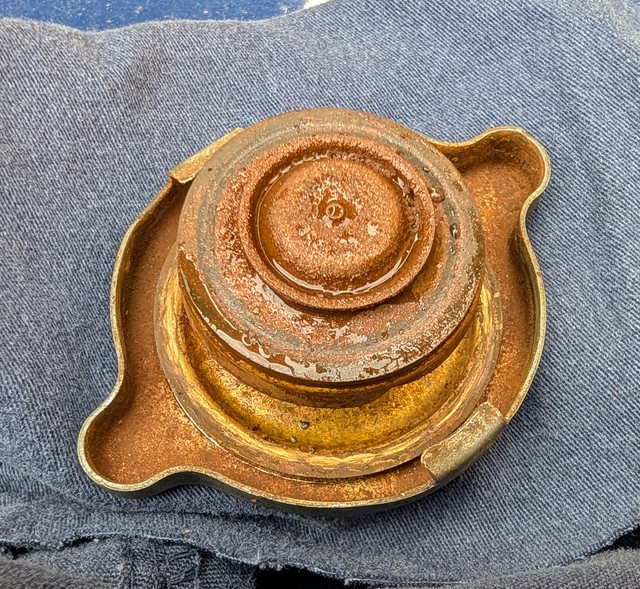
Suffice to say it didn't work. Surprise!
Not in the slightest. It might buy you some time if you've got coolant getting into the cylinders via a leaky inlet manifold gasket on a K-Series, but it's not going to do anything at all if combustion gases are getting into the coolant as was the case here - given the release pressure of the cap on this engine is a heady 4 psi said leak was only ever going to go one way.
I was nearly smart when I went to remove the distributor (which I don't think you actually have to, but I figured it was likely to just be easier with it out the way, and it's just one bolt to pull it). I made sure to mark both where the body was clocked and where no 1 was connected.
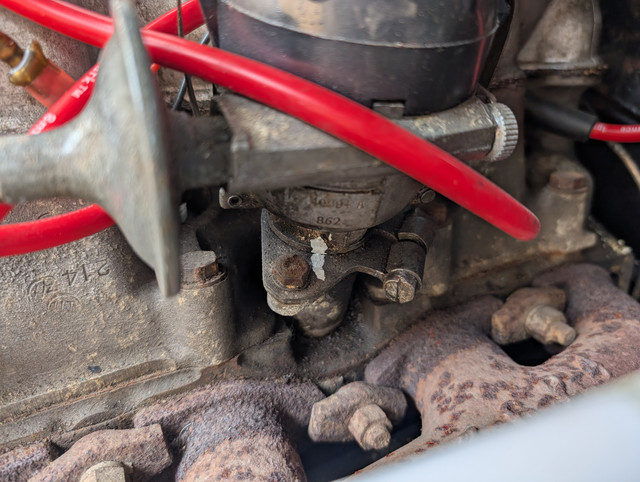
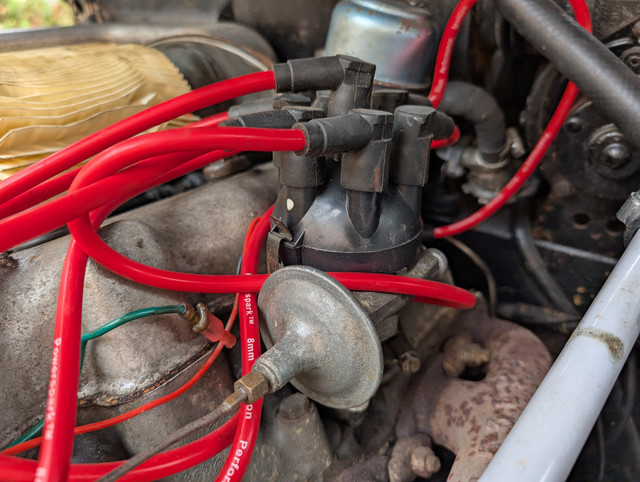
...Then completely failed to note at which cylinder the rotor arm was pointing. Oh well...the distributor drive can only go in two locations, so I'll see if I can figure out where we are from the cylinder and valve positions. Failing that I'll either get it right or get a spectacular backfire when I try to restart the engine.
Added to my to do list when poking the distributor by noting that the vacuum advance is *completely* seized, so I'll need to try to free that off before it goes back together.
Getting the bottom nuts for the carburettor off is precisely as annoying as I remembered as the brake servo is precisely in the way.
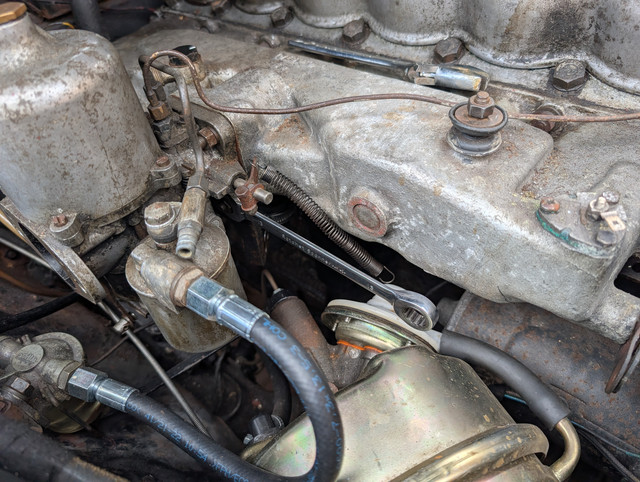
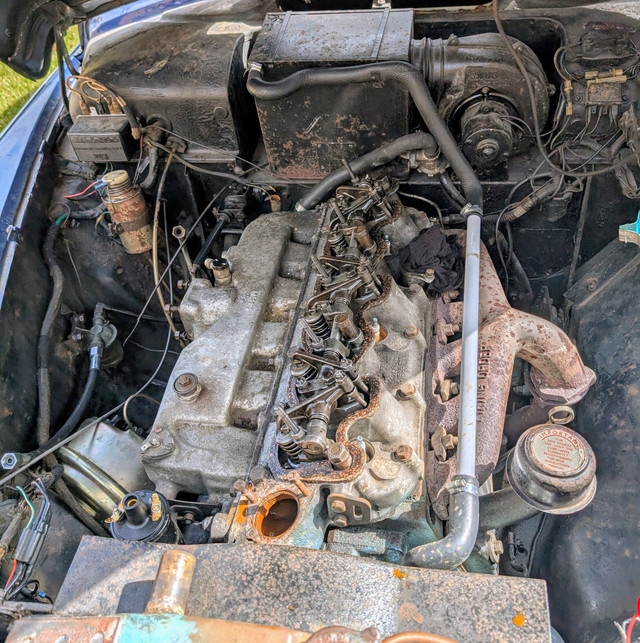
Maybe half an hour in I had the engine bay looking like this and us ready to start dismantling the engine. I'd already had the coolant draining while I was just picking away at getting things out of our way.
Okay...let's preface that with "let me get the bigger socket set and the bit of old exhaust pipe I use as a breaker bar." Those head bolts were fluffing tight. Most cracked off painfully violently, sounding like I was whacking an anvil with a hammer rather than unbolting something.
After a certain amount of swearing and mild terror that they were going to snap all the bolts were out and I could simply lift the head off. Except I couldn't because I'd missed something. The oil feed line to the head is actually external on this engine, fed from a rigid line through a banjo fitting on the rear of the head. Once that was off the head all but tried to slide off the block on its own. I was kinda worried it was going to be stuck to the block, thankfully not.
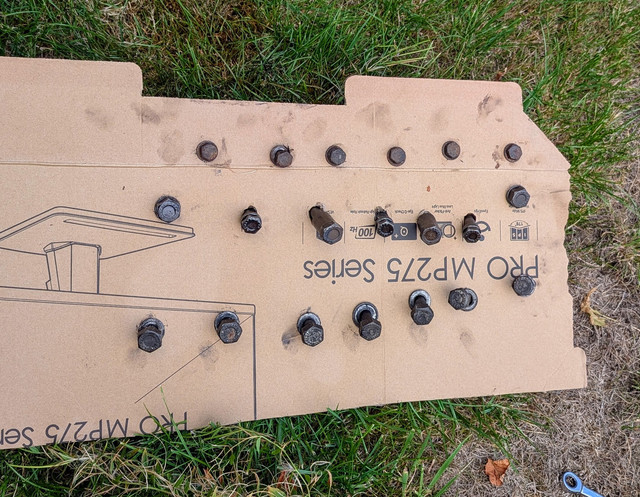
I used the time honoured method of keeping the bolts in the right places.
I had made the conscious decision to pull the head and inlet manifold as one assembly. There were two reasons for this. Firstly is that it is held on by an ungodly amount of nuts - 18 if I remember rightly - which are fiddly to get a spanner on at the best of times because they're a close fit to the surrounding casting. All of the forward ones on the underside are an absolute swine to get to in situ because the brake servo and generator are in the way - I'm pretty sure getting to the front couple last time round I had to unbolt the generator to get clearance. I'd far rather just deal with that off the car when I can easily get at things. Secondly is that while it does indeed make things a bit heavier, I reckon it actually makes it an easier mass to manhandle as it's an easier shape to get hold of. Having the carb side of the manifold 8" or so closer to me allowed me to just get a hand under that side then roll the head towards me and lift it clear of the car. It ain't light but is entirely within the realms of doable so long as you've planned the lift. Which I had. Had a piece of wood on the garden immediately to left so I just had to lift, rotate myself by about 180 degrees then put it straight down.
Ain't this a funky looking setup?
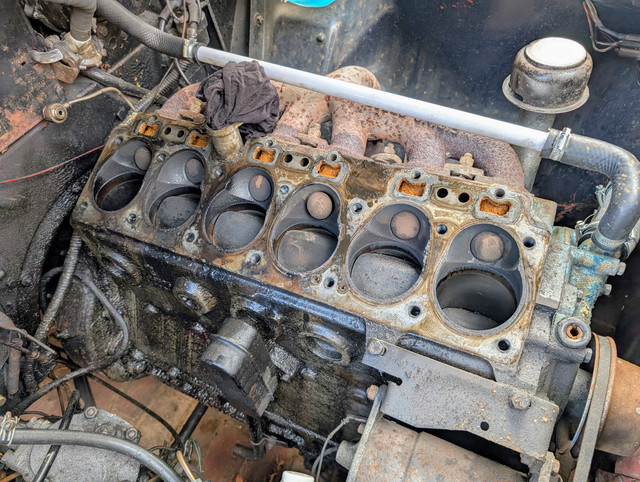
And holy hell, look at the size of those inlet valves!
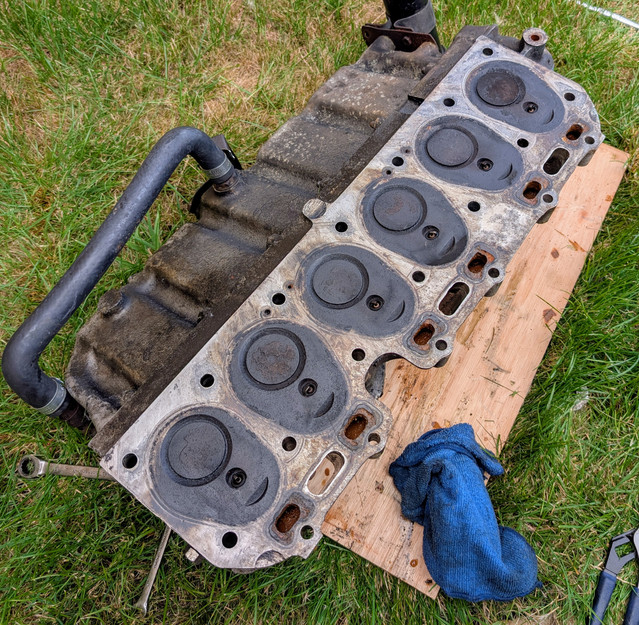
Thumb for scale.
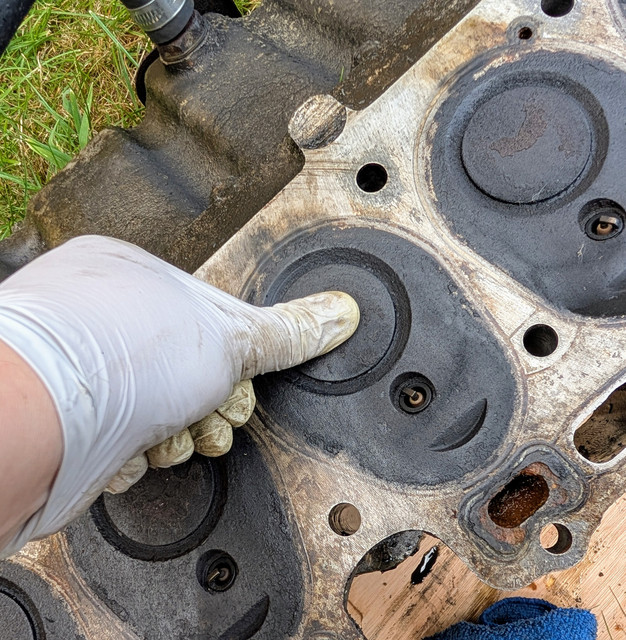
The ability to fit far larger valves for a given bore size was of course one of the primary reasons the IoE layout was originally developed - even so it's a bit surprising seeing valves larger than in some big commercial engines I've been inside in a car engine. It's no surprise that this seems to breathe surprisingly well.
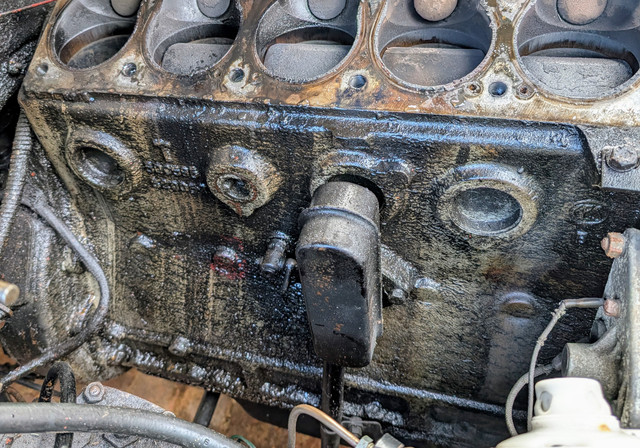
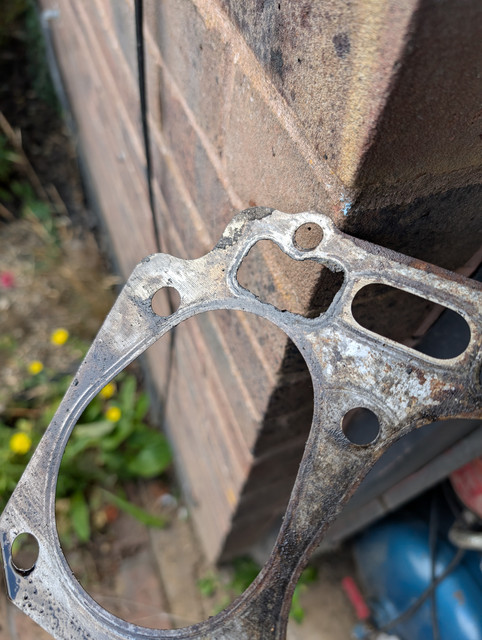
I think we can pretty comprehensively say this gasket has been leaking in multiple places for some considerable time. See all this oily gunk down the side of the block? That's all oozed out of the join between the head and block. It's as much blowby as a conventional oil leak I think.
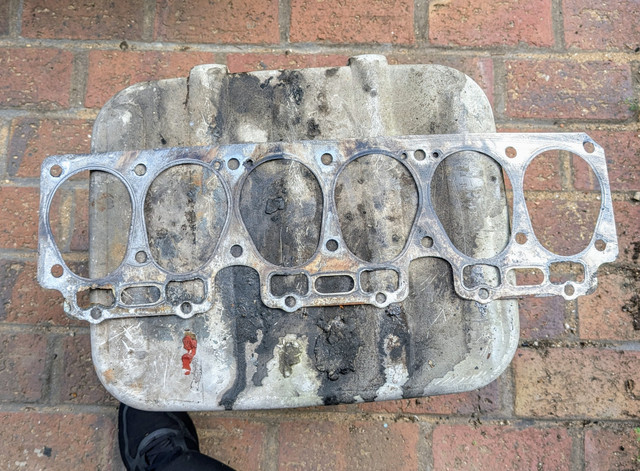
Looking at this gasket it probably would be quicker to list the locations where it *hasn't* been leaking I think.
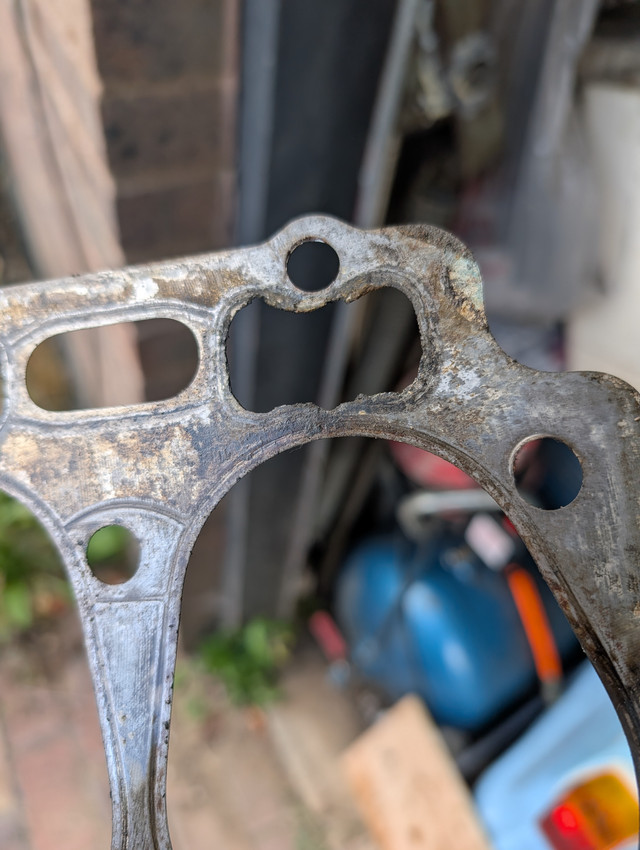
I don't know how old this gasket is, but this corrosion hasn't happened overnight. Or in the last couple of years.
Next up I've got a fair bit of cleaning to do before we can see what we're working with.
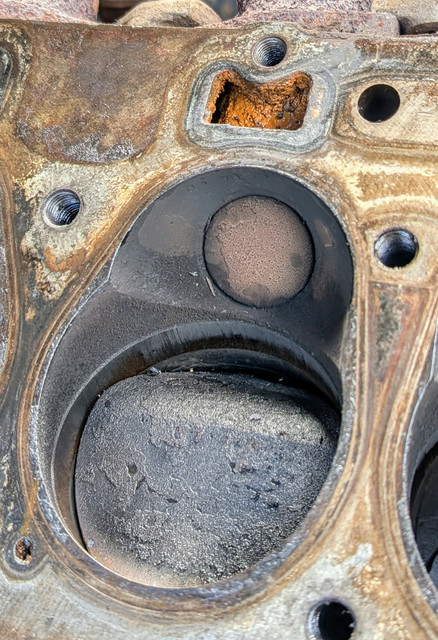
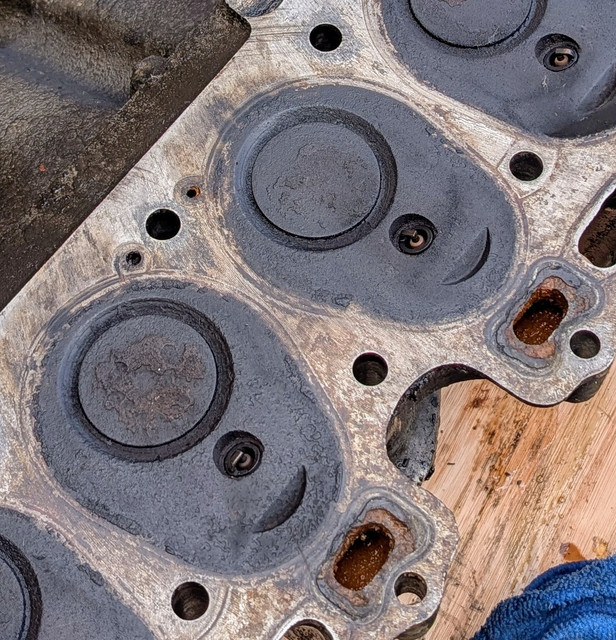
I'm not going to be doing too much with the head myself as I'm just going to be chucking that at Headline MK to have it inspected and cleaned as they are far better equipped to do it properly than I am.
Before I can do that though I need to get the head and inlet manifold to part company.
So far they have been unimpressed with my efforts. Of course if I could find the dead blow hammer that might help, but beyond "in the garage" I've not a clue where it is.
This is where we left things for now after I fogged the cylinders with some oil.
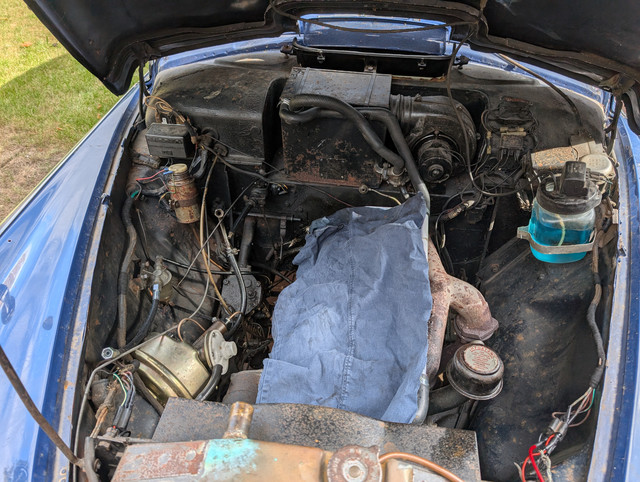
Before anything goes back together I'll be taking the opportunity to clean up this side of the engine bay. Likewise to pull the heater core to see if I can unclog it as that's going to be way less awkward while I have this much extra space to play with. Likewise adjusting the steering box, given that you can actually *see* it at the moment, it's usually buried under the intake manifold.
While I don't want to get any more water into the engine than I can avoid, given how much of a slimy mess it is, I reckon that a *bunch* of degreaser and the pressure washer are probably going to be in its future. I'll be here for a month trying to clean it by hand.
Even if the head gasket was fine, eventually I'd have had to pull the head to change this.
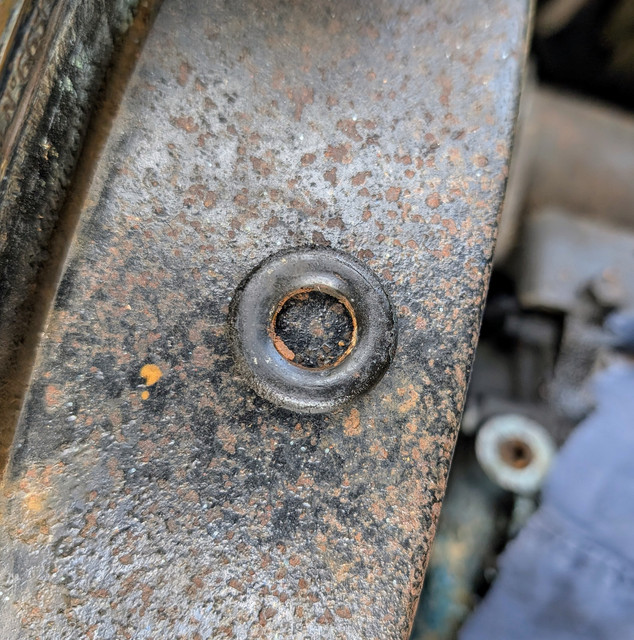
Which sits in between the head and water pump around this little stub.
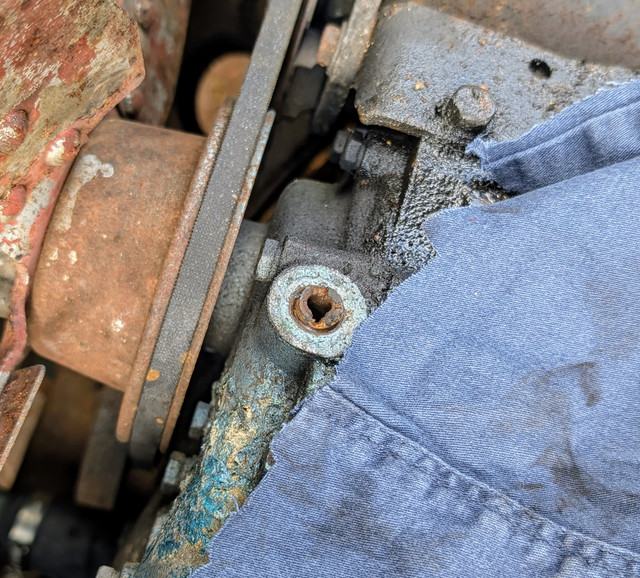
Odd setup.
Given that the water pump studs are renowned for snapping, the head is generally considered to be the safer of the two to remove.
Pretty simple getting this far to be honest. Probably took me a couple of hours to get this far, though a full 30 minutes of that was probably faffing around removing the inlet manifold nuts 1/75th a turn at a time.
Probably be a couple of weeks before reassembly can start, but it feels good to have got stuck into it and had things come apart pretty much as planned.
In other news, more parts for the pinball machine have arrived, so the light bar has now been installed. This isn't something you strictly NEED, but it helps make up for the fact that there's only so much brightness you can get out of an LCD panel.
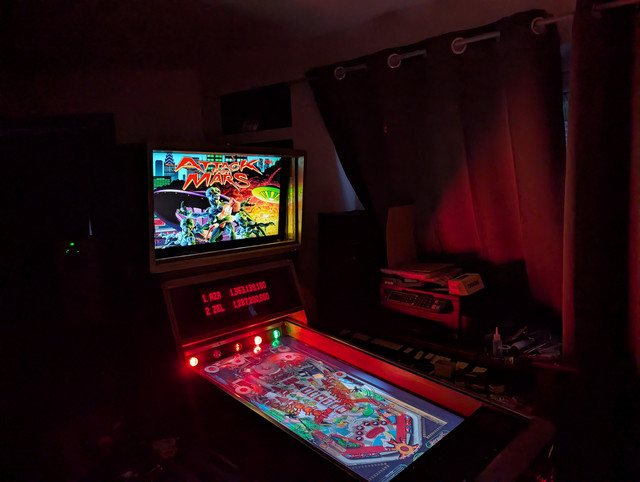
Again I don't need to do any of the hard work here as all the running of them is handled through the Direct Output Framework - I just tell the controller which ports they're connected to and that it's a five lamp RGB light bar.
Two far more chunky solenoids for the flippers have also arrived though I've not had time to connect that up yet. The two currently serving that role will be relocated to the back corners to give us a full 3 x 3 matrix to allow correctly localised feedback for things on the playfield.

It's clear that someone has attempted to "fix" the problem before with K-Seal based on the distinctive coppery sparkle on the radiator cap.

Suffice to say it didn't work. Surprise!
Not in the slightest. It might buy you some time if you've got coolant getting into the cylinders via a leaky inlet manifold gasket on a K-Series, but it's not going to do anything at all if combustion gases are getting into the coolant as was the case here - given the release pressure of the cap on this engine is a heady 4 psi said leak was only ever going to go one way.
I was nearly smart when I went to remove the distributor (which I don't think you actually have to, but I figured it was likely to just be easier with it out the way, and it's just one bolt to pull it). I made sure to mark both where the body was clocked and where no 1 was connected.


...Then completely failed to note at which cylinder the rotor arm was pointing. Oh well...the distributor drive can only go in two locations, so I'll see if I can figure out where we are from the cylinder and valve positions. Failing that I'll either get it right or get a spectacular backfire when I try to restart the engine.
Added to my to do list when poking the distributor by noting that the vacuum advance is *completely* seized, so I'll need to try to free that off before it goes back together.
Getting the bottom nuts for the carburettor off is precisely as annoying as I remembered as the brake servo is precisely in the way.

Maybe half an hour in I had the engine bay looking like this and us ready to start dismantling the engine. I'd already had the coolant draining while I was just picking away at getting things out of our way.

Okay...let's preface that with "let me get the bigger socket set and the bit of old exhaust pipe I use as a breaker bar." Those head bolts were fluffing tight. Most cracked off painfully violently, sounding like I was whacking an anvil with a hammer rather than unbolting something.
After a certain amount of swearing and mild terror that they were going to snap all the bolts were out and I could simply lift the head off. Except I couldn't because I'd missed something. The oil feed line to the head is actually external on this engine, fed from a rigid line through a banjo fitting on the rear of the head. Once that was off the head all but tried to slide off the block on its own. I was kinda worried it was going to be stuck to the block, thankfully not.
I used the time honoured method of keeping the bolts in the right places.

I had made the conscious decision to pull the head and inlet manifold as one assembly. There were two reasons for this. Firstly is that it is held on by an ungodly amount of nuts - 18 if I remember rightly - which are fiddly to get a spanner on at the best of times because they're a close fit to the surrounding casting. All of the forward ones on the underside are an absolute swine to get to in situ because the brake servo and generator are in the way - I'm pretty sure getting to the front couple last time round I had to unbolt the generator to get clearance. I'd far rather just deal with that off the car when I can easily get at things. Secondly is that while it does indeed make things a bit heavier, I reckon it actually makes it an easier mass to manhandle as it's an easier shape to get hold of. Having the carb side of the manifold 8" or so closer to me allowed me to just get a hand under that side then roll the head towards me and lift it clear of the car. It ain't light but is entirely within the realms of doable so long as you've planned the lift. Which I had. Had a piece of wood on the garden immediately to left so I just had to lift, rotate myself by about 180 degrees then put it straight down.
Ain't this a funky looking setup?

And holy hell, look at the size of those inlet valves!

Thumb for scale.

The ability to fit far larger valves for a given bore size was of course one of the primary reasons the IoE layout was originally developed - even so it's a bit surprising seeing valves larger than in some big commercial engines I've been inside in a car engine. It's no surprise that this seems to breathe surprisingly well.
I think we can pretty comprehensively say this gasket has been leaking in multiple places for some considerable time. See all this oily gunk down the side of the block? That's all oozed out of the join between the head and block. It's as much blowby as a conventional oil leak I think.

Looking at this gasket it probably would be quicker to list the locations where it *hasn't* been leaking I think.

I don't know how old this gasket is, but this corrosion hasn't happened overnight. Or in the last couple of years.


Next up I've got a fair bit of cleaning to do before we can see what we're working with.


I'm not going to be doing too much with the head myself as I'm just going to be chucking that at Headline MK to have it inspected and cleaned as they are far better equipped to do it properly than I am.
Before I can do that though I need to get the head and inlet manifold to part company.
So far they have been unimpressed with my efforts. Of course if I could find the dead blow hammer that might help, but beyond "in the garage" I've not a clue where it is.
This is where we left things for now after I fogged the cylinders with some oil.

Before anything goes back together I'll be taking the opportunity to clean up this side of the engine bay. Likewise to pull the heater core to see if I can unclog it as that's going to be way less awkward while I have this much extra space to play with. Likewise adjusting the steering box, given that you can actually *see* it at the moment, it's usually buried under the intake manifold.
While I don't want to get any more water into the engine than I can avoid, given how much of a slimy mess it is, I reckon that a *bunch* of degreaser and the pressure washer are probably going to be in its future. I'll be here for a month trying to clean it by hand.
Even if the head gasket was fine, eventually I'd have had to pull the head to change this.

Which sits in between the head and water pump around this little stub.

Odd setup.
Given that the water pump studs are renowned for snapping, the head is generally considered to be the safer of the two to remove.
Pretty simple getting this far to be honest. Probably took me a couple of hours to get this far, though a full 30 minutes of that was probably faffing around removing the inlet manifold nuts 1/75th a turn at a time.
Probably be a couple of weeks before reassembly can start, but it feels good to have got stuck into it and had things come apart pretty much as planned.
In other news, more parts for the pinball machine have arrived, so the light bar has now been installed. This isn't something you strictly NEED, but it helps make up for the fact that there's only so much brightness you can get out of an LCD panel.

Again I don't need to do any of the hard work here as all the running of them is handled through the Direct Output Framework - I just tell the controller which ports they're connected to and that it's a five lamp RGB light bar.
Two far more chunky solenoids for the flippers have also arrived though I've not had time to connect that up yet. The two currently serving that role will be relocated to the back corners to give us a full 3 x 3 matrix to allow correctly localised feedback for things on the playfield.
Current fleet:
07 Volvo V70 SE D5, 85 Sinclair C5, 84 Trabant 601S, 73 AC Model 70, 62 Rover 110.
-
CitroJim
- A very naughty boy
- Posts: 54787
- Joined: 30 Apr 2005, 23:33
- x 8191
Re: Zel's Fleet Blog - BX, Jag XJ-S, Sinclair C5, Mercedes 208D & 230TE, AC Model 70.
Most excellent Zel and good work on the Rover
That certainly is a well designed combustion chamber to get around the downsides of a long stroke small-bore engine.
Yep, no doubt the head gasket is cooked... Are you going to have the head lightly skimmed?
Jim
A bit of a Citroen AX fan...
-
Zelandeth
- Donor 2024
- Posts: 5285
- Joined: 16 Nov 2014, 23:36
- x 1591
Re: Zel's Fleet Blog - BX, Jag XJ-S, Sinclair C5, Mercedes 208D & 230TE, AC Model 70.
It will be (as lightly as possible) skimmed if it's deemed necessary. Though ideally it will just be cleaned. They'll have the right tools to confirm it's properly flat etc though, which is why I want it to be checked professionally. Especially as I don't imagine this type of gasket has much given in it or tolerance to imperfections.CitroJim wrote: 23 Aug 2025, 05:44 Most excellent Zel and good work on the RoverThat certainly is a well designed combustion chamber to get around the downsides of a long stroke small-bore engine.
Yep, no doubt the head gasket is cooked... Are you going to have the head lightly skimmed?
Current fleet:
07 Volvo V70 SE D5, 85 Sinclair C5, 84 Trabant 601S, 73 AC Model 70, 62 Rover 110.
-
Zelandeth
- Donor 2024
- Posts: 5285
- Joined: 16 Nov 2014, 23:36
- x 1591
Re: Zel's Fleet Blog - BX, Jag XJ-S, Sinclair C5, Mercedes 208D & 230TE, AC Model 70.
Bit of a change of pace this weekend and today.
Something which being from northern Scotland that really grates down here is how hard the water is. When I moved south I still had my parents kettle which probably dated from the 70s, which still looked like new inside. It had never been descaled. The whole concept of needing to do that, chip the timescale off the taps every week and such was something totally alien to me until I arrived in the Midlands. What I hadn't also realised was that about the same time I also started having severe skin problems. All of which mysteriously stopped when we went north again for a week recently. The potential for how ridiculously hard our water is to be playing a part wasn't something I had considered, but apparently that can be a thing.
I actually tested our water a few weeks ago, and got consistent results of between 320 and 350ppm. The chart with the testing kit maxes out at 180!
We had considered installing a water softener a few times before but life always happened and it fell off the end of the ticker tape which forms the house to do list.
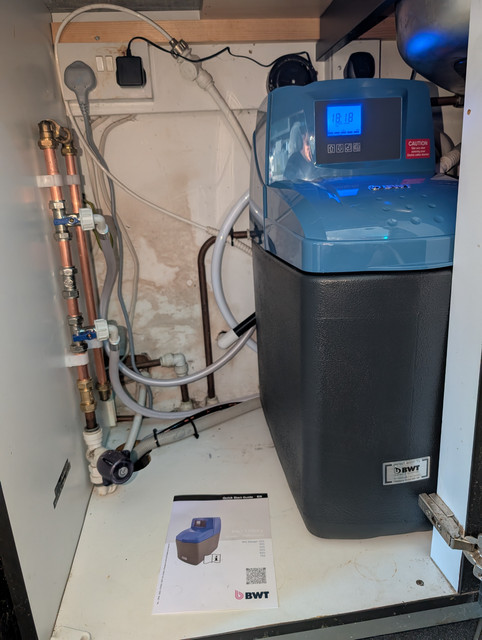
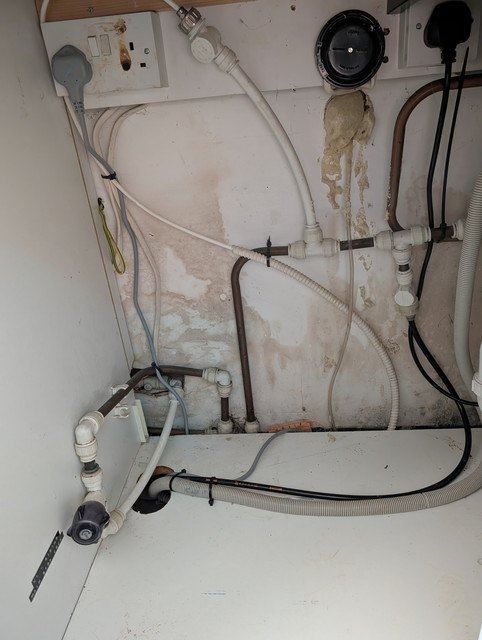
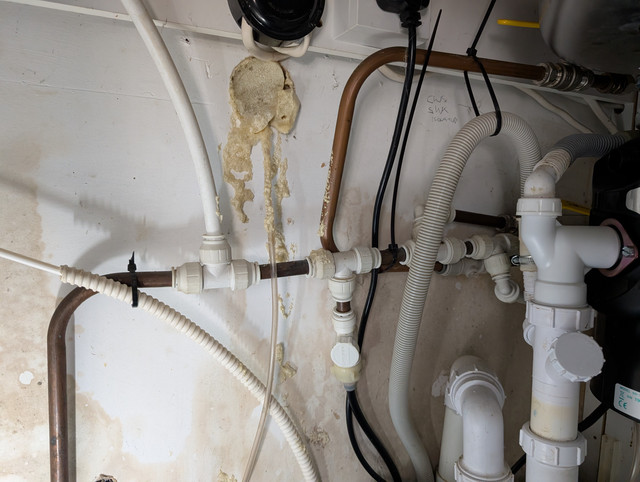
I do not like the plumbing in this house. Basically because anything that the previous owners touched looks like this.


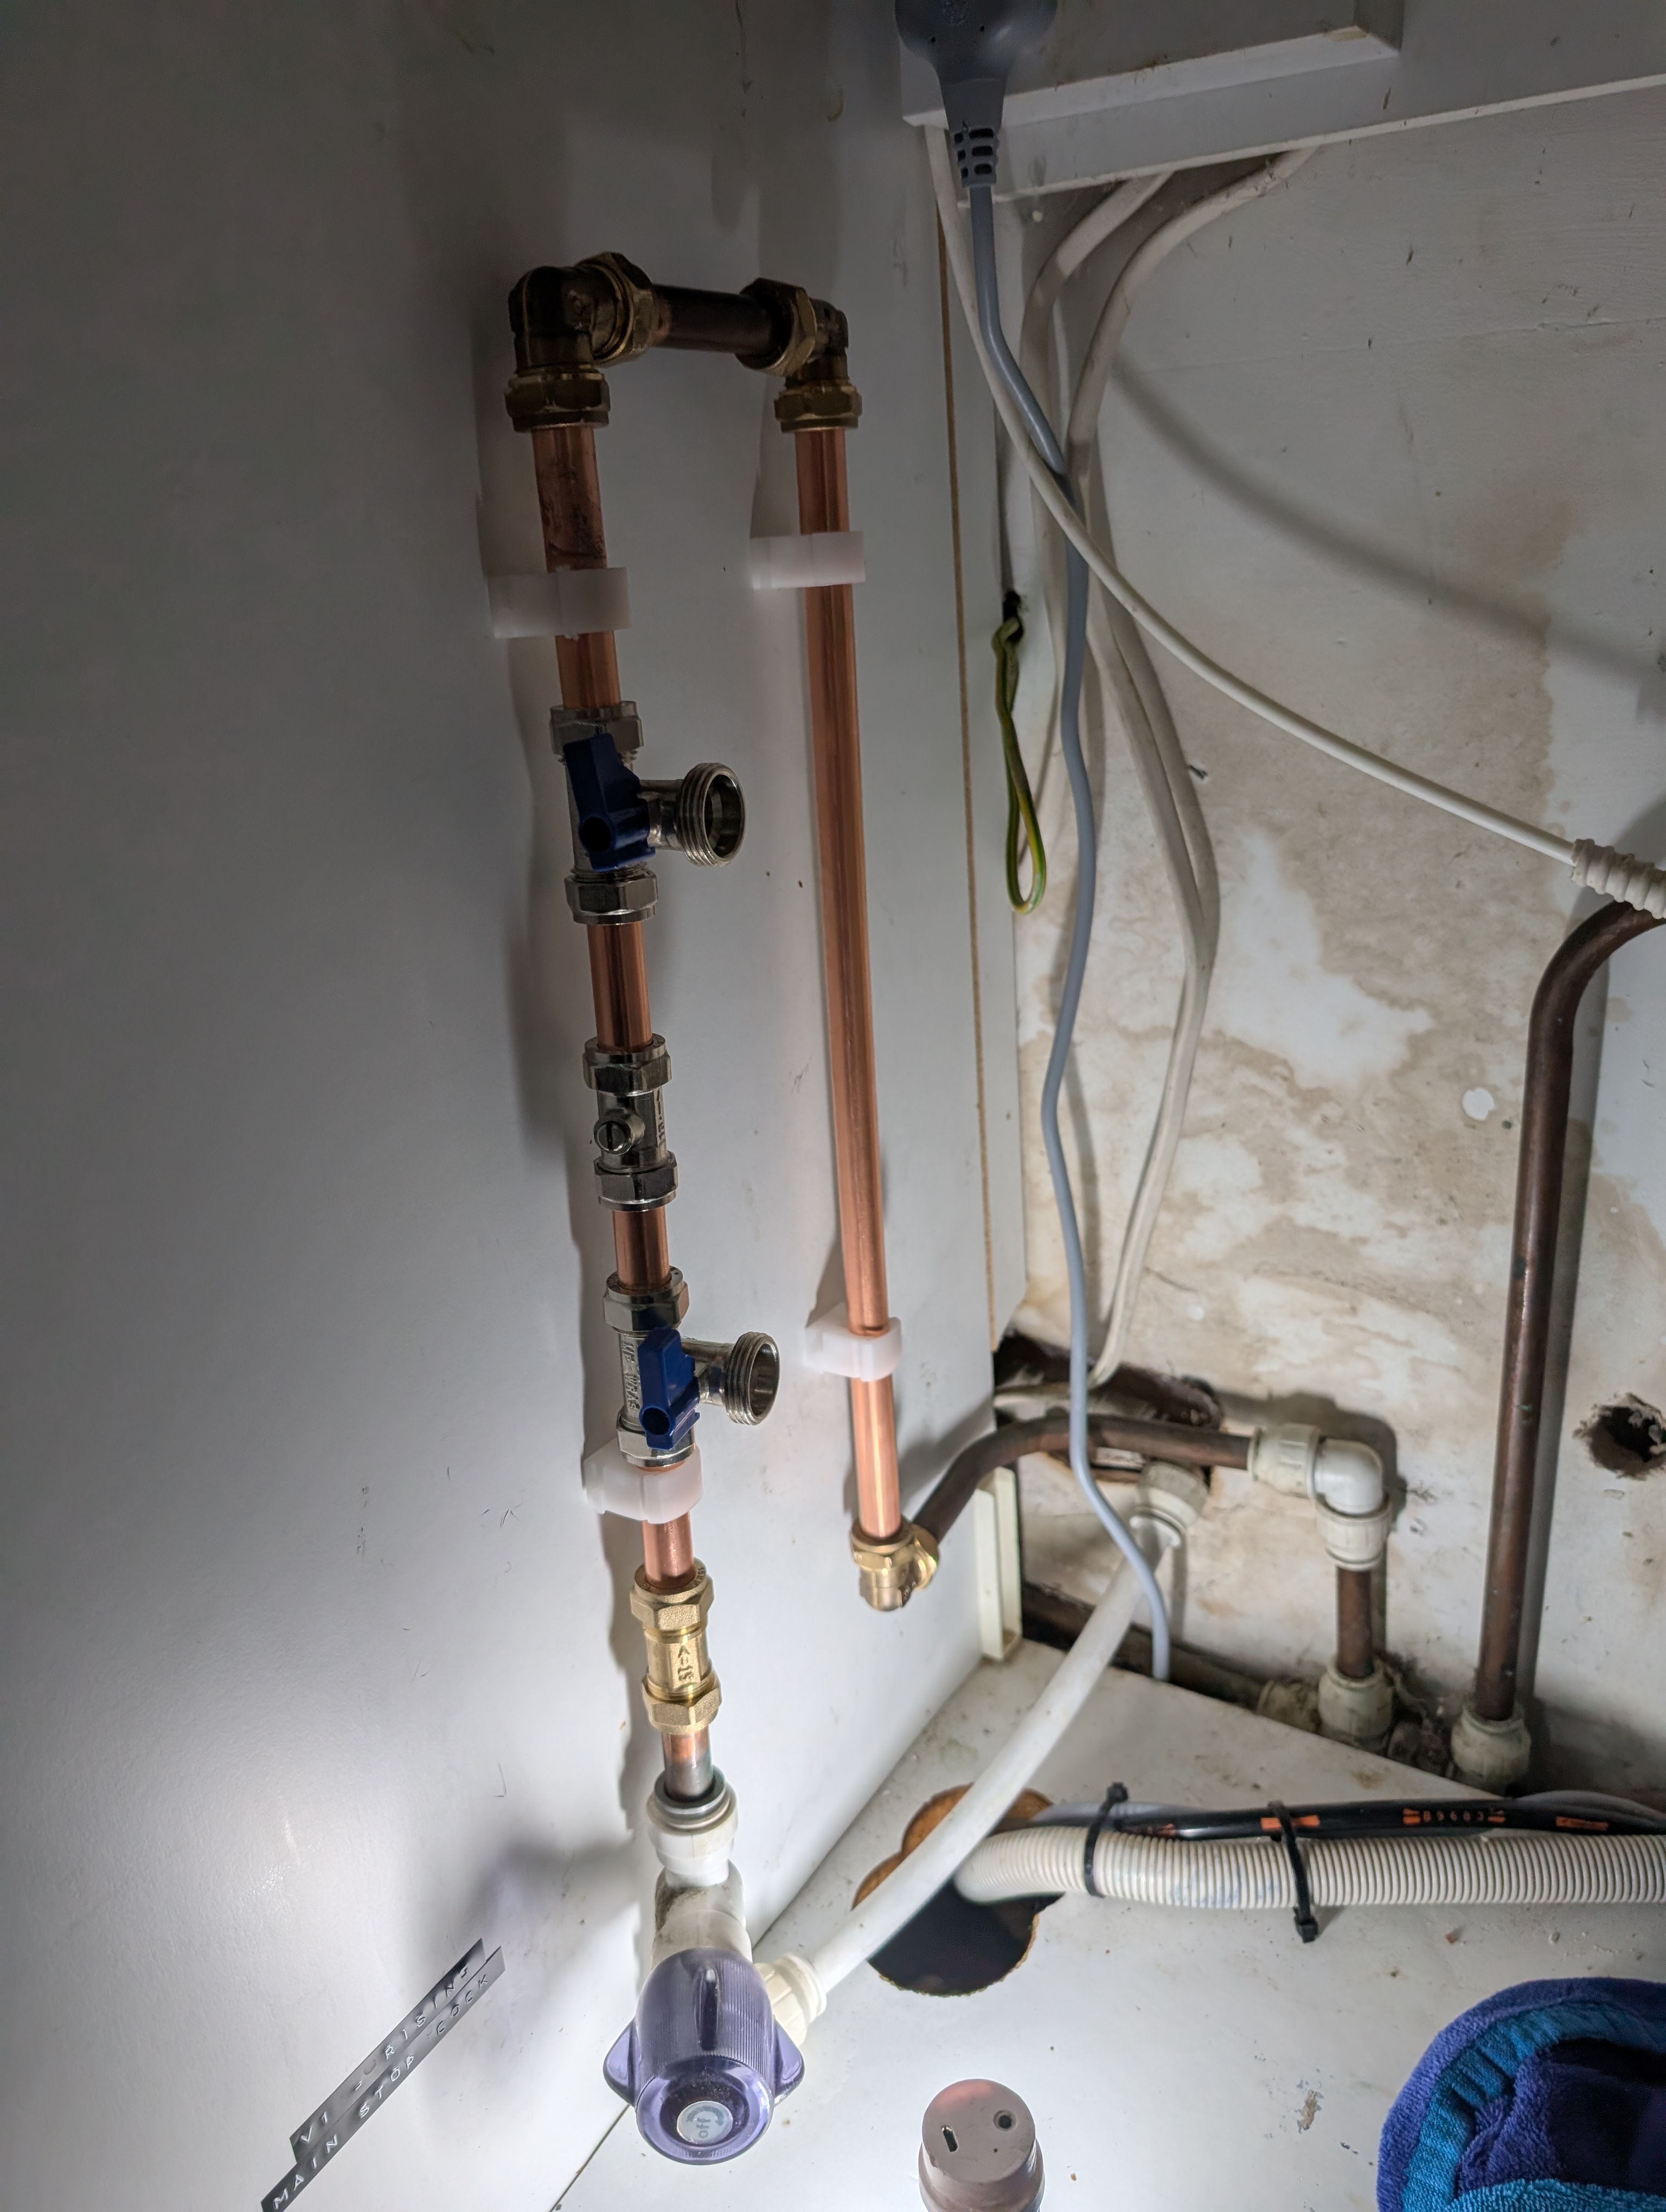
It's just a mess. I had to seriously sit on my hands today to not just rip that whole lot out, but I really didn't have a whole day to dedicate to tidying that up just because it bugs my OCD. Anything you see there with proper compression fittings (ball valves for isolating the kitchen sink taps) by the way has been added by me.
I'd like to think that my addition today has been done to slightly higher standards.

Then after far too long, we were up and running.

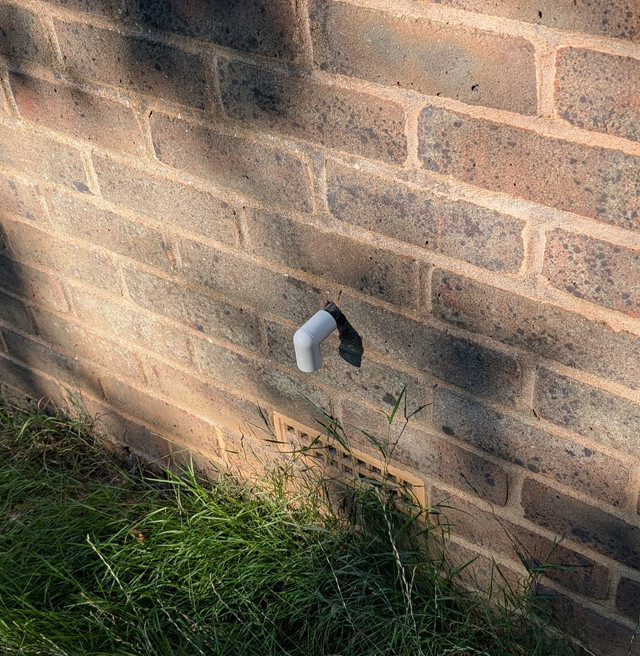
What took far longer than everything else combined was drilling the hole for the overflow. I really don't have a drill designed for this type of job...and for the one time every ten years or so there's really no point in me getting a bigger one.

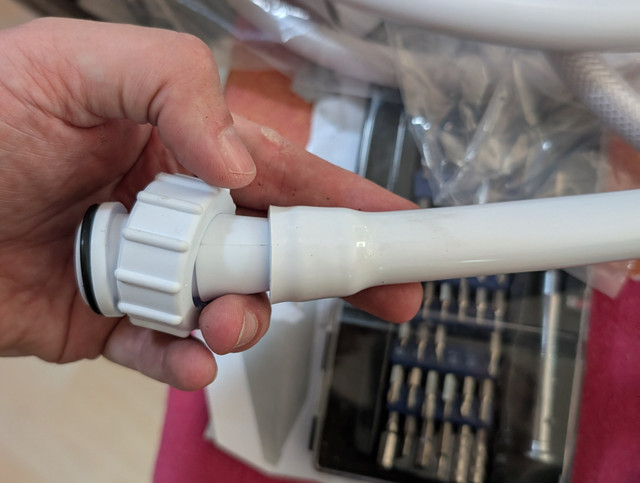
Whoever decided to rigidly attach the overflow to the back of something that virtually everyone will be installing in an enclosed space clearly never had to use their own products. Getting that attached was an absolute nightmare.
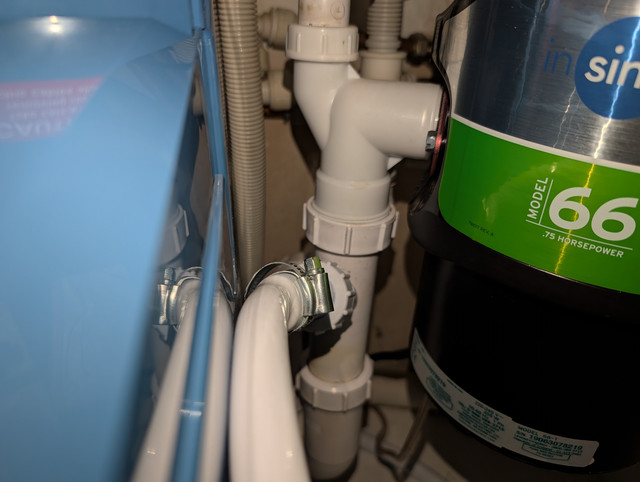
The drain line also caused a bit of head scratching initially. The usual arrangement for this would be to have it running to a standpipe or direct to a surface drain. I didn't have the room for that really, and it would have meant completely redesigning the drain pipework in there. I really wasn't interested in that nonsense. I did however have a spare washing machine drain style spigot on the sink waste...and with a bit of help from a heat gun I made that work.

Sorted.

Will be interesting to do another hardness test tomorrow and see what number that comes back with.
That socket will be getting replaced as it's obviously been vastly overheated at some point, but seems to make fine contact and this pulls a maximum of 6W so it'll be fine till tomorrow. I didn't know it was so bad until I unplugged the previous dishwasher that was in here when we moved in from there.
Further rambling from the weekend's activities will need to wait until tomorrow as I'm out of time for now.
Something which being from northern Scotland that really grates down here is how hard the water is. When I moved south I still had my parents kettle which probably dated from the 70s, which still looked like new inside. It had never been descaled. The whole concept of needing to do that, chip the timescale off the taps every week and such was something totally alien to me until I arrived in the Midlands. What I hadn't also realised was that about the same time I also started having severe skin problems. All of which mysteriously stopped when we went north again for a week recently. The potential for how ridiculously hard our water is to be playing a part wasn't something I had considered, but apparently that can be a thing.
I actually tested our water a few weeks ago, and got consistent results of between 320 and 350ppm. The chart with the testing kit maxes out at 180!
We had considered installing a water softener a few times before but life always happened and it fell off the end of the ticker tape which forms the house to do list.
I do not like the plumbing in this house. Basically because anything that the previous owners touched looks like this.


It's just a mess. I had to seriously sit on my hands today to not just rip that whole lot out, but I really didn't have a whole day to dedicate to tidying that up just because it bugs my OCD. Anything you see there with proper compression fittings (ball valves for isolating the kitchen sink taps) by the way has been added by me.
I'd like to think that my addition today has been done to slightly higher standards.

Then after far too long, we were up and running.

What took far longer than everything else combined was drilling the hole for the overflow. I really don't have a drill designed for this type of job...and for the one time every ten years or so there's really no point in me getting a bigger one.

Whoever decided to rigidly attach the overflow to the back of something that virtually everyone will be installing in an enclosed space clearly never had to use their own products. Getting that attached was an absolute nightmare.
The drain line also caused a bit of head scratching initially. The usual arrangement for this would be to have it running to a standpipe or direct to a surface drain. I didn't have the room for that really, and it would have meant completely redesigning the drain pipework in there. I really wasn't interested in that nonsense. I did however have a spare washing machine drain style spigot on the sink waste...and with a bit of help from a heat gun I made that work.

Sorted.

Will be interesting to do another hardness test tomorrow and see what number that comes back with.
That socket will be getting replaced as it's obviously been vastly overheated at some point, but seems to make fine contact and this pulls a maximum of 6W so it'll be fine till tomorrow. I didn't know it was so bad until I unplugged the previous dishwasher that was in here when we moved in from there.
Further rambling from the weekend's activities will need to wait until tomorrow as I'm out of time for now.
Current fleet:
07 Volvo V70 SE D5, 85 Sinclair C5, 84 Trabant 601S, 73 AC Model 70, 62 Rover 110.
-
xantia_v6
- Forum Admin Team
- Posts: 10857
- Joined: 09 Nov 2005, 22:03
- x 1412
Re: Zel's Fleet Blog - BX, Jag XJ-S, Sinclair C5, Mercedes 208D & 230TE, AC Model 70.
I am not familiar with the plumbing for water softeners, but instinct tells me that UK regs would prohibit connecting to that sink drain without an air gap (and maybe even with one), similar to hot water tanks.
-
Zelandeth
- Donor 2024
- Posts: 5285
- Joined: 16 Nov 2014, 23:36
- x 1591
Re: Zel's Fleet Blog - BX, Jag XJ-S, Sinclair C5, Mercedes 208D & 230TE, AC Model 70.
The weekend itself was a bit of a change of pace. Something I randomly stumbled across a couple of months ago was the fact that there is actually an annual pinball convention in the UK. I think it was in the news section on VP Universe. This was something of a surprise for me as I didn't figure it really had much of a following over here. I was even more surprised to find that it was only half an hour up the road in Daventry. So of course I signed up to go and investigate.
Let's just say that I had sliiiiiiiiightly underestimated how well attended the event was going to be.


There were a bunch of tournaments running over the course of the weekend, though I was really just interested in the 100+ machines they had set up on free play.
So what did I spend the most time on?


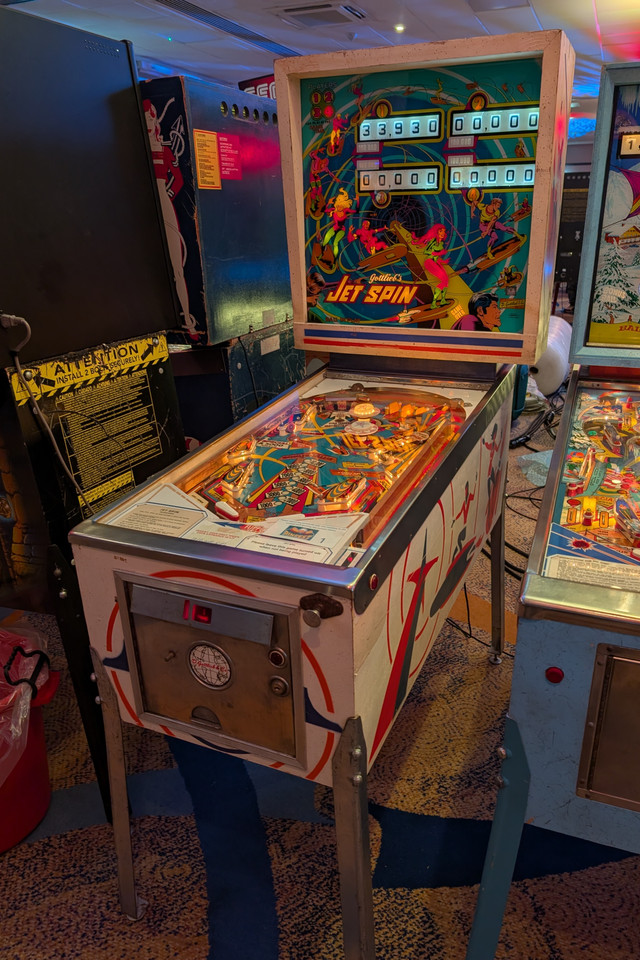
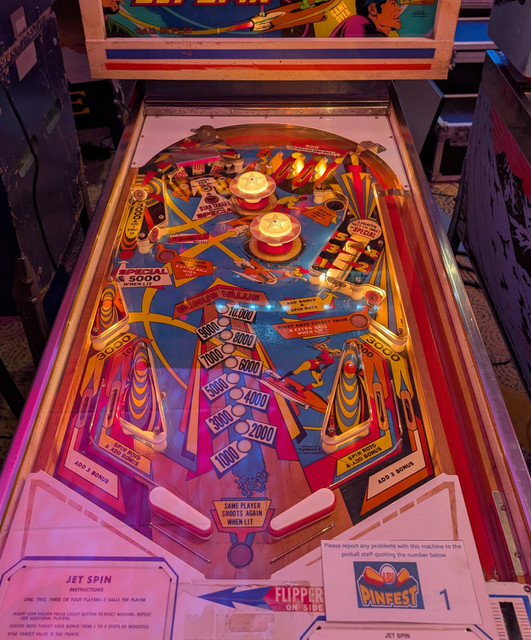
Jet Spin. Has been a favourite ever since I got it running on my virtual setup at home. Simple table in terms of the rule set but it's just enjoyable to play.
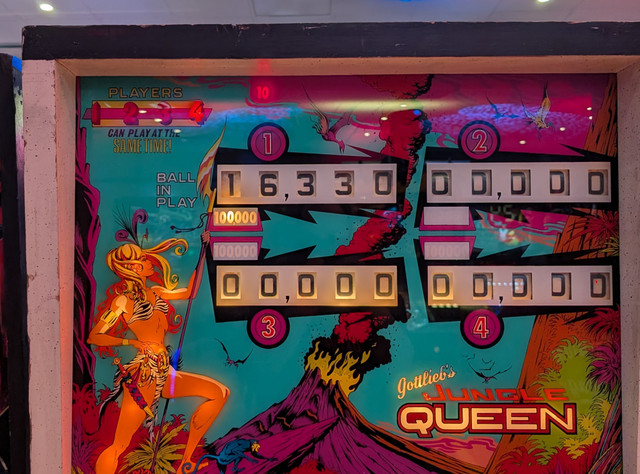
A close second was one I'd never really given much time to before, Jungle Queen.


Again pretty simple formula but enjoyable. Plus once you've got the hang of it even I can pretty consistently run out of score reels.

Quite satisfyingly I found that my average scores on there were actually very close to what I've been seeing on my cabinet at home (well that's Jungle Princess - but it's just the two player version of exactly the same game) which suggests to me that my setup is probably reasonably true to form in how it behaves.
It's probably a good thing that I respect the fact that I have no room or this probably would have come home with me.


While it's a little care worn and needed a bit of a service (and the LED conversion undone, sorry I just don't like it on classic tables), £1200 for a proper Steve Ritchie designed table to me in the UK market sounds really cheap. If I had the room it would have been in the car on the way home with me.
A bit of a neat spot during the weekend was an Eight Ball Deluxe LE - what my cabinet used to be.

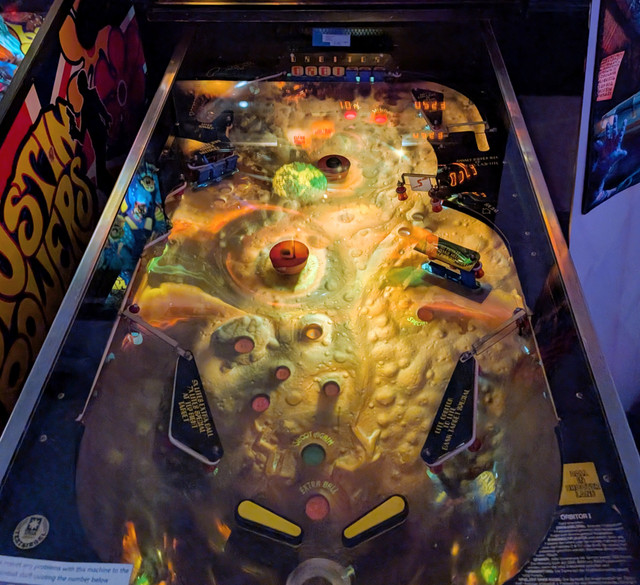
Though my biggest surprise of the weekend was this madness - Orbitor 1 by Stern. Yes spelled like that, someone had trademarked the proper spelling apparently!


This thing looks wacky, but how it plays is orders of magnitude weirder than you'd imagine possible. For a start, the playfield isn't flat. It's a fairly gently contoured valley, which obviously has an impact on how the ball rolls. That's only half of it though - I initially thought there were magnets or something under the playfield as well as the way the ball behaved just defied any other explanation. However it's way simpler than that - and really clever. Those two red bumpers in the playfield which look like pop bumpers, they're actually spinning and covered in a pretty grippy rubber material. So in addition to bouncing the ball around they also impart ridiculous amounts of spin to it. This results in some incredibly odd looking behaviour.
Jump to 02:00 in the video below to see what I mean.
My initial reaction was basically standing there with a comic strip thought bubble reading "...?" above my head after I launched the first ball.
It's a fascinating table and a huge amount of fun to play. Definitely one that's on my "Yep, I'd buy one if I had the room" list now. Also notable as being Stern's last table before they exited the pinball market until they reappeared in 1999.
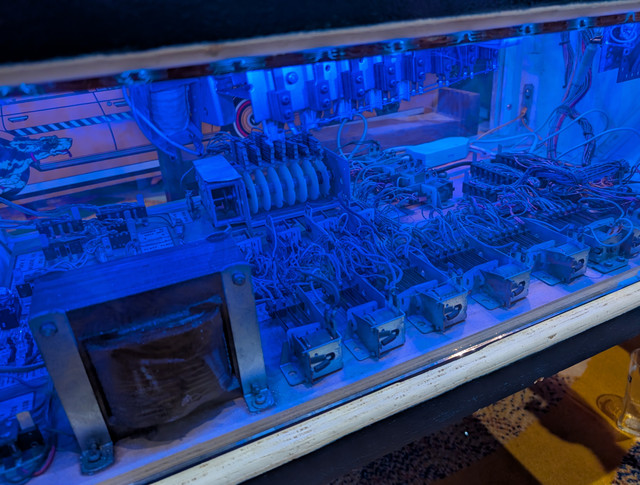
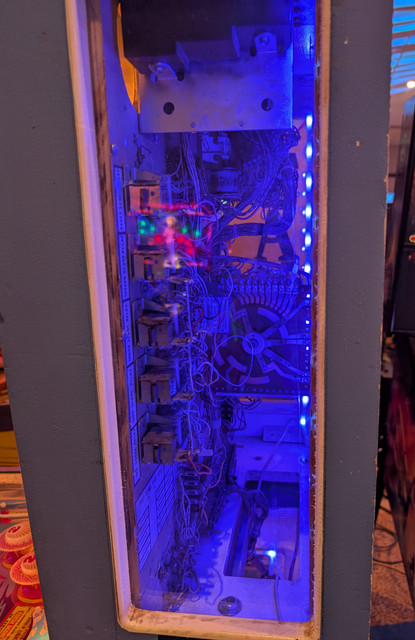
This was quite a neat idea someone had done to make a display piece of this Nautilus. It's always a bit of a shame that so much of an EM table is hidden away never to be seen - this shows off all of those dozens and dozens of relays.


All in all it was a good fun weekend. I'm nowhere near skilled enough to be a worthy competitor in any of the tournaments, I was just there to enjoy playing some pinball. Was also quite useful for me being able to snap photos of a bunch of tables from my usual standing position for fine tuning the field of view settings on my cabinet. Will definitely be going back next year.
Did have a bit of excitement i could have done with on the way home though. Driving along quite happily when out of nowhere the car developed the worst vibration I have ever encountered in a vehicle. I thought the gearbox, a CV joint, collapsed engine mount or something like that had let go. It was honestly violent enough I was worried about it triggering airbags and things like that.
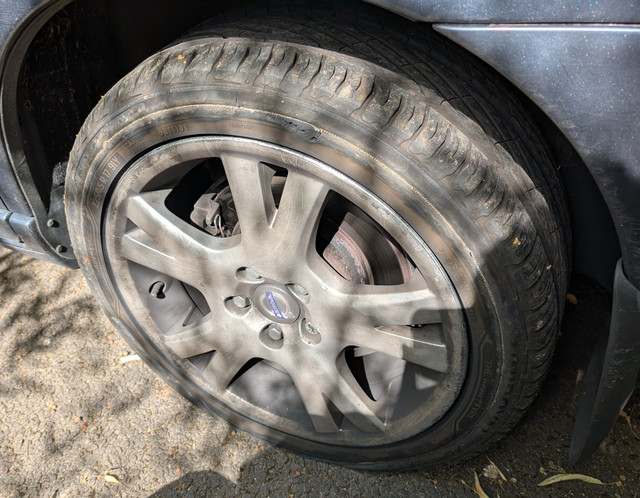
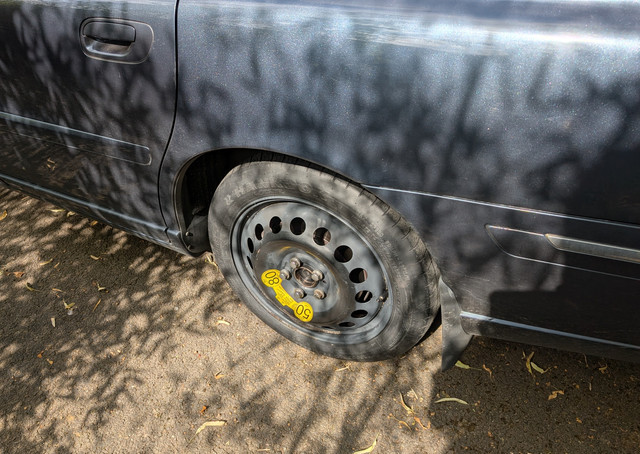
A bit of investigation once I pulled into a side road (of course I was somewhere I initially couldn't stop safely) pretty quickly found the culprit.


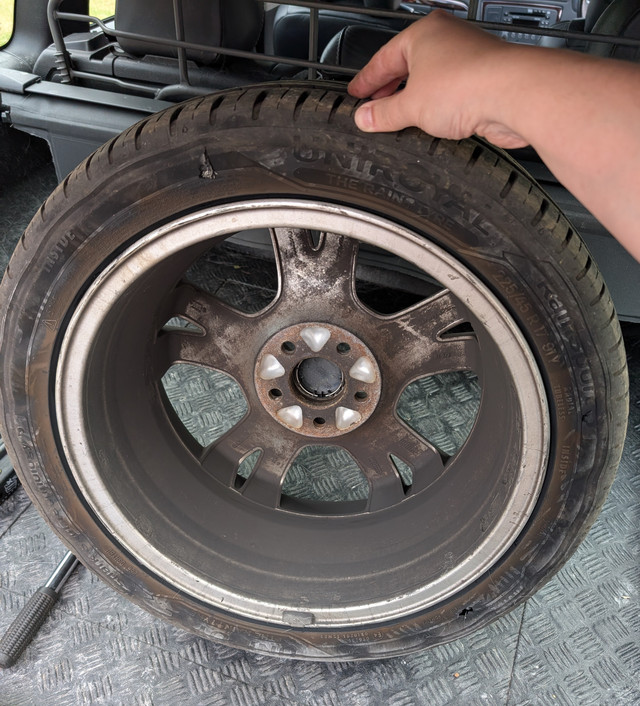
Yep. That's dead! No chance the can of goo most cars seem to come with nowadays would have been any use. It's a space saver, but at least the Volvo does have an actual spare wheel. Ten minutes and we were back on the road.

Were it not for that I'd probably have been sitting there two hours plus waiting for recovery to turn up.
Honestly between how heavy a car it is, how unnecessarily hard the suspension is, the daft low profile tyres and the horrific state of the roads around here, I'm surprised I've only had one blow out so far. What does worry me though is how much without any warning this let go though. They were last checked on Friday afternoon and the pressure was spot on then, I certainly wasn't aware of any signs that we had lost pressure leading up to the event. Just suddenly the entire universe was trying to vibrate itself apart around me.
Having one odd tyre on the car as I'll have to have now is going to bug me something rotten!
No real harm done though, and it didn't take the shine off what had otherwise been a good weekend for me.
Let's just say that I had sliiiiiiiiightly underestimated how well attended the event was going to be.


There were a bunch of tournaments running over the course of the weekend, though I was really just interested in the 100+ machines they had set up on free play.
So what did I spend the most time on?


Jet Spin. Has been a favourite ever since I got it running on my virtual setup at home. Simple table in terms of the rule set but it's just enjoyable to play.
A close second was one I'd never really given much time to before, Jungle Queen.


Again pretty simple formula but enjoyable. Plus once you've got the hang of it even I can pretty consistently run out of score reels.

Quite satisfyingly I found that my average scores on there were actually very close to what I've been seeing on my cabinet at home (well that's Jungle Princess - but it's just the two player version of exactly the same game) which suggests to me that my setup is probably reasonably true to form in how it behaves.
It's probably a good thing that I respect the fact that I have no room or this probably would have come home with me.


While it's a little care worn and needed a bit of a service (and the LED conversion undone, sorry I just don't like it on classic tables), £1200 for a proper Steve Ritchie designed table to me in the UK market sounds really cheap. If I had the room it would have been in the car on the way home with me.
A bit of a neat spot during the weekend was an Eight Ball Deluxe LE - what my cabinet used to be.

Though my biggest surprise of the weekend was this madness - Orbitor 1 by Stern. Yes spelled like that, someone had trademarked the proper spelling apparently!


This thing looks wacky, but how it plays is orders of magnitude weirder than you'd imagine possible. For a start, the playfield isn't flat. It's a fairly gently contoured valley, which obviously has an impact on how the ball rolls. That's only half of it though - I initially thought there were magnets or something under the playfield as well as the way the ball behaved just defied any other explanation. However it's way simpler than that - and really clever. Those two red bumpers in the playfield which look like pop bumpers, they're actually spinning and covered in a pretty grippy rubber material. So in addition to bouncing the ball around they also impart ridiculous amounts of spin to it. This results in some incredibly odd looking behaviour.
Jump to 02:00 in the video below to see what I mean.
My initial reaction was basically standing there with a comic strip thought bubble reading "...?" above my head after I launched the first ball.
It's a fascinating table and a huge amount of fun to play. Definitely one that's on my "Yep, I'd buy one if I had the room" list now. Also notable as being Stern's last table before they exited the pinball market until they reappeared in 1999.
This was quite a neat idea someone had done to make a display piece of this Nautilus. It's always a bit of a shame that so much of an EM table is hidden away never to be seen - this shows off all of those dozens and dozens of relays.


All in all it was a good fun weekend. I'm nowhere near skilled enough to be a worthy competitor in any of the tournaments, I was just there to enjoy playing some pinball. Was also quite useful for me being able to snap photos of a bunch of tables from my usual standing position for fine tuning the field of view settings on my cabinet. Will definitely be going back next year.
Did have a bit of excitement i could have done with on the way home though. Driving along quite happily when out of nowhere the car developed the worst vibration I have ever encountered in a vehicle. I thought the gearbox, a CV joint, collapsed engine mount or something like that had let go. It was honestly violent enough I was worried about it triggering airbags and things like that.
A bit of investigation once I pulled into a side road (of course I was somewhere I initially couldn't stop safely) pretty quickly found the culprit.


Yep. That's dead! No chance the can of goo most cars seem to come with nowadays would have been any use. It's a space saver, but at least the Volvo does have an actual spare wheel. Ten minutes and we were back on the road.

Were it not for that I'd probably have been sitting there two hours plus waiting for recovery to turn up.
Honestly between how heavy a car it is, how unnecessarily hard the suspension is, the daft low profile tyres and the horrific state of the roads around here, I'm surprised I've only had one blow out so far. What does worry me though is how much without any warning this let go though. They were last checked on Friday afternoon and the pressure was spot on then, I certainly wasn't aware of any signs that we had lost pressure leading up to the event. Just suddenly the entire universe was trying to vibrate itself apart around me.
Having one odd tyre on the car as I'll have to have now is going to bug me something rotten!
No real harm done though, and it didn't take the shine off what had otherwise been a good weekend for me.
Last edited by Zelandeth on 27 Aug 2025, 07:25, edited 1 time in total.
Current fleet:
07 Volvo V70 SE D5, 85 Sinclair C5, 84 Trabant 601S, 73 AC Model 70, 62 Rover 110.
-
CitroJim
- A very naughty boy
- Posts: 54787
- Joined: 30 Apr 2005, 23:33
- x 8191
Re: Zel's Fleet Blog - BX, Jag XJ-S, Sinclair C5, Mercedes 208D & 230TE, AC Model 70.
That pinball meetup looked like great fun Zel
Shame it was slightly marred by the tyre 
Loved seeing the few tantalising pictures of the 'works' of some of the proper electro-mechanical ones
Jim
A bit of a Citroen AX fan...
-
OnlinePaulC5
- Donor 2024
- Posts: 2461
- Joined: 06 Jun 2023, 15:26
- x 632
Re: Zel's Fleet Blog - BX, Jag XJ-S, Sinclair C5, Mercedes 208D & 230TE, AC Model 70.
I am now a big fan of tyre pressure monitoring after we had a puncture on the 308 at 70mph overtaking a wagon on the A46 dual carriageway. It flagged up when alongside and gave me chance to finish the overtake and pull straight in to a layby. The tyre was still up so I thought a false warning but I could hear air leaking out and was soon flat. Fitting the space saver got us back on our way, plus going at 50 mph returned about 70 mpg over the next 60 miles when back home, would have been around 55 normally. The tyre was scrap since it had a 2 inch cut in the tread and the offending lump of metal inside it.
-
Zelandeth
- Donor 2024
- Posts: 5285
- Joined: 16 Nov 2014, 23:36
- x 1591
Re: Zel's Fleet Blog - BX, Jag XJ-S, Sinclair C5, Mercedes 208D & 230TE, AC Model 70.
Hopefully Peugeot's system is less flaky than VW/Audi's one. The systems in the modern VW/Audi/Skoda company car that's here flags up false alarms so frequently that it's basically ignored save for the couple of cars which have had an actual pressure readout rather than just a warning light. The Q5 was the worst - If the weather changed significantly from one day to the next it was 50/50 as to whether it would put the light on. Resetting it involved going several layers deep in menus on the dash as well which got very old very quickly.PaulC5 wrote: 27 Aug 2025, 12:32 I am now a big fan of tyre pressure monitoring after we had a puncture on the 308 at 70mph overtaking a wagon on the A46 dual carriageway. It flagged up when alongside and gave me chance to finish the overtake and pull straight in to a layby. The tyre was still up so I thought a false warning but I could hear air leaking out and was soon flat. Fitting the space saver got us back on our way, plus going at 50 mph returned about 70 mpg over the next 60 miles when back home, would have been around 55 normally. The tyre was scrap since it had a 2 inch cut in the tread and the offending lump of metal inside it.
Having had to randomly stop mid journey to check the tyres so often did do a good job of showing us how inaccurate a whole load of garage forecourt pressure gauges are though.
Current fleet:
07 Volvo V70 SE D5, 85 Sinclair C5, 84 Trabant 601S, 73 AC Model 70, 62 Rover 110.
-
OnlinePaulC5
- Donor 2024
- Posts: 2461
- Joined: 06 Jun 2023, 15:26
- x 632
Re: Zel's Fleet Blog - BX, Jag XJ-S, Sinclair C5, Mercedes 208D & 230TE, AC Model 70.
Interesting comment, we have a 2024 Skoda Octavia and a few weeks ago I pumped up the tyres a bit, did not bother resetting the TPMS and then 150 miles into a trip to the Lake District the warning went off in a long stretch of A66 40 mph roadworks. Pulled in to a layby, found nothing wrong so reset it and been ok since. At the time I did think maybe after so far at about 70 then slowing down the tyres had cooled and the pressures dropped a bit. Only an unlikely guess but later once cool on checking the pressures were still ok but I reset it again.
-
Hell Razor5543
- (Donor 2023)
- Posts: 14269
- Joined: 01 Apr 2012, 09:47
- x 3281
Re: Zel's Fleet Blog - BX, Jag XJ-S, Sinclair C5, Mercedes 208D & 230TE, AC Model 70.
Years ago I had a 57 reg company Skoda Octavia with a simple TPMS (using the ABS system to monitor wheel speeds all of the time, rather than just when braking). Unusually I read the owners handbook, and learned that, any time you topped up the tyres, you had to hold down the TPMS button for a couple of seconds to update the system. The only time I got any warning was because there was a screw in the tread. No false alarms, no missed low tyres.
James
ex BX 1.9
ex Xantia 2.0HDi SX
ex Xantia 2.0HDi LX
ex C5 2.0HDi VTR
ex C5 2.0HDi VTR
ex C5 2.2HDi VTX+
Yes, I am paranoid, but am I paranoid ENOUGH?
Out amongst the stars, looking for a world of my own!
ex BX 1.9
ex Xantia 2.0HDi SX
ex Xantia 2.0HDi LX
ex C5 2.0HDi VTR
ex C5 2.0HDi VTR
ex C5 2.2HDi VTX+
Yes, I am paranoid, but am I paranoid ENOUGH?
Out amongst the stars, looking for a world of my own!
-
Zelandeth
- Donor 2024
- Posts: 5285
- Joined: 16 Nov 2014, 23:36
- x 1591
Re: Zel's Fleet Blog - BX, Jag XJ-S, Sinclair C5, Mercedes 208D & 230TE, AC Model 70.
To be honest, half the problem is that the car changes every four months - well it's meant to be but they're usually running late - and they usually seem to have changed the UI just enough to not be able to find everything between cars. Though their recent obsession with complete elimination of all physical buttons means I can't even use half of them as their capacitive touch sensors as with so many things (like our hob) often refuse to acknowledge the existence of my finger tips. Not even being able to turn on/off the heated seat in the Arteon without asking for help because I couldn't make the button work was downright embarrassing!
Just glad I don't need to travel in them often.
Current fleet:
07 Volvo V70 SE D5, 85 Sinclair C5, 84 Trabant 601S, 73 AC Model 70, 62 Rover 110.
-
Zelandeth
- Donor 2024
- Posts: 5285
- Joined: 16 Nov 2014, 23:36
- x 1591
Re: Zel's Fleet Blog - BX, Jag XJ-S, Sinclair C5, Mercedes 208D & 230TE, AC Model 70.
First up I want to issue an apology. My phone upgraded itself to the latest version of Android a few days ago and one of the very obvious changes is that autocorrect has become FAR more aggressive. However it also seems to have at the same time become far more erratic and is often autocorrecting things with utter nonsense. I do try to proof read things before hitting submit, but I'm not the best at spotting where nonsense like that has happened.
Using an external keyboard doesn't even stop it!
-- -- --
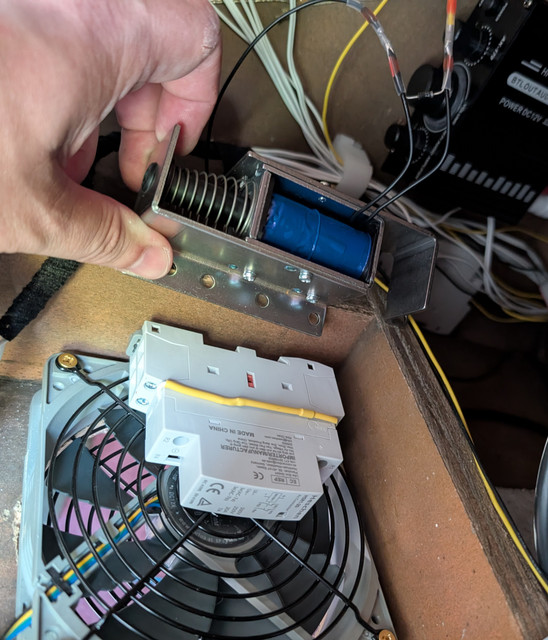
Very quick upgrade made to the pinball project today - far beefier coils for the flipper feedback devices. The little contactors I'd originally used (because they were readily available and very cheap) just didn't give anywhere near as substantial a thunk particularly for the flippers. These should be more what the doctor ordered.

These are actually made specifically for this application. I may well upgrade a couple of the others down the line, especially for the centre rear playfield which does most of the work simulating the pop bumpers, but will probably go with something more cheaply available like a generic automotive starter solenoid for that. Having some variety between the various items isn't a bad thing anyway as there is in a real machine too.
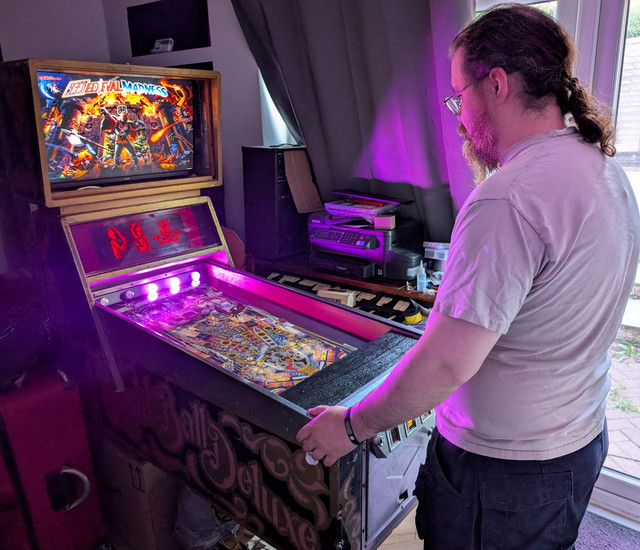
The light bar behind the display is also now working. This helps make up for the lack of brightness from display panels just not being able to produce the same effect as the high intensity flash lamps which there are on many tables.
These five lamps are all addressable RGB units which are handled by the Direct Output Framework and operate in time with events on the tables - either when the flashers would be fired there, but also just where the folks doing the digital conversion felt it was appropriate. They have some decent punch to them.

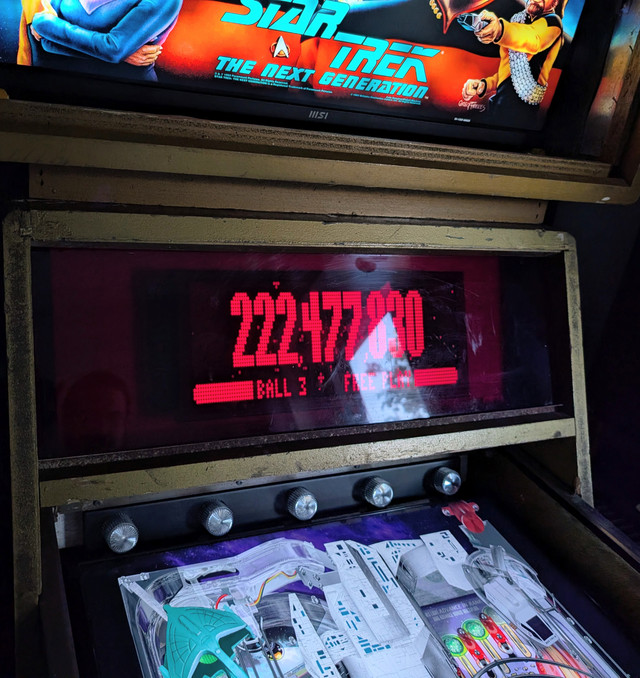
The centre display is also far brighter now it has the new panel in place - I just need to paint the backing board for it so that's not visible through the window.

Once that's done the score displays should just "float" there without the display itself really being obvious.
Was quite nice yesterday evening just playing the thing for an hour or so as I'd intended. We're definitely down to more of the detailed work now.
Using an external keyboard doesn't even stop it!
-- -- --
Very quick upgrade made to the pinball project today - far beefier coils for the flipper feedback devices. The little contactors I'd originally used (because they were readily available and very cheap) just didn't give anywhere near as substantial a thunk particularly for the flippers. These should be more what the doctor ordered.

These are actually made specifically for this application. I may well upgrade a couple of the others down the line, especially for the centre rear playfield which does most of the work simulating the pop bumpers, but will probably go with something more cheaply available like a generic automotive starter solenoid for that. Having some variety between the various items isn't a bad thing anyway as there is in a real machine too.
The light bar behind the display is also now working. This helps make up for the lack of brightness from display panels just not being able to produce the same effect as the high intensity flash lamps which there are on many tables.
These five lamps are all addressable RGB units which are handled by the Direct Output Framework and operate in time with events on the tables - either when the flashers would be fired there, but also just where the folks doing the digital conversion felt it was appropriate. They have some decent punch to them.

The centre display is also far brighter now it has the new panel in place - I just need to paint the backing board for it so that's not visible through the window.

Once that's done the score displays should just "float" there without the display itself really being obvious.
Was quite nice yesterday evening just playing the thing for an hour or so as I'd intended. We're definitely down to more of the detailed work now.
Current fleet:
07 Volvo V70 SE D5, 85 Sinclair C5, 84 Trabant 601S, 73 AC Model 70, 62 Rover 110.