Zel's Fleet Blog - BX, Jag XJ-S, Sinclair C5, Mercedes 208D & 230TE, AC Model 70.
-
CitroJim
- A very naughty boy
- Posts: 54730
- Joined: 30 Apr 2005, 23:33
- x 8167
Re: Zel's Fleet Blog - BX, Jag XJ-S, Sinclair C5, Mercedes 208D & 230TE, AC Model 70.
There's an awful lot of devil in the detail here Zel
Absolutely loving all of this 
Jim
A bit of a Citroen AX fan...
-
Zelandeth
- Donor 2024
- Posts: 5274
- Joined: 16 Nov 2014, 23:36
- x 1586
Re: Zel's Fleet Blog - BX, Jag XJ-S, Sinclair C5, Mercedes 208D & 230TE, AC Model 70.
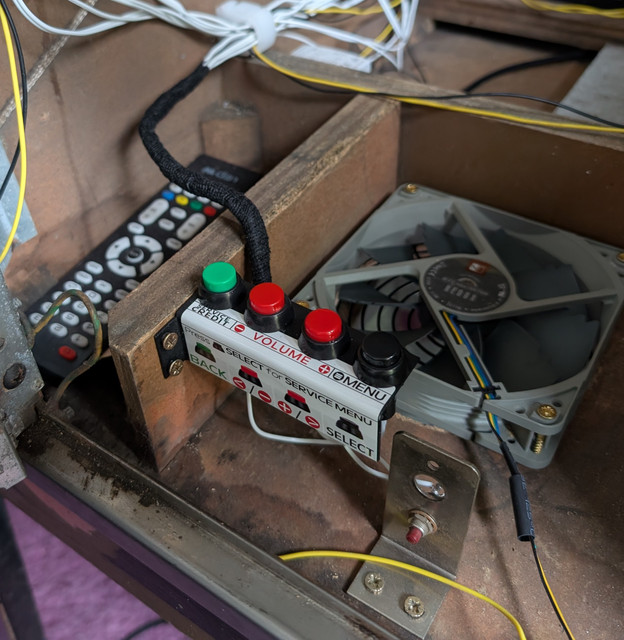
The service menu controls have now been hooked up.

The little red button on the right is actually the self test button from the original cabinet. It is now doing duty as a control which toggles whether the coin door appears open to the emulation. This is needed to get into the menus on a lot of machines - actually implementing a door switch on here would be a bit fiddly as there's no provision for one, and honestly being able to just choose whether it's open or closed is easier as it saves having to keep opening and closing the door if you're testing things. Gave me a good opportunity to let a bit of the original hardware keep being used usefully.
As this isn't a component that's likely to be changed as we move on I decided that we could go ahead and add loom wrap to the wiring immediately by these controls. Given the little compartment to the left there is being used as "misc stuff storage" and likely always will be giving that bit of wiring some protection seemed wise.
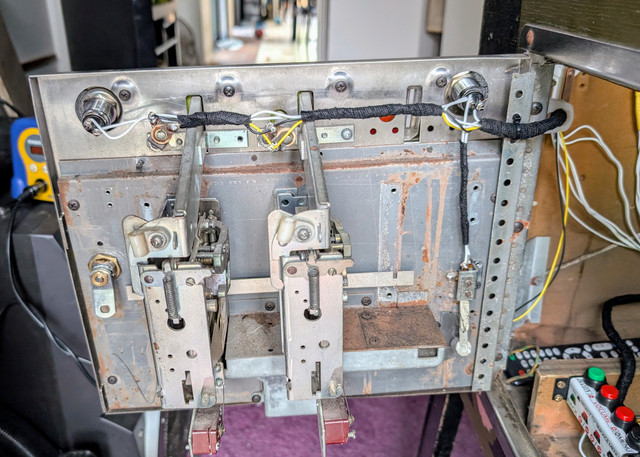
While I was in the area I hooked up the slam tilt switch on the coin door and also tidied up the wiring on there.

I wanted to get that done sooner than later as I felt things were quite vulnerable to getting pinched in the hinge - something that's now impossible. As it's the first thing you see when opening it up, having that look reasonably tidy helps with the first impression I think.
Nice to be at a stage where I feel I can actually do some basic tidying of some bits that I feel are basically finished. We won't be wrapping ALL of the wiring by any means, but i imagine a fair chunk of it will end up that way just because it looks so much tidier.
I don't have any photos, but the last thing I was working on today was testing out a better arrangement for table audio. Up until now we had just been using the onboard speakers in the playfield display, which are predictably very average. They're actually pretty clear and don't distort horribly or anything, but they don't really have any "punch" to them and it all just sounds a bit flat.
The original speaker was long gone, but a random 5x7" automotive speaker I had laying around fit reasonably well over the original cutout, and using a cheap little Amazon Special audio amp has given us faaaaar punchier sound. Much more in keeping with what you would expect from something like this. Given that this was absolutely not hifi sound from new going out of my way to fit a better speaker for that really would just be overkill. Unless this one turns out to be buzzy or distorts horribly (I've only tested it as far as proving it works so far) I'll probably just leave the one that's in there.
There WILL be some quite specialised audio equipment fitted far later on, but that's for more feedback purposes rather than game audio. What will be getting installed will be a set of four exciters which couple sound directly into the sides of the cabinet. What for? I hear you ask. To simulate one very specific effect - the sound of the ball itself rolling around the playfield. I wouldn't have thought of that, but apparently it works very well and does vastly improve the immersion.
Plunger is the last major component we need, and according to Royal Mail it is finally actually in the country after being stuck in customs for what has felt like about a month and a half. Once that's fitted I can get a proper enclosure made up for the apron rather than the current random bit of cardboard.

The little red button on the right is actually the self test button from the original cabinet. It is now doing duty as a control which toggles whether the coin door appears open to the emulation. This is needed to get into the menus on a lot of machines - actually implementing a door switch on here would be a bit fiddly as there's no provision for one, and honestly being able to just choose whether it's open or closed is easier as it saves having to keep opening and closing the door if you're testing things. Gave me a good opportunity to let a bit of the original hardware keep being used usefully.
As this isn't a component that's likely to be changed as we move on I decided that we could go ahead and add loom wrap to the wiring immediately by these controls. Given the little compartment to the left there is being used as "misc stuff storage" and likely always will be giving that bit of wiring some protection seemed wise.
While I was in the area I hooked up the slam tilt switch on the coin door and also tidied up the wiring on there.

I wanted to get that done sooner than later as I felt things were quite vulnerable to getting pinched in the hinge - something that's now impossible. As it's the first thing you see when opening it up, having that look reasonably tidy helps with the first impression I think.
Nice to be at a stage where I feel I can actually do some basic tidying of some bits that I feel are basically finished. We won't be wrapping ALL of the wiring by any means, but i imagine a fair chunk of it will end up that way just because it looks so much tidier.
I don't have any photos, but the last thing I was working on today was testing out a better arrangement for table audio. Up until now we had just been using the onboard speakers in the playfield display, which are predictably very average. They're actually pretty clear and don't distort horribly or anything, but they don't really have any "punch" to them and it all just sounds a bit flat.
The original speaker was long gone, but a random 5x7" automotive speaker I had laying around fit reasonably well over the original cutout, and using a cheap little Amazon Special audio amp has given us faaaaar punchier sound. Much more in keeping with what you would expect from something like this. Given that this was absolutely not hifi sound from new going out of my way to fit a better speaker for that really would just be overkill. Unless this one turns out to be buzzy or distorts horribly (I've only tested it as far as proving it works so far) I'll probably just leave the one that's in there.
There WILL be some quite specialised audio equipment fitted far later on, but that's for more feedback purposes rather than game audio. What will be getting installed will be a set of four exciters which couple sound directly into the sides of the cabinet. What for? I hear you ask. To simulate one very specific effect - the sound of the ball itself rolling around the playfield. I wouldn't have thought of that, but apparently it works very well and does vastly improve the immersion.
Plunger is the last major component we need, and according to Royal Mail it is finally actually in the country after being stuck in customs for what has felt like about a month and a half. Once that's fitted I can get a proper enclosure made up for the apron rather than the current random bit of cardboard.
Current fleet:
07 Volvo V70 SE D5, 85 Sinclair C5, 84 Trabant 601S, 73 AC Model 70, 62 Rover 110.
-
Zelandeth
- Donor 2024
- Posts: 5274
- Joined: 16 Nov 2014, 23:36
- x 1586
Re: Zel's Fleet Blog - BX, Jag XJ-S, Sinclair C5, Mercedes 208D & 230TE, AC Model 70.
Small details are continuing to be the order of the day.
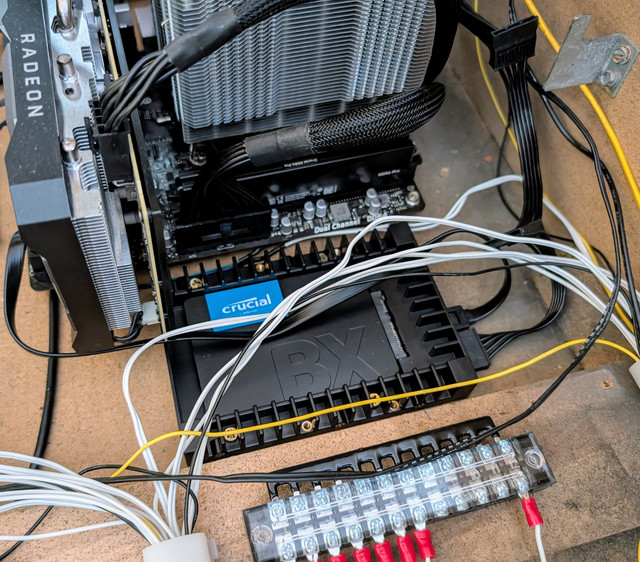
The PC's SSD has now been properly secured in a caddy rather than just being wedged in place. It doesn't run warm really anyway but I've positioned it such that the intake to the CPU cooler will cause a bit of airflow over the drive during normal operation to help keep it cool.

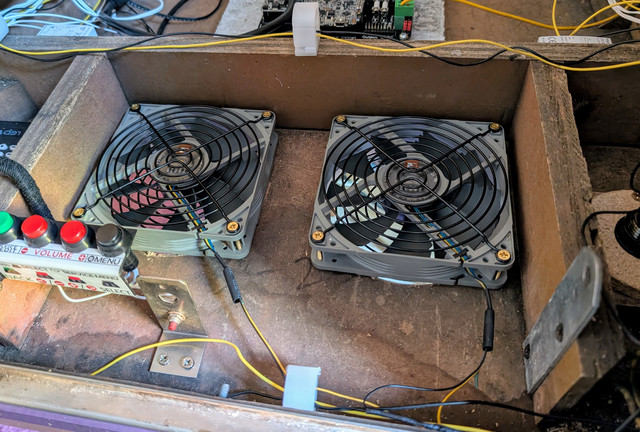
Given their location, it only seemed to be a matter of time before I either dropped something into the fans, got my knuckles skinned by them or had a wire chewed up by them so added some protective grills inside the cabinet as well as outside.

That just seemed a sensible thing to do before we ended up with blood being spilled. There has already been a blood sacrifice on a couple of occasions, so let's not leave unnecessarily opportunities for more!
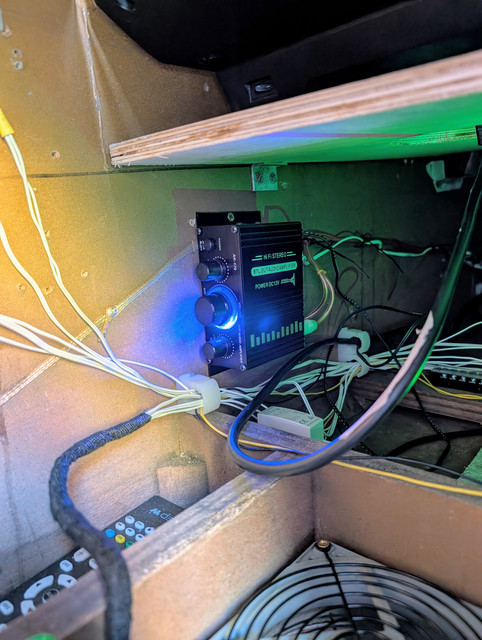
Actually played a couple of games this evening and can confirm that this little audio amplifier and the separate speaker in the cabinet base has made a big difference.

I do need to tweak things a little though as it's picking up quite a bit of interference on the audio feed to the amp - I know it's noise on there as moving the input cable around makes it change. I might see if using a shielded cable solves it, or if a bit of careful routing helps. I'm pretty sure the graphics card on the PC is where the noise is actually coming from.
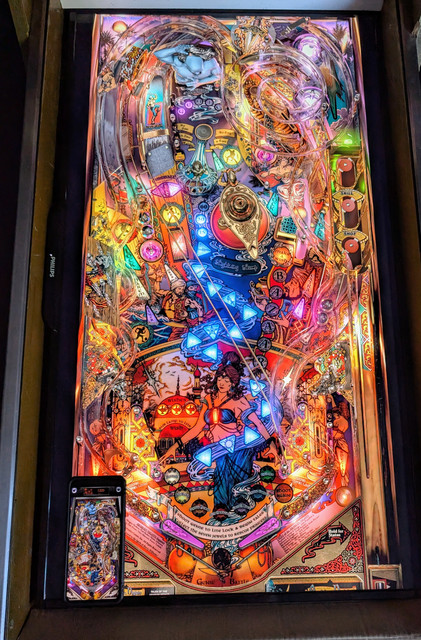
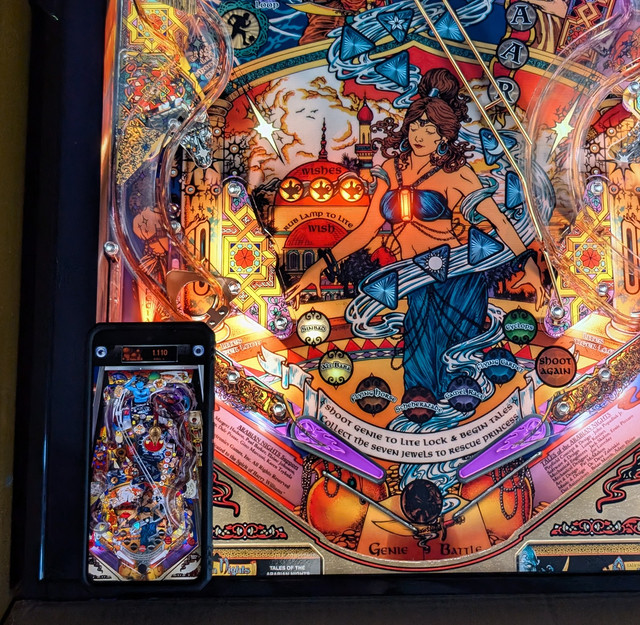
Here's a comparison between the machine itself and a game on my phone which I used to play quite often. Same table, different platform.


The screen I'm using now is just a *little* bit bigger...
The PC's SSD has now been properly secured in a caddy rather than just being wedged in place. It doesn't run warm really anyway but I've positioned it such that the intake to the CPU cooler will cause a bit of airflow over the drive during normal operation to help keep it cool.

Given their location, it only seemed to be a matter of time before I either dropped something into the fans, got my knuckles skinned by them or had a wire chewed up by them so added some protective grills inside the cabinet as well as outside.

That just seemed a sensible thing to do before we ended up with blood being spilled. There has already been a blood sacrifice on a couple of occasions, so let's not leave unnecessarily opportunities for more!
Actually played a couple of games this evening and can confirm that this little audio amplifier and the separate speaker in the cabinet base has made a big difference.

I do need to tweak things a little though as it's picking up quite a bit of interference on the audio feed to the amp - I know it's noise on there as moving the input cable around makes it change. I might see if using a shielded cable solves it, or if a bit of careful routing helps. I'm pretty sure the graphics card on the PC is where the noise is actually coming from.
Here's a comparison between the machine itself and a game on my phone which I used to play quite often. Same table, different platform.


The screen I'm using now is just a *little* bit bigger...
Current fleet:
07 Volvo V70 SE D5, 85 Sinclair C5, 84 Trabant 601S, 73 AC Model 70, 62 Rover 110.
-
Zelandeth
- Donor 2024
- Posts: 5274
- Joined: 16 Nov 2014, 23:36
- x 1586
Re: Zel's Fleet Blog - BX, Jag XJ-S, Sinclair C5, Mercedes 208D & 230TE, AC Model 70.
Last major component I'd been waiting on turned up today.
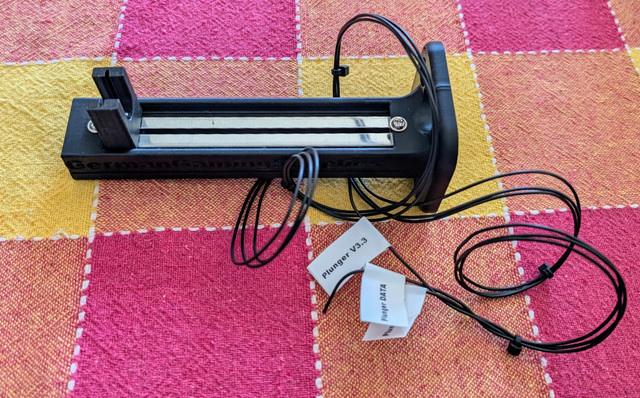
This is the bit of kit to make an exceptionally analogue device - the ball launch plunger on a pinball table - translate into a digital simulation.
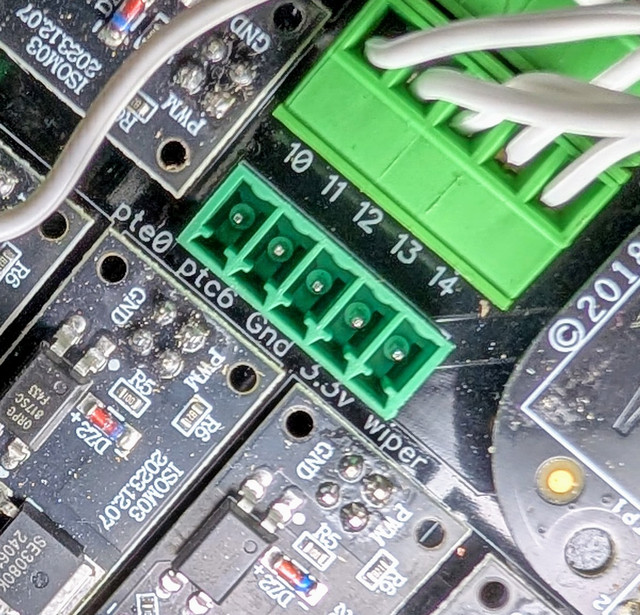
Helpfully the I/O board already has a dedicated set of terminals on the input side set aside for the plunger, and even has the terminals labelled.
The wiring even came labelled ready to install.
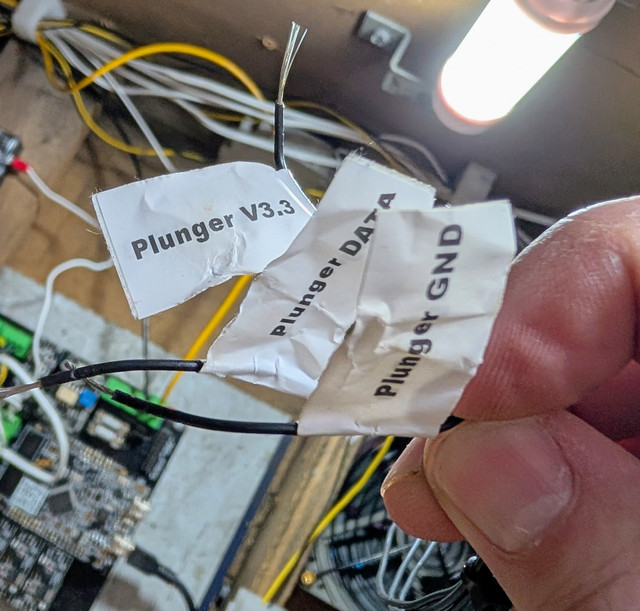
They weren't wrinkled up like that when it arrived, that's after being dragged through one of the cable management eyelets.
It probably won't surprise those of you who have followed this project from the start that we had clearance issues. In this case with the ball launch button - so I had to trim the surround a bit.
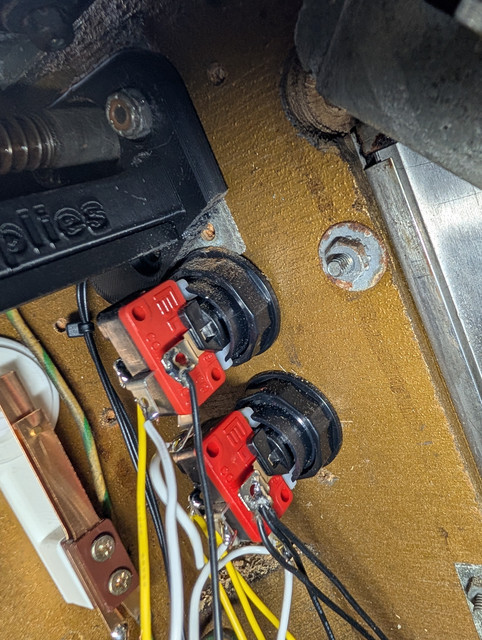
Not a problem though, the lower mounting bolt isn't used on this type of plunger anyway (this kit is designed to work with pretty much all the mainstream types) and there's plenty of surface area to securely fasten in place. Ideally I would have installed this *before* the buttons so wouldn't have had this issue, but hindsight is always 20/20. Honestly the button position works well from an ergonomic standpoint so an extra five minutes installing the plunger isn't a big issue.
Here's the end result.
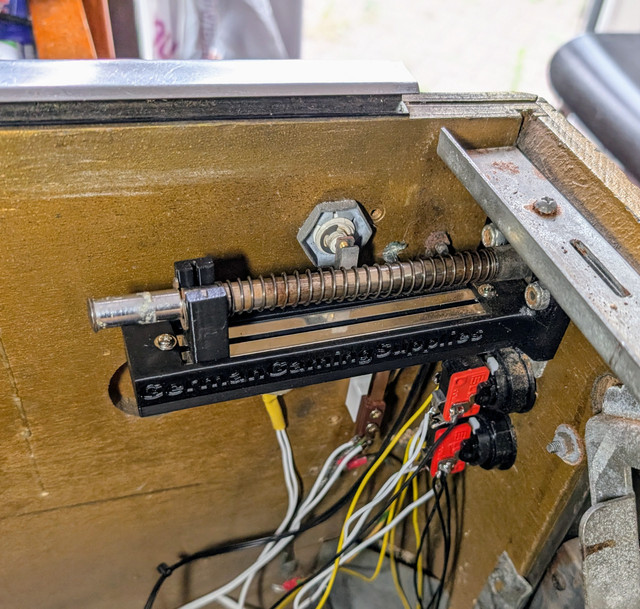
Once again in a huge shout out to the designer of the software that drives this lot, it Just Worked. All I had to do was select the potentiometer option in a drop down list for the plunger type and click a big very clearly labelled button to calibrate it. Said calibration took about 15 seconds and just required me to operate it normally several times. It now works exactly as you would expect it to if you were launching the ball with a manual plunger on a physical table.
This is essential for it to feel real if I'm honest. If you're someone who has played any amount of pinball, pulling back and releasing the plunger is one of those very well ingrained muscle memory type things which is just linked to the game.
It's also important for the gameplay in some cases. Several games have a skill shot where you can score (in some cases quite sizeable) bonuses by shooting either a target on the playfield, which is done by carefully modulating how hard the ball is launched. Examples I can think of off the top of my head are Bride of Pin-Bot, Taxi, Tales of the Arabian Nights, Ripley's Believe it or Not are ones which spring to mind - or even Four Million BC which implemented that (and three ball multiball AND Zipper Flippers) on an electromechanical game - that's a fascinating game almost worth a rambling post in its own right, Ted Zale at his very best. Others either have you time the launch to coincide with a specific event (Medusa, Last Action Hero, Jurassic Park plus probably many others) or to predict where a ball will go by cycling a light on the playfield controller by the flippers (Medieval Madness, Attack from Mars and many others). The latter two setups work fine with a button, but anything requiring you to modulate power is near impossible with a button. Functionality aside though, it just feels better!
We are now up to eight contactors in the bottom of the cabinet to make physical clunky noises and feedback to coincide with things happening on the playfield. This will eventually be ten when the two far more powerful coils for the flippers arrive (at which point I'll relocate the two currently serving that role will move to the back corners).
In the same package as those coils there is also an LED flasher light bar and an expansion board for the I/O controller which will give me an extra 21 outputs to play with - which is needed as I'm down to two left now! Those two will be full once the last two main coils are fitted - but I'll still be wanting another five for chimes and bells, the replay knocker, plus the light bar which will need FIFTEEN just in its own (five RGB LEDs and each of the colours is independently addressable). That might seem like a lot of effort for some blinky lights, but it's actually something which will add a bit of visual drama that you just can't get from a video display. Those will likely get fitted to the currently white bit of trim immediately above the main display.
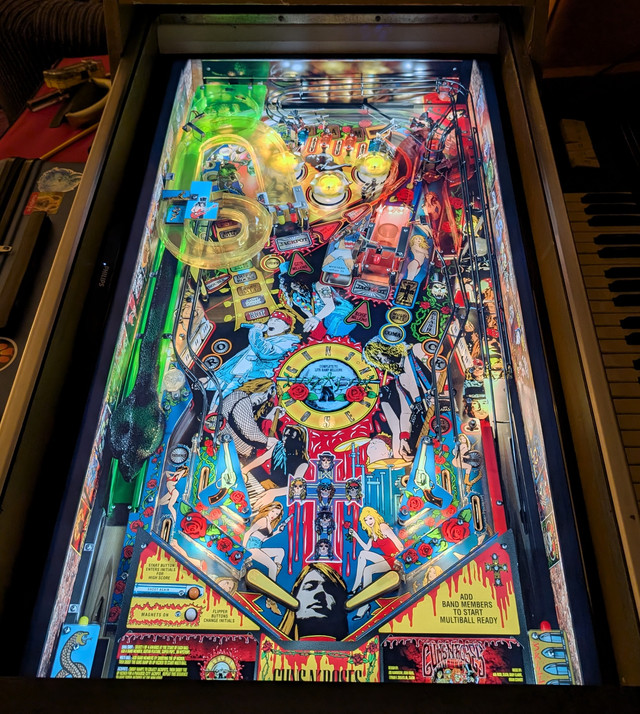
Speaking of lights, here's a look at the playfield lighting on Bride of Pin-Bot. You really could be forgiven for not immediately realising that this is a computer simulation...never mind a photo of a video screen showing a computer simulation.

I shudder to think how long that must have taken to model. Let's not forget this is something that someone has made and is distributing completely for free rather than some huge game design studio.
Here's what you currently see immediately behind the coin door on the table.
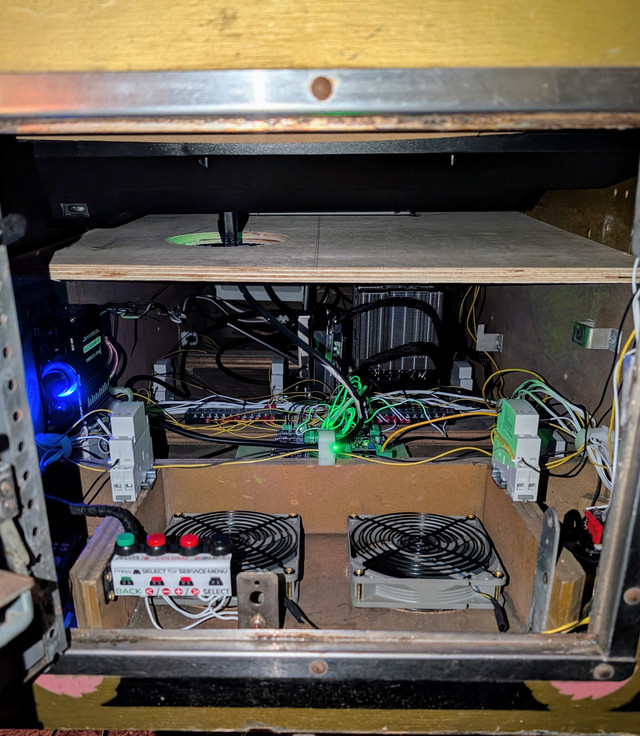
Immediately to the left you can see how readily accessible the service control panel is. You can also see the very deliberate space below the main display. This is there to ensure that a decent chunk of the air from those fans is diverted through there and helps keep the display cool.
Someone asked me how on earth I keep track of where all the wires are going, and the answer is that so long as I know what type of wire it is, I don't need to. This is the magic of having a controller running the show with is essentially software defined. So long as I know that the inputs are connected between the input common and AN input port, that's all I need to know physically. Then I simply go to the input test control panel and see which port changes state when I push the relevant button. I then tell the control program what I want that input to be mapped to. Outputs are handled exactly the same way. I just make sure they're correctly connected to the respective power rails and their ground side goes to an output port. Then I toggle each output in the software and see what operates, then tell the software what's connected to that port. Obviously I have been writing a road map as I've been going as I will want that information if I ever need to find faults, but at the initial build stage the ability to make any input/output port be allocated to any function is an absolute godsend in terms of helping simplify things.

This is the bit of kit to make an exceptionally analogue device - the ball launch plunger on a pinball table - translate into a digital simulation.
Helpfully the I/O board already has a dedicated set of terminals on the input side set aside for the plunger, and even has the terminals labelled.

The wiring even came labelled ready to install.

They weren't wrinkled up like that when it arrived, that's after being dragged through one of the cable management eyelets.
It probably won't surprise those of you who have followed this project from the start that we had clearance issues. In this case with the ball launch button - so I had to trim the surround a bit.

Not a problem though, the lower mounting bolt isn't used on this type of plunger anyway (this kit is designed to work with pretty much all the mainstream types) and there's plenty of surface area to securely fasten in place. Ideally I would have installed this *before* the buttons so wouldn't have had this issue, but hindsight is always 20/20. Honestly the button position works well from an ergonomic standpoint so an extra five minutes installing the plunger isn't a big issue.
Here's the end result.

Once again in a huge shout out to the designer of the software that drives this lot, it Just Worked. All I had to do was select the potentiometer option in a drop down list for the plunger type and click a big very clearly labelled button to calibrate it. Said calibration took about 15 seconds and just required me to operate it normally several times. It now works exactly as you would expect it to if you were launching the ball with a manual plunger on a physical table.
This is essential for it to feel real if I'm honest. If you're someone who has played any amount of pinball, pulling back and releasing the plunger is one of those very well ingrained muscle memory type things which is just linked to the game.
It's also important for the gameplay in some cases. Several games have a skill shot where you can score (in some cases quite sizeable) bonuses by shooting either a target on the playfield, which is done by carefully modulating how hard the ball is launched. Examples I can think of off the top of my head are Bride of Pin-Bot, Taxi, Tales of the Arabian Nights, Ripley's Believe it or Not are ones which spring to mind - or even Four Million BC which implemented that (and three ball multiball AND Zipper Flippers) on an electromechanical game - that's a fascinating game almost worth a rambling post in its own right, Ted Zale at his very best. Others either have you time the launch to coincide with a specific event (Medusa, Last Action Hero, Jurassic Park plus probably many others) or to predict where a ball will go by cycling a light on the playfield controller by the flippers (Medieval Madness, Attack from Mars and many others). The latter two setups work fine with a button, but anything requiring you to modulate power is near impossible with a button. Functionality aside though, it just feels better!
We are now up to eight contactors in the bottom of the cabinet to make physical clunky noises and feedback to coincide with things happening on the playfield. This will eventually be ten when the two far more powerful coils for the flippers arrive (at which point I'll relocate the two currently serving that role will move to the back corners).
In the same package as those coils there is also an LED flasher light bar and an expansion board for the I/O controller which will give me an extra 21 outputs to play with - which is needed as I'm down to two left now! Those two will be full once the last two main coils are fitted - but I'll still be wanting another five for chimes and bells, the replay knocker, plus the light bar which will need FIFTEEN just in its own (five RGB LEDs and each of the colours is independently addressable). That might seem like a lot of effort for some blinky lights, but it's actually something which will add a bit of visual drama that you just can't get from a video display. Those will likely get fitted to the currently white bit of trim immediately above the main display.
Speaking of lights, here's a look at the playfield lighting on Bride of Pin-Bot. You really could be forgiven for not immediately realising that this is a computer simulation...never mind a photo of a video screen showing a computer simulation.

I shudder to think how long that must have taken to model. Let's not forget this is something that someone has made and is distributing completely for free rather than some huge game design studio.
Here's what you currently see immediately behind the coin door on the table.

Immediately to the left you can see how readily accessible the service control panel is. You can also see the very deliberate space below the main display. This is there to ensure that a decent chunk of the air from those fans is diverted through there and helps keep the display cool.
Someone asked me how on earth I keep track of where all the wires are going, and the answer is that so long as I know what type of wire it is, I don't need to. This is the magic of having a controller running the show with is essentially software defined. So long as I know that the inputs are connected between the input common and AN input port, that's all I need to know physically. Then I simply go to the input test control panel and see which port changes state when I push the relevant button. I then tell the control program what I want that input to be mapped to. Outputs are handled exactly the same way. I just make sure they're correctly connected to the respective power rails and their ground side goes to an output port. Then I toggle each output in the software and see what operates, then tell the software what's connected to that port. Obviously I have been writing a road map as I've been going as I will want that information if I ever need to find faults, but at the initial build stage the ability to make any input/output port be allocated to any function is an absolute godsend in terms of helping simplify things.
Current fleet:
07 Volvo V70 SE D5, 85 Sinclair C5, 84 Trabant 601S, 73 AC Model 70, 62 Rover 110.
-
CitroJim
- A very naughty boy
- Posts: 54730
- Joined: 30 Apr 2005, 23:33
- x 8167
Re: Zel's Fleet Blog - BX, Jag XJ-S, Sinclair C5, Mercedes 208D & 230TE, AC Model 70.
This is getting so, so good Zel
Loving following this project 
Jim
A bit of a Citroen AX fan...
-
mickthemaverick
- Forum Admin Team
- Posts: 20464
- Joined: 11 May 2019, 17:56
- x 7902
Re: Zel's Fleet Blog - BX, Jag XJ-S, Sinclair C5, Mercedes 208D & 230TE, AC Model 70.
On Quest TV now and Quest+1 at 20.00 Shed & Buried Classic Cars they are doing a Trabant!! 
I used to be indecisive, now I'm not so sure!
I used to ride on two wheels, but now I need all four!
-
Gibbo2286
- (Donor 2020)
- Posts: 8170
- Joined: 08 Jun 2011, 18:04
- x 2943
Re: Zel's Fleet Blog - BX, Jag XJ-S, Sinclair C5, Mercedes 208D & 230TE, AC Model 70.
Here:
Anyone who has never made a mistake has never tried anything new. (Albert Einstein)
-
Zelandeth
- Donor 2024
- Posts: 5274
- Joined: 16 Nov 2014, 23:36
- x 1586
Re: Zel's Fleet Blog - BX, Jag XJ-S, Sinclair C5, Mercedes 208D & 230TE, AC Model 70.
Will have to have a look at that when I'm back home. See how many of the usual urban myths are quoted!
Current fleet:
07 Volvo V70 SE D5, 85 Sinclair C5, 84 Trabant 601S, 73 AC Model 70, 62 Rover 110.
-
Zelandeth
- Donor 2024
- Posts: 5274
- Joined: 16 Nov 2014, 23:36
- x 1586
Re: Zel's Fleet Blog - BX, Jag XJ-S, Sinclair C5, Mercedes 208D & 230TE, AC Model 70.
In case anyone wondered how the XJ-S I had a few years is doing these days.
Has had about fifteen grand spent on it since I sold it. This cat definitely landed on its feet.
Current fleet:
07 Volvo V70 SE D5, 85 Sinclair C5, 84 Trabant 601S, 73 AC Model 70, 62 Rover 110.
-
Hell Razor5543
- (Donor 2023)
- Posts: 14268
- Joined: 01 Apr 2012, 09:47
- x 3280
Re: Zel's Fleet Blog - BX, Jag XJ-S, Sinclair C5, Mercedes 208D & 230TE, AC Model 70.
While she looks awesome now, she had a good re-birth when you took her on.
James
ex BX 1.9
ex Xantia 2.0HDi SX
ex Xantia 2.0HDi LX
ex C5 2.0HDi VTR
ex C5 2.0HDi VTR
ex C5 2.2HDi VTX+
Yes, I am paranoid, but am I paranoid ENOUGH?
Out amongst the stars, looking for a world of my own!
ex BX 1.9
ex Xantia 2.0HDi SX
ex Xantia 2.0HDi LX
ex C5 2.0HDi VTR
ex C5 2.0HDi VTR
ex C5 2.2HDi VTX+
Yes, I am paranoid, but am I paranoid ENOUGH?
Out amongst the stars, looking for a world of my own!
-
CitroJim
- A very naughty boy
- Posts: 54730
- Joined: 30 Apr 2005, 23:33
- x 8167
Re: Zel's Fleet Blog - BX, Jag XJ-S, Sinclair C5, Mercedes 208D & 230TE, AC Model 70.
That is awesome 
Jim
A bit of a Citroen AX fan...
-
Zelandeth
- Donor 2024
- Posts: 5274
- Joined: 16 Nov 2014, 23:36
- x 1586
Re: Zel's Fleet Blog - BX, Jag XJ-S, Sinclair C5, Mercedes 208D & 230TE, AC Model 70.
Back from a nice trip away in Aberdeenshire last week. Definitely needed that.
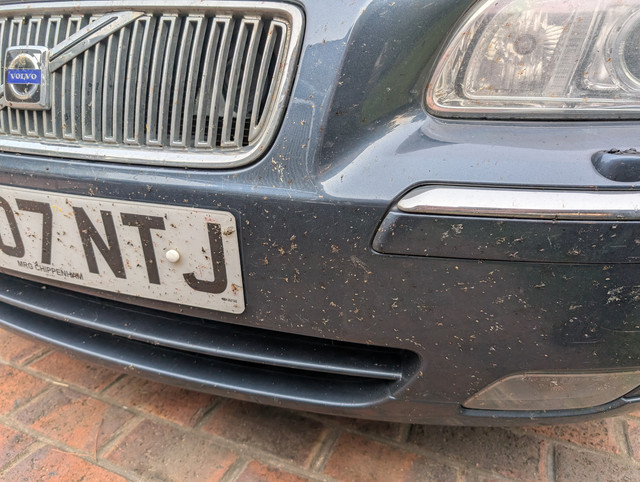
The Volvo unsurprisingly dispatched ~1000 miles of driving without any difficulty, returning mid 40s MPG throughout the trip. Though it does now need a wash.

A bit big on some back roads but that car is unbelievably good at dispatching long distances in the blink of an eye.
Mostly been catching up on everything that stacked up while I was away, but found time to do a bit more work on the pinball table today.
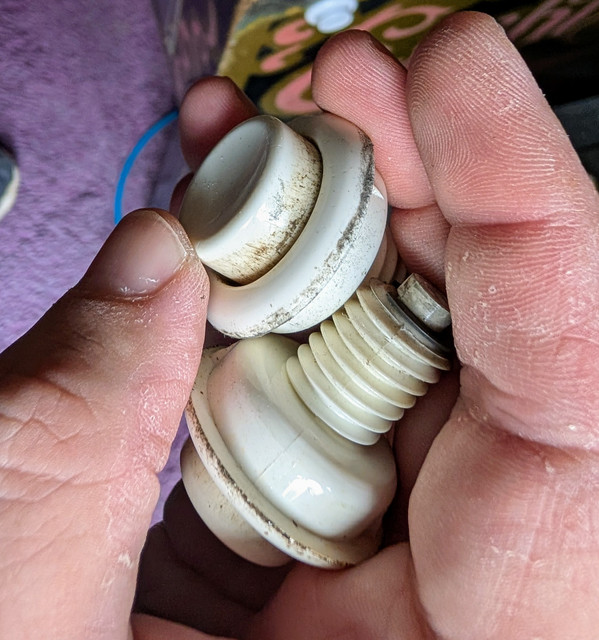
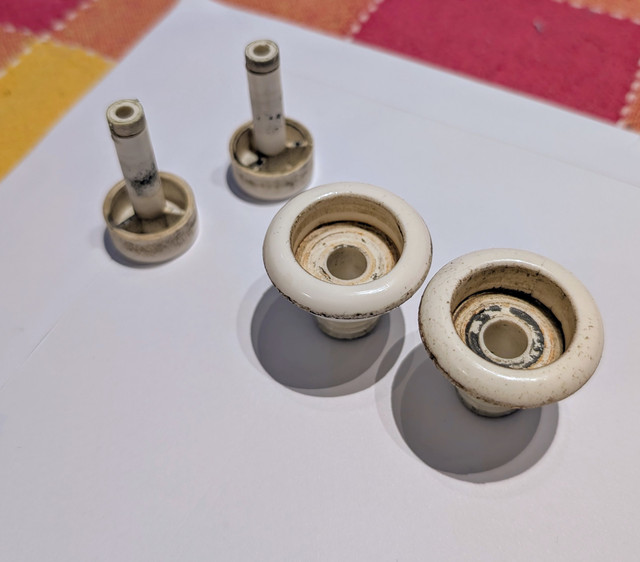
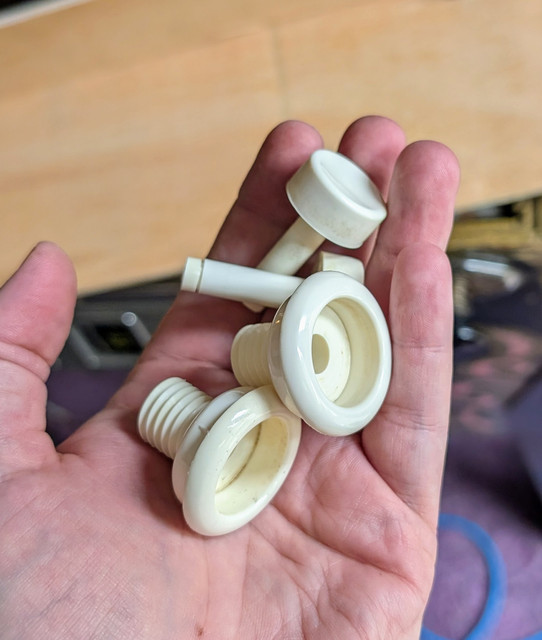
The flipper buttons needed some attention. Particularly the right one would occasionally bind a little, especially if pushed off centre. My hunch was that this was due to god only knows how many years of grime. Certainly looked that way when I pulled them apart.


Looked a lot better after a good clean.

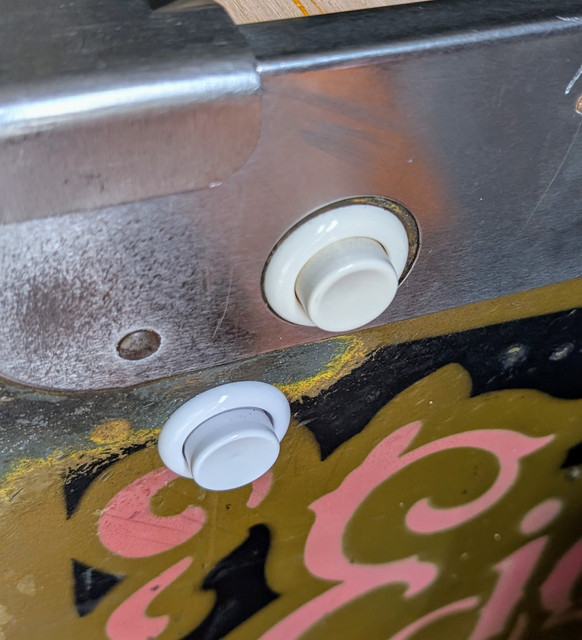
Back in place.

This seems to have resolved the binding issue. Time will tell I guess. If not I'll swap the buttons out for a new pair - they're not expensive.
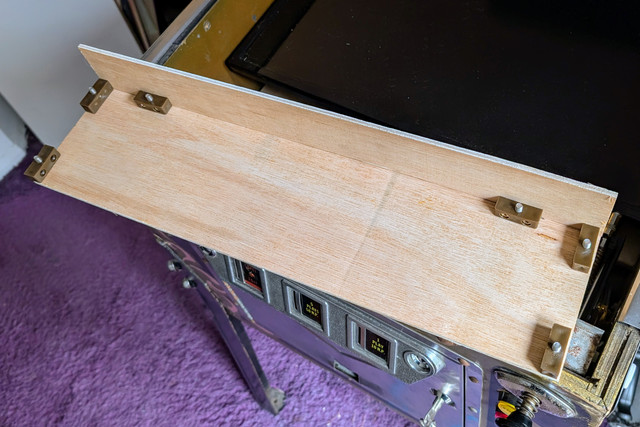
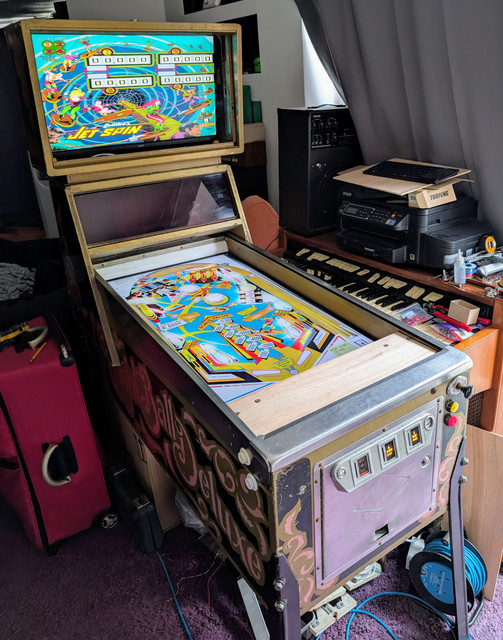
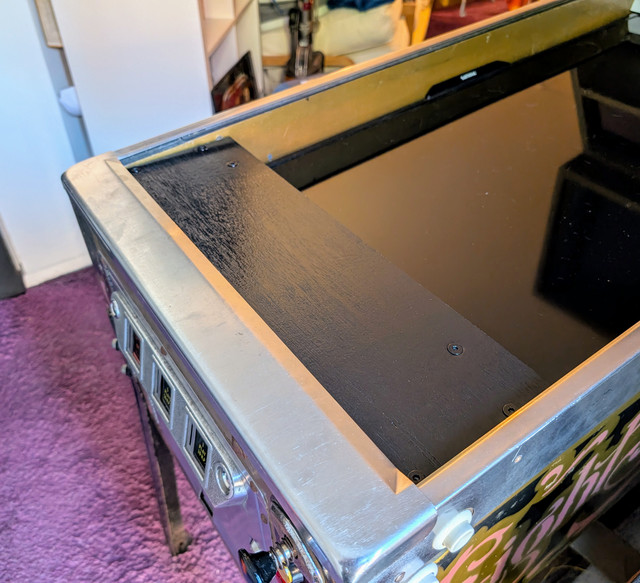
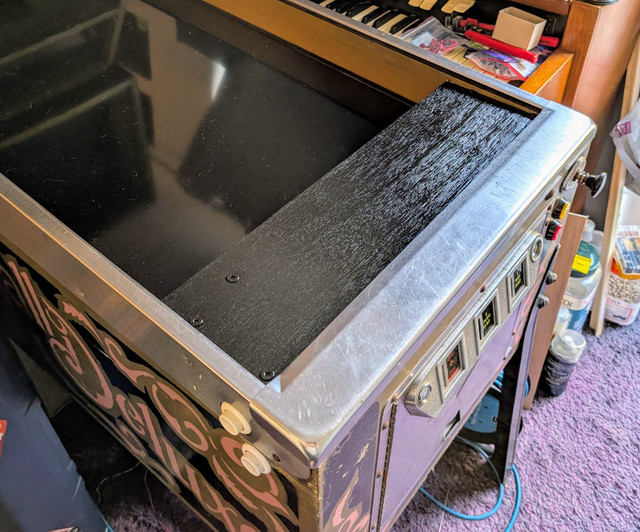
Probably the biggest visible change in a while was made today with the construction of this.

Which is a cover for the gap between the lockdown bar and the bottom of the playfield display - essentially where the apron would normally be on a real table.

Obviously paint will happen in the near future.
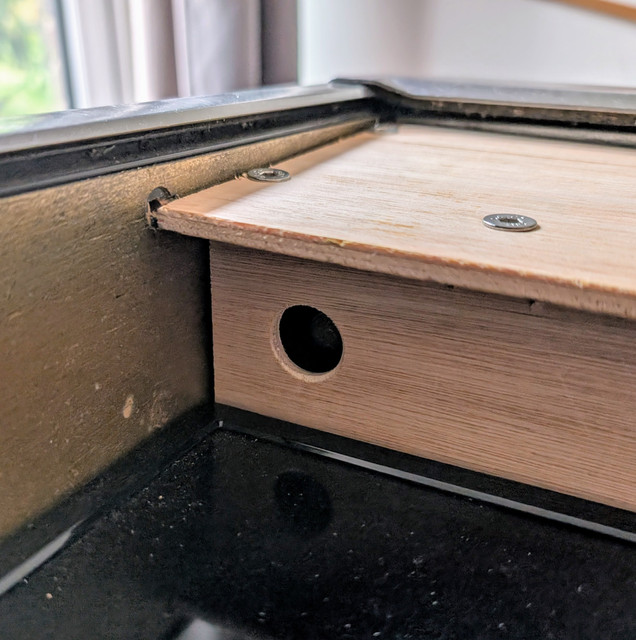
I did run into one issue though in that there wasn't *quite* enough clearance, so the tip of the plunger would just touch it when released - producing an extremely loud bang. Solution for this was pretty simple - cut a hole in it. A rubber bung will go here shortly to cover the hole while retaining the clearance.

Get some paint on there tomorrow.

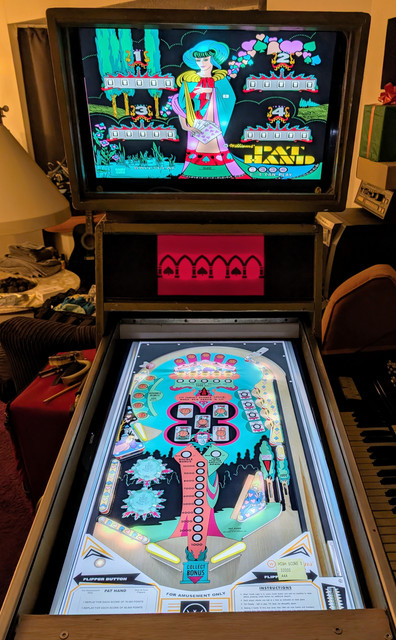
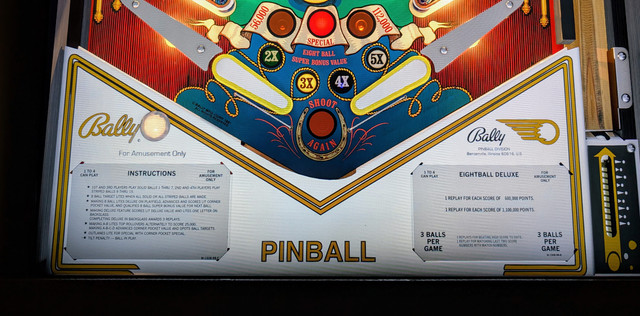
Will also add some instructions there on how to use the machine - will break up the space a bit more so it's less obviously not what would normally be there - which would normally look something like this.

Challenge will be figuring out how to make it look in keeping with the original table art.
The Volvo unsurprisingly dispatched ~1000 miles of driving without any difficulty, returning mid 40s MPG throughout the trip. Though it does now need a wash.

A bit big on some back roads but that car is unbelievably good at dispatching long distances in the blink of an eye.
Mostly been catching up on everything that stacked up while I was away, but found time to do a bit more work on the pinball table today.
The flipper buttons needed some attention. Particularly the right one would occasionally bind a little, especially if pushed off centre. My hunch was that this was due to god only knows how many years of grime. Certainly looked that way when I pulled them apart.


Looked a lot better after a good clean.

Back in place.

This seems to have resolved the binding issue. Time will tell I guess. If not I'll swap the buttons out for a new pair - they're not expensive.
Probably the biggest visible change in a while was made today with the construction of this.

Which is a cover for the gap between the lockdown bar and the bottom of the playfield display - essentially where the apron would normally be on a real table.

Obviously paint will happen in the near future.
I did run into one issue though in that there wasn't *quite* enough clearance, so the tip of the plunger would just touch it when released - producing an extremely loud bang. Solution for this was pretty simple - cut a hole in it. A rubber bung will go here shortly to cover the hole while retaining the clearance.

Get some paint on there tomorrow.

Will also add some instructions there on how to use the machine - will break up the space a bit more so it's less obviously not what would normally be there - which would normally look something like this.

Challenge will be figuring out how to make it look in keeping with the original table art.
Current fleet:
07 Volvo V70 SE D5, 85 Sinclair C5, 84 Trabant 601S, 73 AC Model 70, 62 Rover 110.
-
CitroJim
- A very naughty boy
- Posts: 54730
- Joined: 30 Apr 2005, 23:33
- x 8167
Re: Zel's Fleet Blog - BX, Jag XJ-S, Sinclair C5, Mercedes 208D & 230TE, AC Model 70.
Pleased you enjoyed a good trip Zel 
Jim
A bit of a Citroen AX fan...
-
Zelandeth
- Donor 2024
- Posts: 5274
- Joined: 16 Nov 2014, 23:36
- x 1586
Re: Zel's Fleet Blog - BX, Jag XJ-S, Sinclair C5, Mercedes 208D & 230TE, AC Model 70.
There we go, a bit of paint has made that look a bit less scruffy.


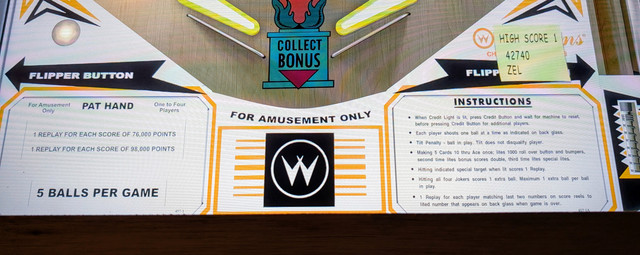
Next step will be to make some labels with guidance on how the machine works. Will obviously be heavily based on the apron artwork from Eight Ball Deluxe (and indeed most Bally tables from that era).

Pretty simple really. I've got a decently high resolution copy of the Bally logo I believe and a note of the typefaces that were used, the rest should be easy to put together in Gimp. I just need to decide exactly what information I want to put on there.


Next step will be to make some labels with guidance on how the machine works. Will obviously be heavily based on the apron artwork from Eight Ball Deluxe (and indeed most Bally tables from that era).

Pretty simple really. I've got a decently high resolution copy of the Bally logo I believe and a note of the typefaces that were used, the rest should be easy to put together in Gimp. I just need to decide exactly what information I want to put on there.
Current fleet:
07 Volvo V70 SE D5, 85 Sinclair C5, 84 Trabant 601S, 73 AC Model 70, 62 Rover 110.
-
Zelandeth
- Donor 2024
- Posts: 5274
- Joined: 16 Nov 2014, 23:36
- x 1586
Re: Zel's Fleet Blog - BX, Jag XJ-S, Sinclair C5, Mercedes 208D & 230TE, AC Model 70.
The central display for the DMD worked but had an issue with the fact that it was just too dim. It could just about be passable for direct viewing but was far too dim once the red filter was added. In fairness, I think the panel cost something like £30 so I'm not going to lose any sleep over it. It's still handy for random testing of computers which is mainly what it's been used for before.
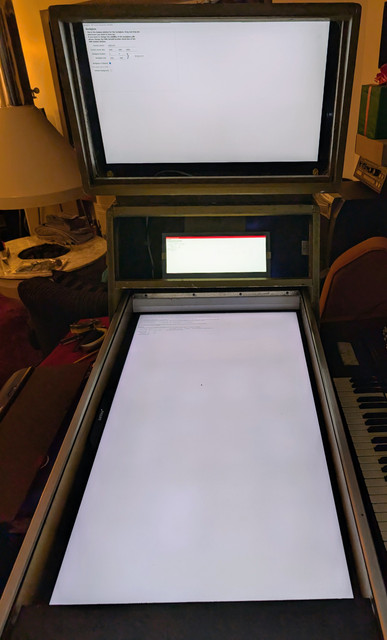
Today a more permanent solution arrived. A little 12" ultra wide industrial panel. This is more intended for point of sale advertising displays or other industrial applications and as such is stupidly bright, even just at the default settings. If you turn the brightness up it's honestly painful to look at.

Those are all showing the same light grey.
This does a much better job of still looking properly punchy even once the filter is back in place.

Obviously it will be positioned centrally in there in due course - it's just wedged in place on a bit of cardboard in these photos. Being an industrial panel it's in a metal case with several mounting options so shouldn't be difficult to get it mounted securely.
I also seem to have finally got to grips with how the point of view options interact and have pretty much got things set up so the proportions look correct from where you stand in front of the table.

Now I just need to go and tweak those settings...on each of the currently installed tables. Which to date number 138. Only takes a minute or two to set each one up, but it quickly gets tedious!
I do really need to do something about shielding the input to the audio amp as the squealing it picks up at some points (particularly in the menu rather than when a table is playing) while it's really pretty quiet is really bugging me.
I'm really looking forward to actually just getting a few hours in just playing this thing at some point! Nevertheless, it is quite satisfying looking back at some of the earlier photos and my scribbled ideas in a notepad to see how far it's come from the original idea I had a year or so back.
Once we're near enough finished I will probably add up roughly what it's cost me and see how it's compared to just buying a commercial virtual cabinet. A few folks have asked if I could build and sell something like this - and that's a pretty firm "no" in my mind. Not even taking account of the hours I've put into it and keeping in mind that quite a lot of the big ticket items were bought secondhand (main display, CPU, GPU, cabinet) or were just random electronic supplies I had in stock, it's still going to be pretty well into four figures. I'm a little apprehensive about how much the glass is going to cost as I've really no idea what to expect there. Assuming I can even find anywhere locally that will cut a couple of panels for me. That *sounds* like a simple enough thing, but I've learned not to make assumptions like that any more.
While I may complain that the graphics setup is tedious, the really tedious bit is still ahead of me and that's going to be getting the cabinet tidied up a bit. It's not being fully restored and repainted, I don't mind it showing that it's got some miles on it, the thing is 44 years old. I do want to tidy it up a bit though so it doesn't look *quite* so like it's just been abandoned for a decade or two then dragged out the back of someone's garage. Which it was! Paint is something that you can't rush. It'll be a faff to match the colours as it is given how much it's faded (and that varies especially on the one side which has obviously seen the sun) even before I try to strike that awkward balance between reasonable repairs and overzealous restoration.
Today a more permanent solution arrived. A little 12" ultra wide industrial panel. This is more intended for point of sale advertising displays or other industrial applications and as such is stupidly bright, even just at the default settings. If you turn the brightness up it's honestly painful to look at.

Those are all showing the same light grey.
This does a much better job of still looking properly punchy even once the filter is back in place.

Obviously it will be positioned centrally in there in due course - it's just wedged in place on a bit of cardboard in these photos. Being an industrial panel it's in a metal case with several mounting options so shouldn't be difficult to get it mounted securely.
I also seem to have finally got to grips with how the point of view options interact and have pretty much got things set up so the proportions look correct from where you stand in front of the table.

Now I just need to go and tweak those settings...on each of the currently installed tables. Which to date number 138. Only takes a minute or two to set each one up, but it quickly gets tedious!
I do really need to do something about shielding the input to the audio amp as the squealing it picks up at some points (particularly in the menu rather than when a table is playing) while it's really pretty quiet is really bugging me.
I'm really looking forward to actually just getting a few hours in just playing this thing at some point! Nevertheless, it is quite satisfying looking back at some of the earlier photos and my scribbled ideas in a notepad to see how far it's come from the original idea I had a year or so back.
Once we're near enough finished I will probably add up roughly what it's cost me and see how it's compared to just buying a commercial virtual cabinet. A few folks have asked if I could build and sell something like this - and that's a pretty firm "no" in my mind. Not even taking account of the hours I've put into it and keeping in mind that quite a lot of the big ticket items were bought secondhand (main display, CPU, GPU, cabinet) or were just random electronic supplies I had in stock, it's still going to be pretty well into four figures. I'm a little apprehensive about how much the glass is going to cost as I've really no idea what to expect there. Assuming I can even find anywhere locally that will cut a couple of panels for me. That *sounds* like a simple enough thing, but I've learned not to make assumptions like that any more.
While I may complain that the graphics setup is tedious, the really tedious bit is still ahead of me and that's going to be getting the cabinet tidied up a bit. It's not being fully restored and repainted, I don't mind it showing that it's got some miles on it, the thing is 44 years old. I do want to tidy it up a bit though so it doesn't look *quite* so like it's just been abandoned for a decade or two then dragged out the back of someone's garage. Which it was! Paint is something that you can't rush. It'll be a faff to match the colours as it is given how much it's faded (and that varies especially on the one side which has obviously seen the sun) even before I try to strike that awkward balance between reasonable repairs and overzealous restoration.
Current fleet:
07 Volvo V70 SE D5, 85 Sinclair C5, 84 Trabant 601S, 73 AC Model 70, 62 Rover 110.