Back in March, the bike was running decidedly rough. Low down, it would pop and fart and sometimes just stall of it's own accord. A classic sign of blocked pilot jets in the carburettors, as if I could coax it above about 2500rpm, it would come to life and take off like a scalded cat. After having had plenty of time to get used to my ADHD medication, and seeing how much some of the local bike places wanted to sort the carbs out, I joined the ZZR-1100 owners group on FB, and decided to do it myself.
So, much to the disgust of Suzy, I parked it in her favourite sunny spot around the back of the house, and sat on a chair and looked at it for a while..
I presume the cats weren't aware of my new medication, and realising how frustrated I can get, sat with me and looked at the bike with concern.
It was just after this point in the proceedings I decided to have a look underneath the bike as I felt it had got noisier too. This is where the job got a whole lot more involved. I noticed a small hole in the exhaust collector, where the 4-into-2 joint is. After prodding it with a screwdriver, a load of bodge paste fell out. That did not, as it were (James's saying), make my day. After a day or so trawling around the Internet asking for bits and advice - ever tried finding an OEM exhaust, in mild steel, that's nigh on 30 years old? Not really possible.
One of the chaps on the ZZR-1100 page on FB however was selling this.
I furnished him with money, and it arrived well-packed a couple of days later.
Whilst waiting for the exhaust to arrive, I started on the carburettors. Seat has to come off, then the fuel tank - 2 bolts at the front, 2 at the back and disconnect the pipe and gauge wiring. That was easy enough.
Then one has to remove the airbox, again, 10x10mm bolts, the top pops off then the filter and mesh can be removed. Taking the bottom part of the airbox off is a bit of a pig. A flexing ratchet 8mm spanner is essential for this. It was pretty grotty under there, so I gave it a decent clean before I got started. I also removed, cleaned and gapped the plugs as well as cleaning the HT leads properly.
Once that was done, I disconnected the throttle cables at the twist-grip, as recommended by experienced folk. They're apparently (and I can see why) a complete ar53 to get back on the carbs with the carbs fitted. I wiggled the cables through the frame. Then, it's just a case of disconnecting the choke, undoing 4 screws that clamp the carbs to the inlet rubbers, and lifting them off, after disconnecting the coolant pipes for the carb heater circuit.
My carburettor repair kits, costing £12 each, and including float needle valves, seals and gaskets also arrived.
Carburettors off. I'll go easy on the pics for this bit. They're all the same, and not that interesting - though the jets on the outer two carburettors are different to the centre pair.
All four main jets were cleanish, but I cleaned and blew them through properly. 3 of the 4 pilot jets were blocked solid, so I had a fight with them, but cleaned them eventually. 2 of the 4 float needle valves had perished seals and marks on them. I replaced all 4 with new from the kits.
I found plenty of this orangey, sticky crud in all the carbs.
Anyway, they all cleaned up well, so I put them back on the bike and reconnected the throttle and choke. I didn't bother putting the fuel tank on and starting it, as the exhaust needed to come off next to be replaced.
To replace the exhaust on a ZZR-1100 isn't massively complex. It's 8 manifold nuts and gaskets, a bolt under the bottom of the bike and one for each footpeg hanger where the silencers are secured.
The radiator and fan do have to come off though. Some say you can do it without, but it looked impossible.
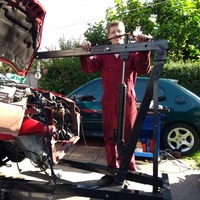
Two bolts at the top of the rad and two at the bottom. Then two to remove to allow the oil cooler to swing forward far enough to get the exhaust out. It wasn't actually that hard. Thankfully I had a James helping and wittering, so the heavy old exhaust was removed quite easily.
The bike itself looked a bit of a sad state at that time.
Upon inspecting the old exhaust, it was indeed found to be .. somewhat rotten.
Gave up for the day then. I did however take the manky old grilles into the shed, bend them back into something resembling their original shape and give them a few coats of Nitromors black anti-rust spray paint.
Next day, James helped me fit the new exhaust. It was pretty straightforward. Much lighter than the old unit, and only a single silencer.
Compared to the manky old unit.
.
To give myself a boost, as I was getting fed up of being oily and dirty by now, I put the painted grilles back on.
Next day, I connected the fuel tank and tried to start it. It took some churning, but it ran brilliantly.
You'll notice that there's no fuel pipe connected. The reason - every time I turned the fuel tap on, it would suddenly run like sh1te, pop and fart, then stall. I'd removed the tank to find out why. Couldn't spot anything obvious other than fuel pouring down the venturi from these two inlets in the centre pair of carbs.
I'd clearly messed something up with those two, so I had to remove all the carbs again. This time however, I used my ADHD to my advantage, didn't disconnect the throttle cables and simply flipped the carbs upside down.
I found I'd not properly tightened two of the screws that hold the float needle in place, so I rectified that, then put it back together and started it again.
Exactly the same issue. I found this somewhat infuriating. I think I may have sworn at this point.
Out of sheer belligerence, I rooted out the two best needles and valves from the bin-bag of crap I'd collected, and replaced the two brand new ones in the centre carbs with the manky old ones.
Obviously, when I put it all back together, it worked! Faulty cheapo Wemoto parts. That's the bit I told you to remember earlier, as it would be important!
Annoyingly, one of the carb heater hoses had perished, and gave up the ghost whilst being mikehandled.
I managed to bypass that particular one by fiddling with the hoses. I've got a replacement secondhand one arriving in a few days, so I'll be fitting them in the 4 weeks I'm not allowed to ride for in June.
It all went back together quite easily. I also ordered a bag of 30 stainless screws to replace all the fairing bolts (A fairing bolt kit costs about £25 on eBay. A chap called Roland, (who appears to be the Citrojim of the ZZR-1100 world) told me to simply buy a bag of 30 of whatever he specified from a bolt supplier for £4.
With all the cranking of the bike, I managed to flatten the battery. I also managed to flatten my spare battery, a new one I'd been given that someone found in their shed (pictured) These are not cheap!
This led to one of the more amusing moments (for readers anyway) of the entire job. I had to nip down to Halfords to get some cleaning spray, the XCP degreaser, £6.99 per litre - it's bloody great and not toxic.
I got into the Picasso to go down, and the bloody thing was completely dead when I turned the key. After a minute or so of wondering WHAT NOW??!!! , I stomped off to the garden to have a brew, Remember, I had two flat batteries on the bike already.
Can you spot the issue that was preventing the Picasso from starting?
I can't remember what I said, but I may have been inviting someone to have their way with me.. sideways.
There was one last optional job to do - remove the centre stand. When the bike had silencers on both sides, the stand kind of rested below the left side pipe. Without the pipe there, it looks rubbish sticking up, and can catch on boots. Solution is to remove it. It's a 20 second job to lean down, stick the bolts back in, and use it as a centre stand to work on the bike so no great issue.
After all that, I had to simply nip out to the local cafe to see if it actually worked on the road.
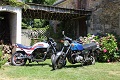
It did, and obviously Ed took to sitting on it once I got back.
.
While I'm on a roll, I'll tell you about my weekend trip up to Lancashire and back over Snake Pass and through Chesterfield.
I've been meaning to take the bike for a decent, long trip as a test for some time, but weather and work and other stuff have just knocked it on the head. I got the chance this weekend, so I nipped up to the Rossendale Valley to see my brother.
It's about 218 miles the way I usually go, A404, M40,M42, M6, M62, M66 then another 5 miles on local roads, and I'd worked it out to be 230 miles coming back over Snake Pass.
Off we go!
All went well. I "made good time" getting to the Tesco petrol station just off J3 (Shirley) of the M42
It's literally 30 seconds off the motorway and the usual 30p/litre cheaper than motorway services. I worked out the bike had done about 43mpg up until that point, which, under the circumstances I thought rather good.
I didn't bother to eat or drink anything here, as I like to stop at either Norton Canes on the M6 Toll, or Keele because I can hide in the empty coach park away from people. So, I got going again, got to Keele, where I got out my flask and banana, and sat on the concrete edge of the coach park for a while.
There's nothing to beat the glamour of Keele services coach park.
I got going again after a decent break, but then the temperature dropped like a stone, I was bloody freezing. This necessitated another stop at Sandbach just up the road, where I got myself another coffee and put my thermal top on!
I got going then, and just let rip all the way up to Rawtenstall, the town I was born in. I had to stop in the centre and take a pic of the bike.
From there, I went up to Whitewell Bottom (BB4 9LQ) and took a pic of the bike outside my gran's old house they lived in from 1949 until she died in 2005, I've also lived there and my brother lived there until 2015.
I'd always wondered why it had a hedgerow round the front and not railings - the new owners have put railings. I told my brother this later, and he said that it did originally have railings, but they were removed for the war effort and replaced with a hedge - that's why there were funny little iron spikes in the top of the wall.
From there, a quick run up the road to Weir, where my brother lives. His house is a couple of hundred yards down the hill from here..
As usual, I found my brother meddling with the Mistubishi Delica he has as an interesting family bus.
This time, it's to change a "heater bypass hose" This is an aluminium pipe that runs from the thermostat housing on the front left of the block (as you look at it), down the side of the block, around the back, and to a piece on the other side near the back. Clearly, they had someone from Citroen on secondment when that was designed. In the end, the exhaust manifold and turbo oil-feed had to come off, and it was still nigh on impossible to get the old pipe out and new pipe in.
My brother's freebie Volvo V70 - a T-reg, parked with my bike, his wife's Polo, the spare - or my old Polo that's for sale or I might get it for Sammy if I can get up there cheap one day soon.
On Monday, I set off quite early and got as far as the petrol station in Bacup before my bike broke down. The sidestand switch has failed. This means it'll start and rev, but as soon as I put it in gear, it thinks the stand is down and cuts the engine. Cured by ripping the wires out of the switch and twisting them together to bypass the switch. Replacement on it's way with the carb heater pieces for me to fit during my month-long enforced no-riding June.
Then I trundled down to Glossop.
I got a Costa in Glossop and put it in my flask, as I was damn sure, that being the UK, there'd be absolutely no hope of getting a hot drink at the top of Snake Pass on a holiday day, when it's going to be busy. Of course, not a tea van in sight up there. Crowded with folk. What a missed opportunity.
A few more from Snake Pass.
From there, I dropped down into Chesterfield eventually, took a pic of the weird pointy church, got on the M1 and trundled home!
Good job on the bike. With all mine you can't take the airbox off without removing the carbs first. They look like Keihins. I had a mare of a job on my Zeph11 with the pilot circuit. Old carbs don't like ethanol. Ended up replacing all carb inlet rubbers, all float valves (genuine at 30 squid each), float bowl gaskets then did a clear tube off the bike float height check, then synced with my my old mercury gauges once back on. Only aftermarkat kit I would touch for carbs is Keyster and even then all the brass original bits get cleaned and kept. I only had to replace o rings and gaskets on my 1980 Z1000. Happy riding Mike
Pete
Notice the BX is still top the list but sadly gone
More please, Mike. You write well and it's interesting.... to me and a few others at least
I cleaned out the throttle bodies on my V-F-R* a couple of years ago, handily there was a part of the inlet gubbins that could only be fitted together with the airbox in place, but you could only get to the gubbins with the airbox not in place. I can only assume that whoever put them together had very small hands
* - I have to write it like that or the forum software thinks it's part of a VIN number........ or should that be VI Number for the pedants out there
moizeau wrote: 07 May 2025, 19:19
Good job on the bike. With all mine you can't take the airbox off without removing the carbs first. They look like Keihins.
They are Keihin KH4s.
This is the bottom half of the airbox. There's 6 bolts around the carb trumpets that need to be undone before it lifts off. Those bolts also make the carb>airbox seal.
On Monday, the replacement sidestand cut-out switch arrived. In case you didn't know, this device cuts the ignition if the sidestand is down, you're in gear and let the clutch out. It's to stop you banging the stand on the ground and having it throw you off - particularly surprising on left-hand bends, as I know from experience! As these are all old, first thing to do with it was give it a quick rub down, then a coat of Nitromors anti-rust paint.
It got left to dry in the sun there, much to one of the cat's annoyance. She likes to sit on the warm manhole cover.
While it was drying, I set to work removing the old one. It's mounted under the bike, and the screws are only accessible from below. Being 28 years old, and made of that curious material the Japanese used in the 90s, they were both seized solid, very strong.. yet made of cheese.
At this point, I'd already decided I'd had enough f@cking around with seized fasteners on this bike, and vowed to replace them. Rather than struggle with screw extractors, I got my favourite spanner out - made by Dremel, and used my upside-down dremeling skills to cut two big slots in them to get the big screwdriver out. Even with that, one of them simply sheared immediately.
My sartorial elegance knows no beginning, as you can see. In my defence, I was having a medication free day, and this was all an impulse job rather than something I'd planned to do.
Sheared bolt and 28 year old thread lock made this one a bit of a challenge!
That was wiggled out with pliers eventually.
The old switch, plus wiring - I'd cut the wiring by the roadside up North and twisted the wires together to bypass the switch to get the bike to run last week.
A quick test to check it worked - Start engine, leave sidestand down, put in gear, let clutch out. Engine stops. Perfect.
So, yesterday, there I am, giving it the beans, like WOT beans in 2nd gear onto to dual carriageway, and suddenly the thing cuts out dead. The enormous backfire at first led me to believe I'd blown it up or something terribe.
No.
I hadn't pushed the clip for the sidestand switch in properly. It came out, and cut the engine. All that unburnt fuel being dumped into a hot exhaust made a hell of a bang.
I sat bemused for a minute or two, then spent 10 mins burning my fingers (I have marks!) getting it back together. Bloody thing.
All is now good.
Next week, it's carburettor off time again, to replace the carb heating elements and pipes. Yes, I know it's warm and they're not being used, but it's a bodged bypass on there at the moment and I'd rather it wasn't. I think I'll order some pipe and replace all the rubber on this 28 year old replacement, even though it looks in VGC
I was on my way to pick the boy and his friend up from band practice yesterday. I noticed the centre vents weren't blowing properly. So, as is my wont, I started fiddling with it while sat in traffic.
Pic taken when I got home, but I got it to this stage whilst fiddling in traffic, much to the amusement of the boys when I picked them up.
The vent assembly was coming apart, and this piece had a seal on it at some point, that had turned to dust and likely been inhaled over the years.
As I had no sticky foam around, I made a new seal with halfords double-sided foam number plate tape, as it's no use for it's intended purpose. It sticks to everything apart from number plates.
Whilst doing that, I cleaned under the dash trim plate thing
Then I decided as they're all 22 years old and grotty AF, I'd find better ones on eBay and fit them. So, I've ordered them.
However, in the meantime, I decided to liven the interior up a bit..
It's still drying and not fitted. It'll either be great, or awful. Watch this space!
While it was drying, I set to work removing the old one. It's mounted under the bike, and the screws are only accessible from below. Being 28 years old, and made of that curious material the Japanese used in the 90s, they were both seized solid, very strong.. yet made of cheese.
I know them well. Everyone who has owned a japanese bike has cursed these screws until you realise that the screwhead that looks identical to a Philips isn't. It's JIS. Japanese Industrial Standard. It has a slightly different angle and a flat on the tip of the driver. A JIS screwdriver can be used on Philips screws but not the other way round. I have these along with a JIS bit for my manual impact driver.
Pete
Notice the BX is still top the list but sadly gone
JIS #2 Mike
The larger screwdriver is called an 'impacter' I think. The steel traverses the whole length and can be hit with a hammer. It then turns through 14 degrees anti clockwise.
Fantastic quality
Pete
Notice the BX is still top the list but sadly gone
bobins wrote: 07 May 2025, 21:00
a VIN number........ or should that be VI Number for the pedants out there
Ah yes, my ears were burning!
I say, "nah, let's have a bit of RAS Syndrome now and then!"
P.s. I know next to nowt about bikes, but enjoyed reading about the various fixes. I don't know Snake Pass well, but over A628 Woodhead many a time. Lovely scenery and enjoyable road (even better if it was, ever, empty of dawdlers!!)