Zel's Fleet Blog - BX, Jag XJ-S, Sinclair C5, Mercedes 208D & 230TE, AC Model 70.

Tell us your ongoing tales and experiences with your French car here. Post pictures of your car here as well.
User avatar
Zelandeth
Donor 2024
Posts: 5285
Joined: 16 Nov 2014, 23:36
x 1591

Re: Zel's Fleet Blog - Xantia Activa, BX, Jag XJ-S, Sinclair C5, Mercedes 208D, AC Model 70.

Unread post by Zelandeth »

Gibbo2286 wrote: 25 May 2021, 09:53 Zel "Still not quite how I managed to dodge all the worst of the weather...it was all around me pretty much the whole time."

Maybe because we had it all here. :)
We had plenty here too - I just lucked out not having to walk or drive through it!

-- -- --

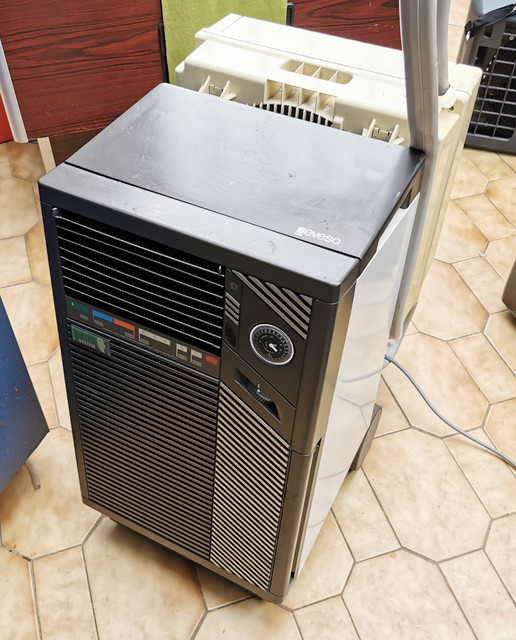
Ever since I got it there has been something slightly funky with the control system on this one air conditioner. Never bothered too much about it at the time given the price of it and being a unit from the early 90s and that it was clearly an electronic issue rather than mechanical issues with the refrigeration side of things.
Image

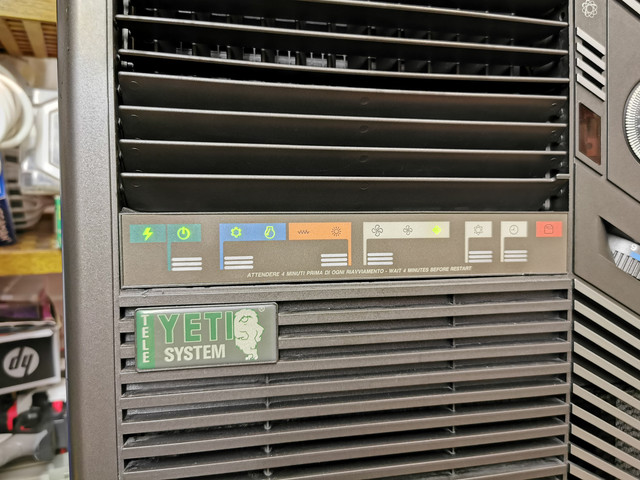
The issue has always been with that fancy pants soft touch control panel - which obviously has an unnecessarily complicated layer of electronics behind it for a device of this type. This sort of control system seemed to be the late 80s/early 90s version of the obsession with everything having to have a touch screen these days.
Image

As Montgomery Scott said, "The more they overcomplicate the plumbing, the easier it is to stop up the drain."

If switched on without pressing anything it should just run in fan mode - cooling or heating modes are enabled by pressing the buttons under the striped grey areas first or second from the left. Next one cycles through fan speeds, then turns on/off an ioniser, then the timer.

What it had taken to doing however was after a completely random period of time between zero seconds and about six hours is that it would drop out of cooling mode and then refuse to acknowledge any keypad presses aside from the power button or timer button (or the ioniser - but that's a completely independent subsystem which is live whenever the AC supply is on). Sometimes power cycling the unit would kick it back on into cooling mode, but not always. Day before yesterday it decided to play up once too often so I started investigating. Back right when this first started I checked out the keypad itself and ruled it out as a possible culprit. A sticking button could give similar symptoms but would also knock out the power button functionality. Plus they all checked out individually anyway. The issue was clearly with the brains of the machine.

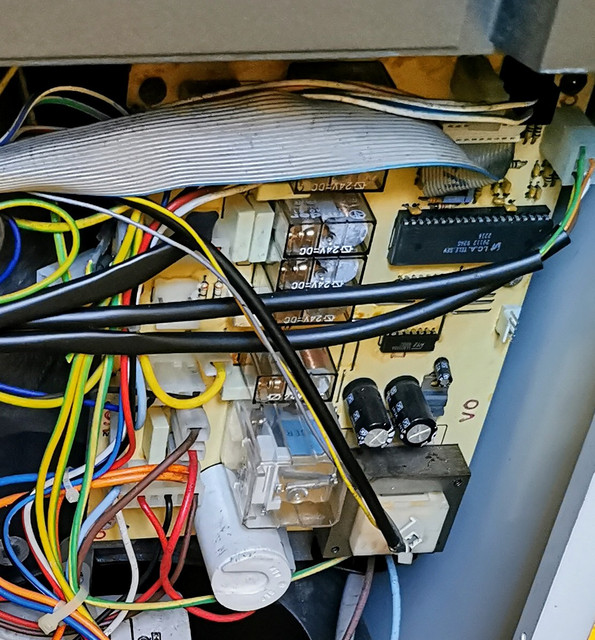
This is the control PCB.
Image

For something that needs to turn on/off a compressor, a heating element and switch between three fan speeds this really is unnecessarily complicated. The timer functionality is a totally separate physical unit so that's not even on this board. Likewise there's no need to run the condensate pump off the board...the switch contacts on the float are more than rated for the full load of the whole unit, so just let it handle itself and use the overflow one to cut power to everything aside from the warning light. Initial checks didn't reveal anything visibly showing signs of distress or any bulging caps. The wire you can see hanging off down by the transformer was the receiver for the remote control - I pulled that off first in the off chance something was interfering with it. Second step was to obviously pull and reseat that large socketed chip.

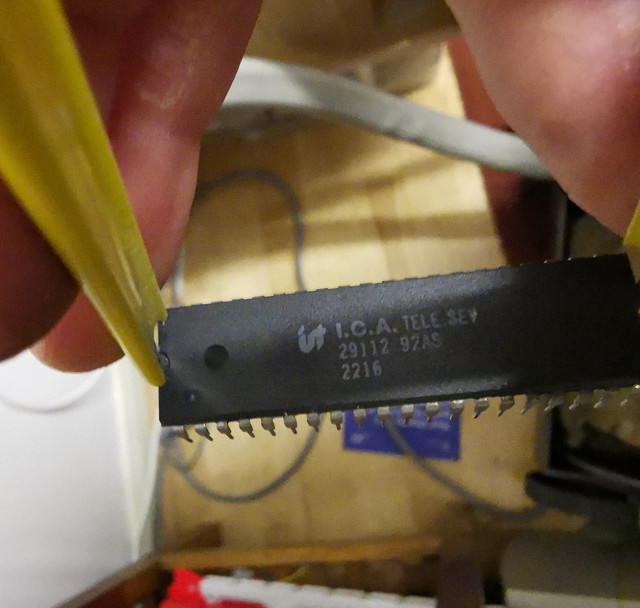
Here's a close up of the markings for those of you playing along at home.
Image

Given this chip is basically running the whole show it was an obvious first port of call - sadly didn't make any difference. I also went over the board with a good magnifying glass to look for any dry joints or possibly cracked traces...Zip turned up. In fact the quality of the soldering and the traces on the board is really very good and I can't fault it at all.

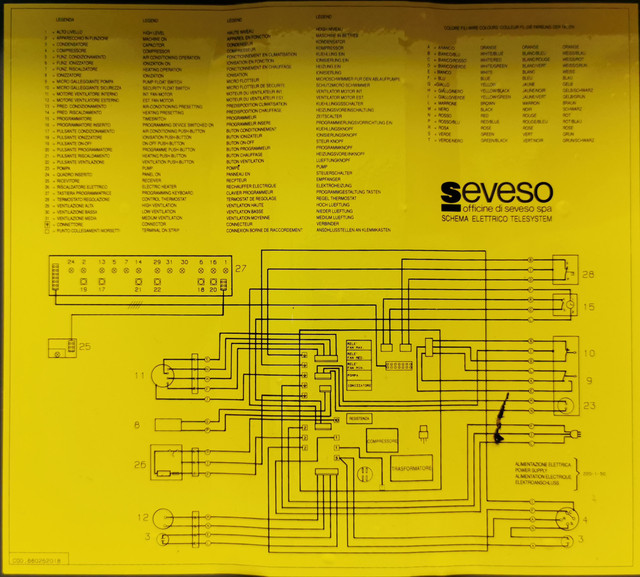
Helpfully there is a simplified system schematic on the inside of the rear cover. As none of the connectors on the PCB are labelled this is appreciated.
Image

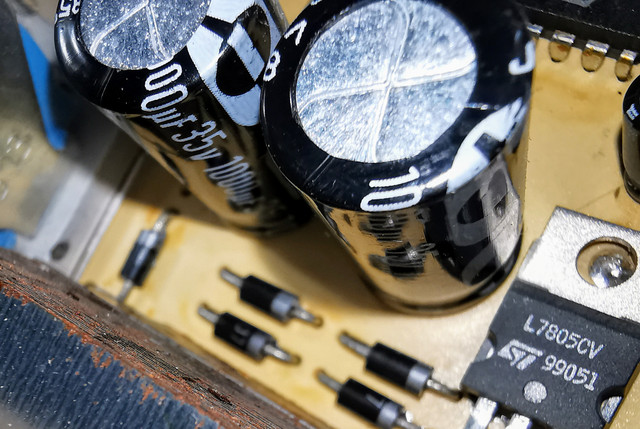
Given the unit is thirty years old, my obvious next port of call was the DC smoothing capacitors. Looking at the voltage rails (5V and 24V) they were both slightly on the low side.
Image

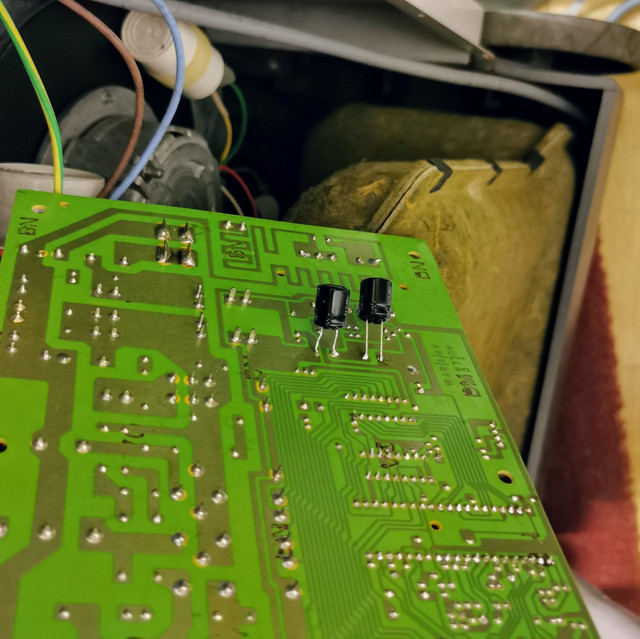
Smoothing capacitors are 1000uF 35V...and of course I didn't have any of those in stock. I did have two 470uF ones in a suitable voltage rating though so in the spirit of experimentation I tacked those on in parallel with the existing ones to see if a bit of extra capacitance would make any difference...if they'd just gone low value it probably would have gone a long way to help. Not tidy by any stretch of the imagination, but for testing purposes it'll do just fine.
Image

It fooled me into thinking I'd fixed it as after doing this it behaved itself for about six hours...before doing exactly the same thing again.

Fair enough. My intention is basically to do away with this overcomplicated "brain" and stick a proper temperature controller in. I've got one in a box somewhere which can handle heating/cooling (this thing could only be set to one or the other - and just has a 0-9 numbered thermostat) and has proper adjustments for hysteresis, anti-cycle timers etc...I just need to figure out where the heck it is. The original PCB will stick around to handle the evaporator fan speed control, but that will basically be it. Control over the compressor, condenser fan and heating elements will be handed over to the new controller.

I wanted it back up and running today though...and I'm not one to be beaten by something like this.

The thermostat on this thing is just a mechanical make/break switch, and that quickly got me to thinking that I could very easily bypass the brain. I'd lose the anti-cycle timer, but to be honest there's a decent deadband on the thermostat I don't see that being an issue.

A little bit of poking around with a meter found that there's an always on 24V feed to all of the relay coils, and it's the earthy end that's switched by the control logic. Sure enough, if I earthed the low side of the compressor relay coil it and the condenser fan motor both kicked in, even though the unit wasn't in cooling mode.

Didn't take long for a plan to form. Even though this unit doesn't (and as far as I can see never has had) an ioniser unit fitted, the button and relay are there for it. This function being "always on" seemed to escape from the lockup issue...with the relay clicking away merrily when the button was toggled. This meant that I had an easily accessible switchable ground available to me.

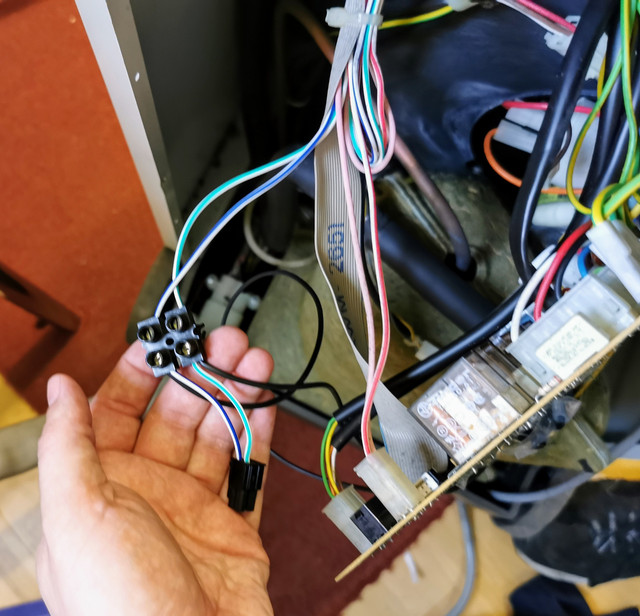
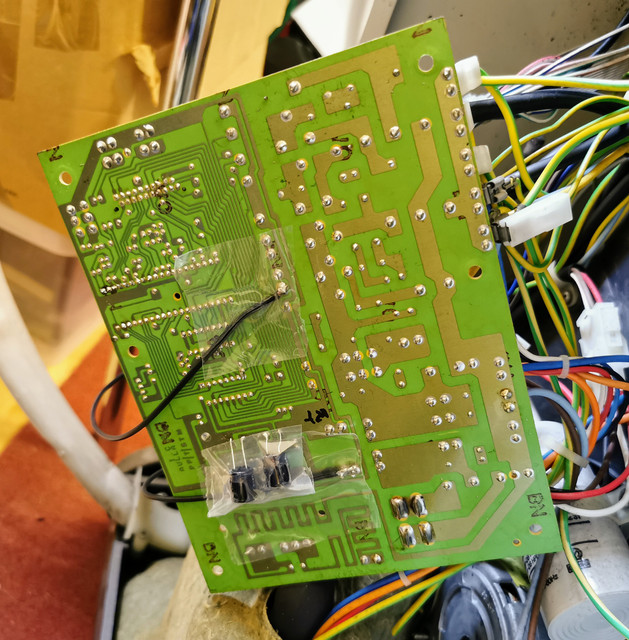
That's us halfway there. I then pulled the thermostat connector off the board and spliced a couple of wires into that - wiring it in series with a wire to the switched ground I mentioned above.
Image

Image

Result is that the ioniser button is now a "compressor enable" button, and when that's turned on the thermostat makes it cut in/out as originally intended.

Only other thing I had to do was to physically unplug the heating element power supply as if it jumps into heating mode it will turn the element on (as in heating mode it interprets the stat being open as a cool for heat - whereas it's the other way around for cooling) because the thermostat is no longer hooked up to the PCB. Dead easy to do as it's got a socket up front.

I've not gone any further by way of making it pretty or securing the wires to the PCB with hot glue or anything as this only needs to last until I track down the proper controller, then quite a bit of re-engineering will happen. Hopefully see it going for a good while yet, and actually with better functionality as I'll be able to dial in an actual desired temperature rather than just picking a number. Plus overnight I'd really prefer the room to be a degree or two cooler than the inbuilt stat allows for...new control will resolve that. Worth noting that the wiring on there is just 24V, nothing on the mains side has been touched, and I've been careful to keep the tape from bridging the isolation gap.

Still not sure what the original problem is, and there's very little on these units on the web that I've been able to find. As best I can tell though there's something amiss with that big IC...Without another unit on hand I can rob one out of to test it's pretty hard to tell really.

It's a total bodge, but it's doing what I bought it to again, and soon will be upgraded rather than bodged.

Also in fairness to the unit...It's 30 years old and has spent a good portion of its life on an equipment rental company's books...so it's not done bad at all really! May 1991 is the date on the QC sticker on the inside of the back panel.
Current fleet:
07 Volvo V70 SE D5, 85 Sinclair C5, 84 Trabant 601S, 73 AC Model 70, 62 Rover 110.
User avatar
Zelandeth
Donor 2024
Posts: 5285
Joined: 16 Nov 2014, 23:36
x 1591

Re: Zel's Fleet Blog - Xantia Activa, BX, Jag XJ-S, Sinclair C5, Mercedes 208D, AC Model 70.

Unread post by Zelandeth »

My bodged air conditioner control setup worked perfectly overnight and through most of the afternoon when I was back in the room. Right up to where the compressor made an unpleasant noise then stopped. Fear not, I'd just not done a good enough job of soldering one of the wires to the PCB so it had cracked the joint and come adrift. You remember me talking about how I wasn't a fan of it and the testing setup needing to be beefed up long term? Yep, there's why! Vibration has a tendency of finding any weak spots for you in settings like this in a hurry.

A bit of hot glue is now providing mechanical support in addition to me having remade the two solder joints. I actually took the PCB out to do that this time rather than soldering it while working left handed half buried in the back of an air conditioner like last time. Correct operation was restored.

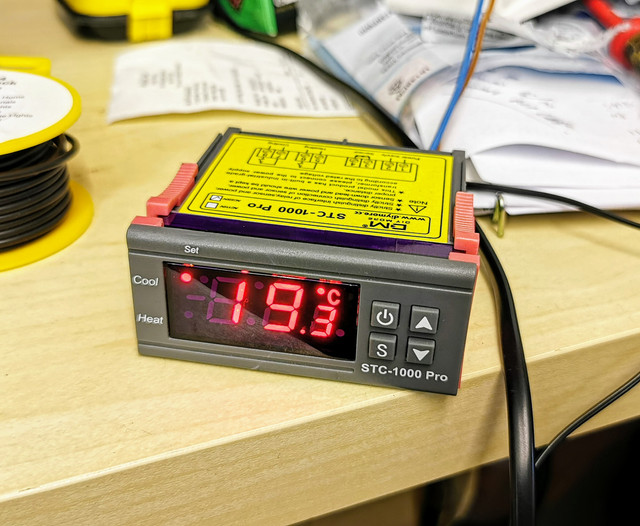
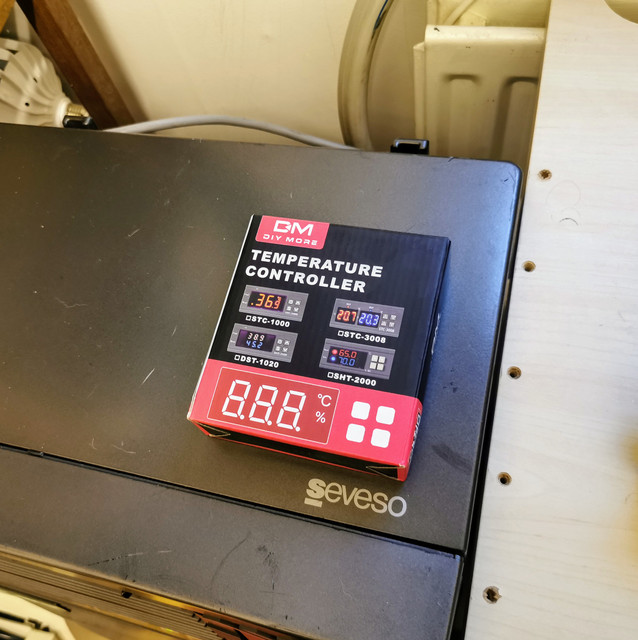
After a thorough search only requiring me to upend around 80% of the north wing loft I tracked down the little temperature controller I remembered still having leftover from another project a few years ago.

Image

Between the size of it and the fact that I was absolutely positive that the box was almost entirely blue it's quite surprising that I found it at all - assuming that there isn't another one up there of course!

Just a cheap generic little unit I've seen badged under about a dozen different brands, but it does what it says on the tin. These are all of about £15 on eBay/Amazon so even if they don't last forever it's not the end of the world really. Honestly I'd struggle to build one for less...and that's assuming I already have a suitable enclosure and LED display in stock.

Image

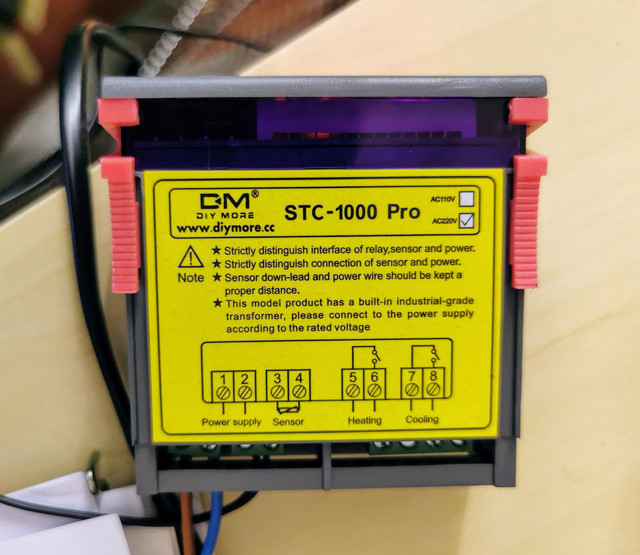
Very simple to wire up, four sets of two terminals on the back: Mains in, temperature probe, then two pairs of relay contacts for the heating and cooling loads.

Image

The internal relays are rated for up to 10A at mains voltage, though precisely how far you want to trust the relays in a control this cheap is up to you. For this application I'll be using the existing relays in the air conditioner to do the heavy lifting, this will just be the brains of the operation.

Couple of advantages in using this control over the original setup on this unit/or my bodge currently in operation.

The first is that it will be able to seamlessly handle both the heating and cooling side of things from one control. The original control system allowed the unit to run either as an air conditioner or a heater (it's just a 1.5kW resistive heater rather than a heat pump sadly), but required the user to manually switch modes. In this application I'm not likely to ever really call on the heating side but this feels like a more elegant solution.

Secondly is being able to dial in an exact temperature. The existing thermostat has an arbitrary 0-9 numeric scale, just being able to dial in whatever temperature I want is definitely my preference. Especially as the coolest setting on the existing stat is only just cool enough for me to be comfortable overnight.

Being a dedicated temperature controller it also has properly configurable hysteresis and anti-cycle timer settings - both things that I really wish the fancy pants wireless thermostat for the household central heating system had!

The existing PCB will basically just be relegated to being a source of the 24V relay control voltage and fan speed control once I'm finished.

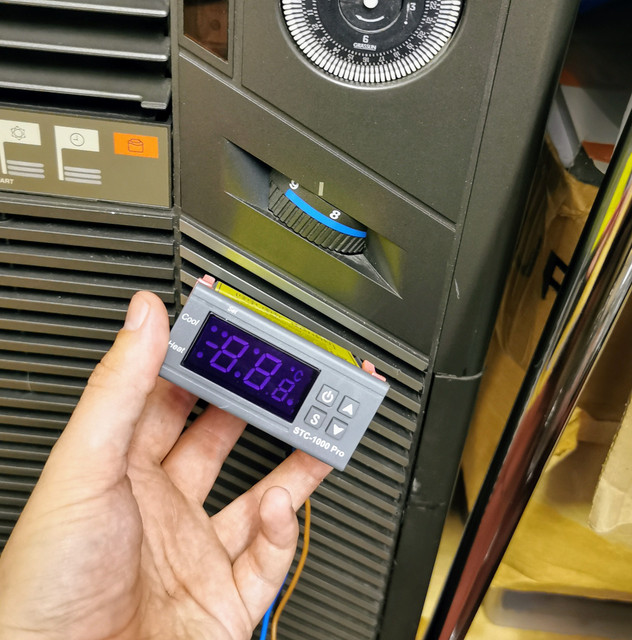
Just need to figure out a tidy way to fit this. It's a shame the existing thermostat cutout isn't a tiny bit bigger or it could just slot in behind the front panel there.

Image

May still be able to get away with it - not particularly worried about losing a bit of the left side of the display, but big question will be whether I can fit it back there and still properly access the buttons.

Might be a nice little evening project for next week if I have time. At least the AC is working properly again now though so some of the heat (pun entirely intended) has been taken off the job.
Current fleet:
07 Volvo V70 SE D5, 85 Sinclair C5, 84 Trabant 601S, 73 AC Model 70, 62 Rover 110.
User avatar
Dormouse
Donor 2024
Posts: 2145
Joined: 15 Apr 2021, 14:32
x 696

Re: Zel's Fleet Blog - Xantia Activa, BX, Jag XJ-S, Sinclair C5, Mercedes 208D, AC Model 70.

Unread post by Dormouse »

Zelandeth wrote: 28 May 2021, 04:07 My bodged air conditioner control setup worked perfectly overnight and through most of the afternoon when I was back in the room. Right up to where the compressor made an unpleasant noise then stopped. Fear not, I'd just not done a good enough job of soldering one of the wires to the PCB so it had cracked the joint and come adrift. You remember me talking about how I wasn't a fan of it and the testing setup needing to be beefed up long term? Yep, there's why! Vibration has a tendency of finding any weak spots for you in settings like this in a hurry.

A bit of hot glue is now providing mechanical support in addition to me having remade the two solder joints. I actually took the PCB out to do that this time rather than soldering it while working left handed half buried in the back of an air conditioner like last time. Correct operation was restored.

After a thorough search only requiring me to upend around 80% of the north wing loft I tracked down the little temperature controller I remembered still having leftover from another project a few years ago.

Image

Between the size of it and the fact that I was absolutely positive that the box was almost entirely blue it's quite surprising that I found it at all - assuming that there isn't another one up there of course!

Just a cheap generic little unit I've seen badged under about a dozen different brands, but it does what it says on the tin. These are all of about £15 on eBay/Amazon so even if they don't last forever it's not the end of the world really. Honestly I'd struggle to build one for less...and that's assuming I already have a suitable enclosure and LED display in stock.

Image

Very simple to wire up, four sets of two terminals on the back: Mains in, temperature probe, then two pairs of relay contacts for the heating and cooling loads.

Image

The internal relays are rated for up to 10A at mains voltage, though precisely how far you want to trust the relays in a control this cheap is up to you. For this application I'll be using the existing relays in the air conditioner to do the heavy lifting, this will just be the brains of the operation.

Couple of advantages in using this control over the original setup on this unit/or my bodge currently in operation.

The first is that it will be able to seamlessly handle both the heating and cooling side of things from one control. The original control system allowed the unit to run either as an air conditioner or a heater (it's just a 1.5kW resistive heater rather than a heat pump sadly), but required the user to manually switch modes. In this application I'm not likely to ever really call on the heating side but this feels like a more elegant solution.

Secondly is being able to dial in an exact temperature. The existing thermostat has an arbitrary 0-9 numeric scale, just being able to dial in whatever temperature I want is definitely my preference. Especially as the coolest setting on the existing stat is only just cool enough for me to be comfortable overnight.

Being a dedicated temperature controller it also has properly configurable hysteresis and anti-cycle timer settings - both things that I really wish the fancy pants wireless thermostat for the household central heating system had!

The existing PCB will basically just be relegated to being a source of the 24V relay control voltage and fan speed control once I'm finished.

Just need to figure out a tidy way to fit this. It's a shame the existing thermostat cutout isn't a tiny bit bigger or it could just slot in behind the front panel there.

Image

May still be able to get away with it - not particularly worried about losing a bit of the left side of the display, but big question will be whether I can fit it back there and still properly access the buttons.

Might be a nice little evening project for next week if I have time. At least the AC is working properly again now though so some of the heat (pun entirely intended) has been taken off the job.
I think you are suffering from my disease. I know I have everything somewhere but I can't find anything anywhere when I want it and invariably find it when I don't need it. Now! Stanley knifes! I must have millions of them by now, but when I need one I am convinced they all scuttle off and hide!
User avatar
Dormouse
Donor 2024
Posts: 2145
Joined: 15 Apr 2021, 14:32
x 696

Re: Zel's Fleet Blog - Xantia Activa, BX, Jag XJ-S, Sinclair C5, Mercedes 208D, AC Model 70.

Unread post by Dormouse »

Loving all these different articles though.
User avatar
Zelandeth
Donor 2024
Posts: 5285
Joined: 16 Nov 2014, 23:36
x 1591

Re: Zel's Fleet Blog - Xantia Activa, BX, Jag XJ-S, Sinclair C5, Mercedes 208D, AC Model 70.

Unread post by Zelandeth »

For me the thing I know there are dozens of but can never find is tape measures. I went out a year or so back and just bought ten from Toolstation and stashed them in various locations around the house...still can never find one when needed!

My loft and garage are in such a state as I had to clear my folks house out in a hurry when my father moved, then again six months later when he passed away - so there's about three LWB Transit loads of stuff crammed in there that really needs going through and organising. Just really difficult to find the time. I had planned the garage getting sorted as the big summer project for 2020, but then 2020 happened instead! Not being able to take things to the tip at the time meant it was a non starter.
Current fleet:
07 Volvo V70 SE D5, 85 Sinclair C5, 84 Trabant 601S, 73 AC Model 70, 62 Rover 110.
User avatar
Dormouse
Donor 2024
Posts: 2145
Joined: 15 Apr 2021, 14:32
x 696

Re: Zel's Fleet Blog - Xantia Activa, BX, Jag XJ-S, Sinclair C5, Mercedes 208D, AC Model 70.

Unread post by Dormouse »

Snap! That is it to a tee! I just feel I haven't got out of the bit for over a year.
Michel

Re: Zel's Fleet Blog - Xantia Activa, BX, Jag XJ-S, Sinclair C5, Mercedes 208D, AC Model 70.

Unread post by Michel »

Zelandeth wrote: 28 May 2021, 11:25 For me the thing I know there are dozens of but can never find is tape measures.
^^^ This ^^^

Got many of them, can never find one when I want one. Our house isn’t exactly huge either.
Gibbo2286
(Donor 2020)
Posts: 8170
Joined: 08 Jun 2011, 18:04
x 2943

Re: Zel's Fleet Blog - Xantia Activa, BX, Jag XJ-S, Sinclair C5, Mercedes 208D, AC Model 70.

Unread post by Gibbo2286 »

I know where mine are. :)
Attachments
tapes.JPG
Anyone who has never made a mistake has never tried anything new. (Albert Einstein)
User avatar
mickthemaverick
Forum Admin Team
Posts: 20756
Joined: 11 May 2019, 17:56
x 7991

Re: Zel's Fleet Blog - Xantia Activa, BX, Jag XJ-S, Sinclair C5, Mercedes 208D, AC Model 70.

Unread post by mickthemaverick »

If I need mine I just go and see SWMBO. - I have a meet her rule!! :argue:
I used to be indecisive, now I'm not so sure!
I used to ride on two wheels, but now I need all four!
User avatar
Zelandeth
Donor 2024
Posts: 5285
Joined: 16 Nov 2014, 23:36
x 1591

Re: Zel's Fleet Blog - Xantia Activa, BX, Jag XJ-S, Sinclair C5, Mercedes 208D, AC Model 70.

Unread post by Zelandeth »

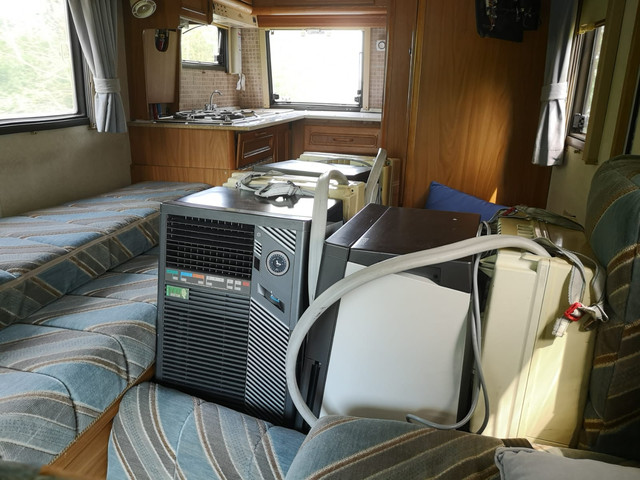
Actually got a decent run out in the van today over to Basildon and back to collect some more air conditioning units.

Image

Definitely easier than trying to shoe horn them into the Xantia.

Nice to get out for a proper run with the old girl even if the M25 was precisely as busy as expected.
Current fleet:
07 Volvo V70 SE D5, 85 Sinclair C5, 84 Trabant 601S, 73 AC Model 70, 62 Rover 110.
User avatar
Zelandeth
Donor 2024
Posts: 5285
Joined: 16 Nov 2014, 23:36
x 1591

Re: Zel's Fleet Blog - Xantia Activa, BX, Jag XJ-S, Sinclair C5, Mercedes 208D, AC Model 70.

Unread post by Zelandeth »

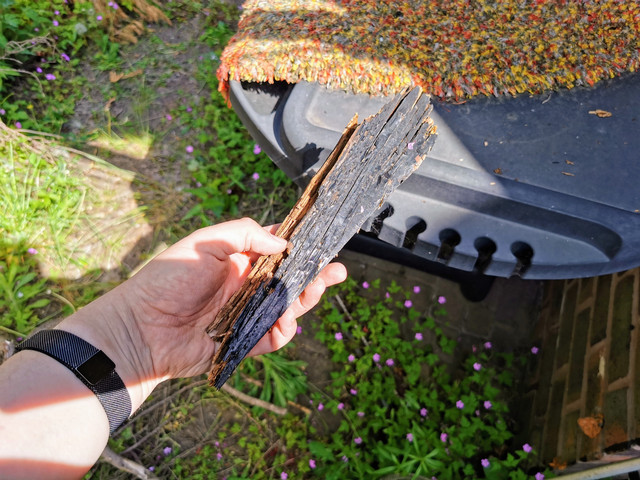
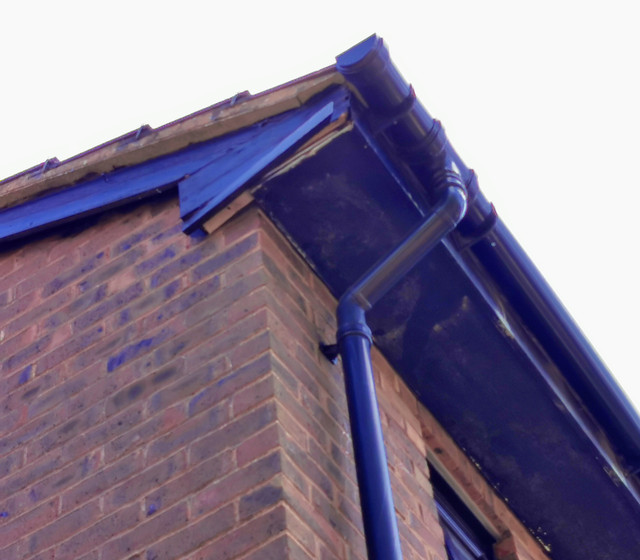
Was wandering around out back today just moving a couple of things around when my eye was drawn to something on the ground. Where has this come from?

Image

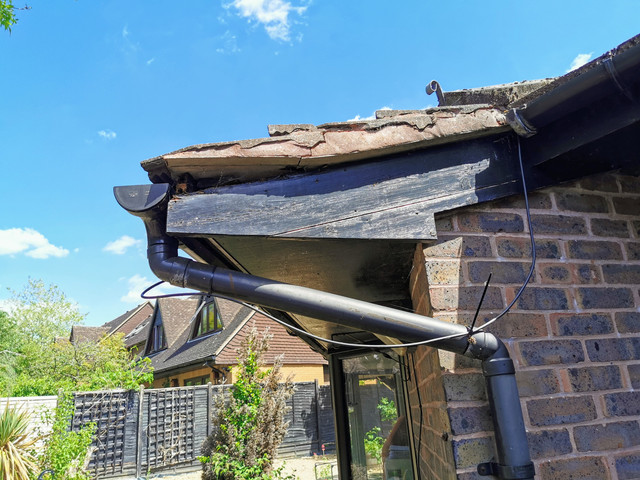
Oh oh. That doesn't look good.

Image

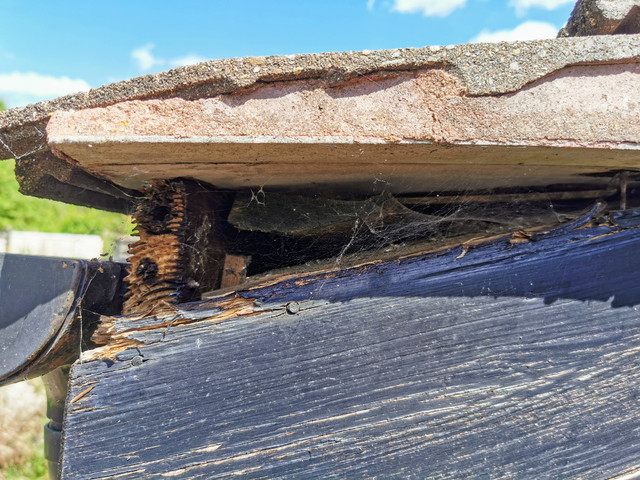
Ah balls...yep, that's going to need sorting sooner rather than later.

Image

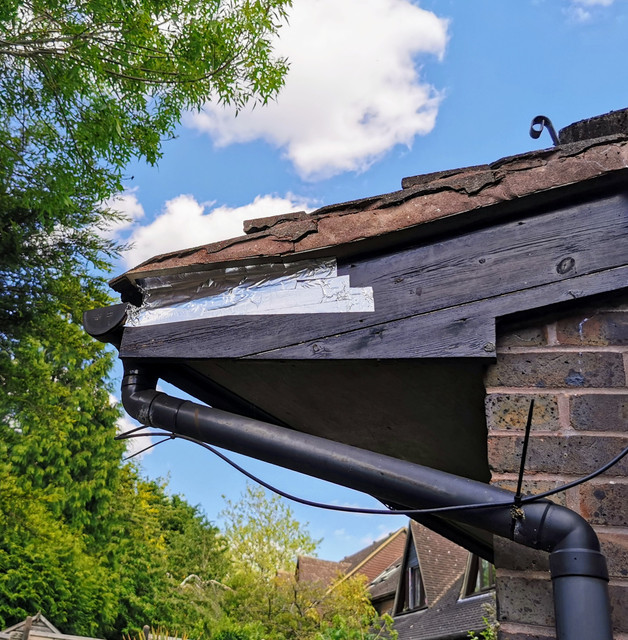
Temporary bodge to keep the weather out for now.

Image

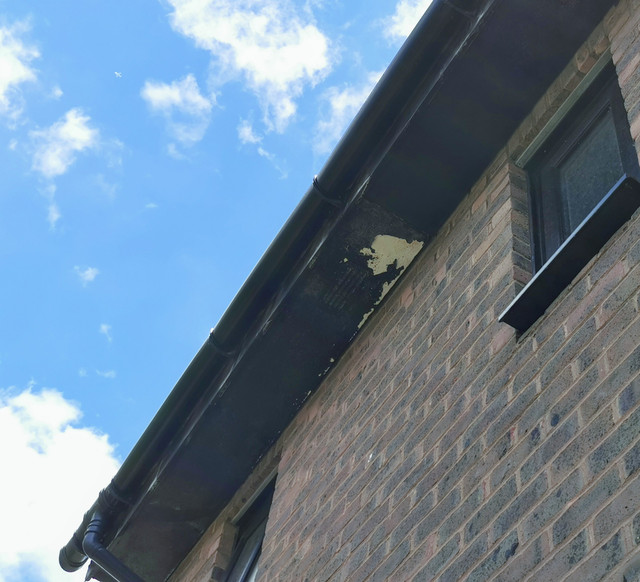
Looking around the house quite a few of the soffit boards haven't weathered this last winter well.

Image

Worryingly it looks to me like the horizontal box section on the underside may well be asbestos...which I'm sure will multiply the costs involved in sorting things out by about ten times.

Image

Great! Just had the first quote in this afternoon from a landscaper to sort out the back garden and driveway, and that's more than we'd hoped - by about five times. Very much hoping they just didn't want the job, but braced for the news from the one coming tomorrow to be similar. Can see this easily eating up half the budget for the garden in one hit. Either way it looks like the plans we had to improve the driveway layout will have to be canned for the time being. Which is a shame as I was really hoping we might be able to arrange things so I could get out of the garage without major car Tetris. Given the school traffic around here it basically means I often can't get out of the garage between 9 and 4 as there's nowhere to move the cars I have to shift to.
Current fleet:
07 Volvo V70 SE D5, 85 Sinclair C5, 84 Trabant 601S, 73 AC Model 70, 62 Rover 110.
User avatar
Dormouse
Donor 2024
Posts: 2145
Joined: 15 Apr 2021, 14:32
x 696

Re: Zel's Fleet Blog - Xantia Activa, BX, Jag XJ-S, Sinclair C5, Mercedes 208D, AC Model 70.

Unread post by Dormouse »

The soffit board might be Fibreboard if you are lucky. Looks like asbestos but uses inert fibres. Started to be used commonly from the 60's. Only one way to find out and that is have a sample tested. Asbestos is best left undisturbed in situ and painting it seals in the fibres.
Gibbo2286
(Donor 2020)
Posts: 8170
Joined: 08 Jun 2011, 18:04
x 2943

Re: Zel's Fleet Blog - Xantia Activa, BX, Jag XJ-S, Sinclair C5, Mercedes 208D, AC Model 70.

Unread post by Gibbo2286 »

I had all my gutters and soffits replaced with plastic by the same company that did all the double glazing.
Anyone who has never made a mistake has never tried anything new. (Albert Einstein)
User avatar
Zelandeth
Donor 2024
Posts: 5285
Joined: 16 Nov 2014, 23:36
x 1591

Re: Zel's Fleet Blog - Xantia Activa, BX, Jag XJ-S, Sinclair C5, Mercedes 208D, AC Model 70.

Unread post by Zelandeth »

Gibbo2286 wrote: 06 Jun 2021, 09:58 I had all my gutters and soffits replaced with plastic by the same company that did all the double glazing.
Yeah, I'll be calling DG Solutions back in to do the work, we were really happy with their work on the windows. Just really annoying that it couldn't have waited another year or two...I knew the soffits were going to need attention at some point in the not too distant future but hadn't expected them to go from "aged" to "falling apart" quite so suddenly. Had really hoped that getting the garden sorted was going to be this year's big (like £25K big as we basically had to turn the whole back garden into a hole in the ground last year to eliminate the bamboo) project. Quotes have come back higher than expected so it's already looking like a lot of the things we'd like to have incorporated will have to be dropped...taking another five grand (optimistically...) out of the pot for this isn't going to help.

There are days I really miss renting!

-- -- --

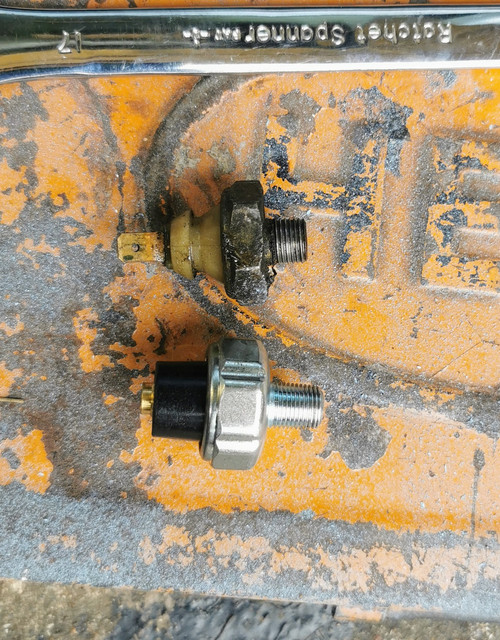
After over two months thanks to problems with shipping due to Brexit related nonsense the new oil pressure switch for the Invacar arrived last week. This afternoon I figured I'd get that fitted in the hope that it cures the minor oil leak from the rear of the engine... I'm not holding my breath as I reckon it's only half the issue, the other source being the crankshaft oil seal. Which is a pain as that's an engine out job to change. If it is the crankshaft oil seal though I'm not going to lose too much sleep over it given the leakage is very slight - one or two drops when the car is parked up. If it was losing any appreciable amount while driving it would have shown up given how small the sump capacity is, but she's never used any between changes so I'm not too worried. Knowing that the pressure switch was visibly weeping though I wanted that changed. That's the sort of leak which can go from very minor to catastrophic with little or no warning.

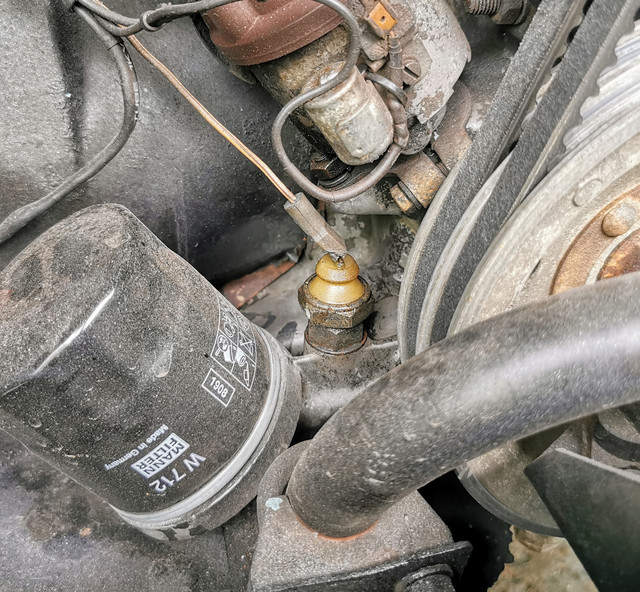
Getting the old one out is actually deceptively awkward due to the proximity of the distributor and oil filter. Not enough to be a problem, but just enough to be moderately annoying.

Image

Eventually managed to get a spanner onto it (24mm) with the oil filter removed. Then discovered quite how tight it was. When I started to pull the car over the wheel chocks I instead opted to remove the boss that the pressure switch is threaded into, allowing me to separate the two off the car.

Image

That let go with an almighty crack which rammed my arm against the engine cover slam panel. This car has drawn blood surprisingly few times during the restoration project but she managed today!

Image

Didn't actually realise I'd done that at the time, it was about ten minutes later when I had that "wait...where is this blood coming from?" moment.

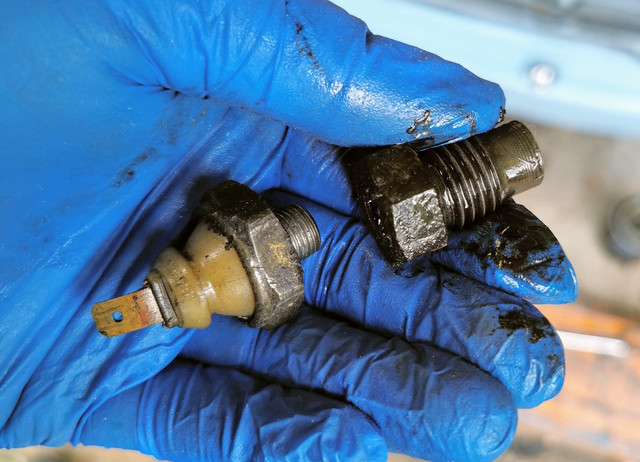
Annoyingly it then quickly became apparent that my new pressure switch is completely wrong, despite having been bought from a Steyr-Puch specialist. The different case style is immaterial - however the thread and threaded length of the body are also totally different.

Image

The length is actually important as the oil pressure relief valve spring sits against the underside of the pressure switch body so the depth it screws in is critical to the preload being right.

At least since I ordered that the actual Bosch part number (0986344041) has been tracked down so I have now got one on the way. Just annoying that I've wasted a lot of time on this - and that the £7 sensor ended up being north of thirty quid by the time shipping and all the tarriffs and fees were paid...only for it to be the wrong thing.

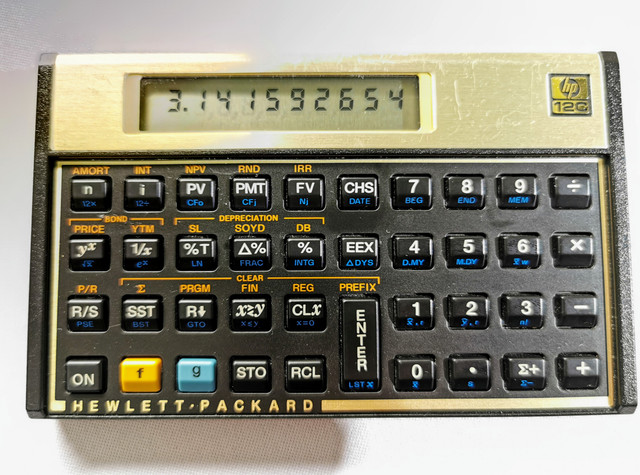
On a slightly lighter note though I had a nice addition that had been on my wish list for a while arrive for the calculator collection a couple of days ago. This was spotted by someone over on UKSaabs who kindly offered to collect it and post it on to me.

I'd been after one of these for a while but refused to pay the frankly ridiculous sums of money they generally seem to change hands for.

Image

Image

This is a HP 12C Calculator - a specialised model intended for the financial market - and a fascinating case of the "if it ain't broke, don't fix it" approach. You'd think looking at this that it's a late 70s, maybe very early 80s model, even then a really late example of a calculator that uses RPN (note the large enter key and the lack of a separate equals key).

Image

The 12C was launched in 1981, the RPN input scheme being maintained because it's particularly well suited to financial calculations, despite the rest of the world having moved on by that point. It gets even more surprising though...you can STILL buy the 12C today, in 2021! Yes there have been numerous changes "under the hood" over the years, but the fact that a piece of electronics (even quite a specialist one) equipment has a model run of forty years and counting is frankly remarkable if you ask me.

This example appears to date from early 2001 judging from the serial number.

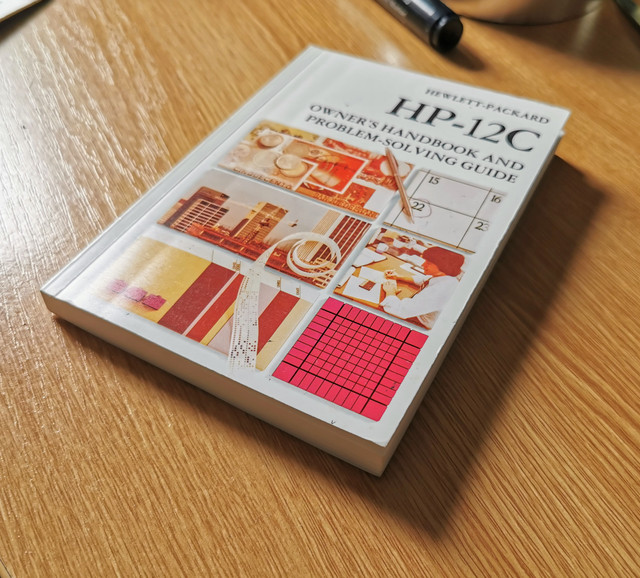
Quite how specialised this really is though is made most apparent by the manual.

Image

You'd think to look at that it would be about thirty pages in English and then repeated in about 357 other languages...nope. That is all English, all 246 pages of it.

It feels like a proper quality instrument in a way that calculators just generally didn't by the time the 21st century rolled in. The keypad action in particular is lovely, you can tell that exactly the weight required to press the keys was designed in, it did not just happen because those were the switches they had in stock.

Being such an anachronistic oddball it's definitely one I'm really glad to have in the collection. Surprisingly enough it's actually the first pure RPN calculator I own! Not quite sure how it's taken me so long to get hold of one.
Current fleet:
07 Volvo V70 SE D5, 85 Sinclair C5, 84 Trabant 601S, 73 AC Model 70, 62 Rover 110.
Gibbo2286
(Donor 2020)
Posts: 8170
Joined: 08 Jun 2011, 18:04
x 2943

Re: Zel's Fleet Blog - Xantia Activa, BX, Jag XJ-S, Sinclair C5, Mercedes 208D, AC Model 70.

Unread post by Gibbo2286 »

If you enjoy electronics fixing Zel maybe you would like me to give you free gratis my Lexia vci, as seen here: viewtopic.php?t=67876&hilit=vci

I had a mate who reckoned he could fix it but made more of a botch of it than it already was, so I found a replacement, this one is destined for the bin if no-one wants it.
Anyone who has never made a mistake has never tried anything new. (Albert Einstein)