
Would it be possible for somebody to post up the procedure for replacing the rear arm bearings on my C5? I will be getting a professional mechanic to do it, but he is not a PSA specialist (the one I contacted last week hasn't bothered to reply).
There is also a separate issue with my C5 in that, once the engine is off, the front suspension drops. She has only started doing this recently. There is no obvious signs of leakage, and the pump is working properly. Once the engine is running she will come back up to the right level (I have taken to dropping her down to the lowest setting as she is trying to maintain the level with the engine off, but the economy mode kicks in and she then does drop). Any suggestions?
C5 rear arm bearings
-
Hell Razor5543
- (Donor 2023)
- Posts: 14261
- Joined: 01 Apr 2012, 09:47
- x 3275
C5 rear arm bearings
James
ex BX 1.9
ex Xantia 2.0HDi SX
ex Xantia 2.0HDi LX
ex C5 2.0HDi VTR
ex C5 2.0HDi VTR
ex C5 2.2HDi VTX+
Yes, I am paranoid, but am I paranoid ENOUGH?
Out amongst the stars, looking for a world of my own!
ex BX 1.9
ex Xantia 2.0HDi SX
ex Xantia 2.0HDi LX
ex C5 2.0HDi VTR
ex C5 2.0HDi VTR
ex C5 2.2HDi VTX+
Yes, I am paranoid, but am I paranoid ENOUGH?
Out amongst the stars, looking for a world of my own!
-
dulenator
- Donor 2024
- Posts: 88
- Joined: 08 Dec 2021, 21:44
- x 11
Re: C5 rear arm bearings
I had the same issue with the front dropping down. It turned out it was a bad right front shock. There was no leak, only quiet hissing from the top of the shock.
When I replaced that shock, everything went back to normal.
I didn't try it then, but a temporary solution could be to try to tighten the nut on top of the shock. When I removed the shock, I realised the nut was a little bit loose, so it wasn't sealing correctly.
When I replaced that shock, everything went back to normal.
I didn't try it then, but a temporary solution could be to try to tighten the nut on top of the shock. When I removed the shock, I realised the nut was a little bit loose, so it wasn't sealing correctly.
-
Hell Razor5543
- (Donor 2023)
- Posts: 14261
- Joined: 01 Apr 2012, 09:47
- x 3275
Re: C5 rear arm bearings
Well, the suspension seems to have sorted itself out, as she is now remaining level overnight. All I can of is that a valve has been sticking, and is now moving freely again. However, I would still like to know the procedure for replacing the rear arm bearings, so I can pass them onto my mechanic.
James
ex BX 1.9
ex Xantia 2.0HDi SX
ex Xantia 2.0HDi LX
ex C5 2.0HDi VTR
ex C5 2.0HDi VTR
ex C5 2.2HDi VTX+
Yes, I am paranoid, but am I paranoid ENOUGH?
Out amongst the stars, looking for a world of my own!
ex BX 1.9
ex Xantia 2.0HDi SX
ex Xantia 2.0HDi LX
ex C5 2.0HDi VTR
ex C5 2.0HDi VTR
ex C5 2.2HDi VTX+
Yes, I am paranoid, but am I paranoid ENOUGH?
Out amongst the stars, looking for a world of my own!
-
myglaren

- Forum Admin Team
- Posts: 28424
- Joined: 02 Mar 2008, 13:30
- x 5577
Re: C5 rear arm bearings
There is a lot of info on the rear suspension and I believe that Malcolm had info on it - didn't he do yours at one point?
I have a vague recollection of him mentioning a kit but it needed supplementing with some other bits, I think the kit may have been for a Xantia.
There is this:-
There are hundreds of threads though and finding the right one could take some time.
This touches on it too:
I have a vague recollection of him mentioning a kit but it needed supplementing with some other bits, I think the kit may have been for a Xantia.
There is this:-
From this threadsvesey wrote: 18 Jun 2009, 00:42 To replace rear trailing arm bearings on a C5 without interfering with the hydraulics.
This works by disconnecting the link between the anti roll barand the rear height corrector. The height corrector is left at the position it would be at if the car were at full height. The engine is then started and the lowest suspension height position is selected using the centre console buttons. switch off the ignition. The system allows all the LDS fluid to return from theresr suspension to the reservoir.
1.Loosen the rear wheel studs slightly.
2.Jack the rear of the car and support the car on axle stands or raise the car on a lift leaving the rear wheels hanging.
3.Disconnect the height corrector link ball joint at the anti roll bar end by levering it off. Make sure that the height corrector remains at the position it was at while it was still connected. If it is marked with a tippex pen it will be easier to know the position (this is to fool the suspension computer)
4.Start the car and use the centre console buttons to select the LOWEST suspension position. when the lowest position shows on the dash stop the engine again and switch off the ignition.
5. Lower the car to the ground or jack up the rear wheels. This will force all the fluid out of the suspension cylinders and back to the reservoir.
6. Disconnect the Battery. (prevents fluid being pumped back into the rear suspension)
7.Raise the car again. There should be no pressure left in the rear suspensions and it should be possible to lift up the rear wheels without resistance.
8.Remove the rear wheels.
9.Remove the anti roll bar (2 torx bolts each side)
10. Remove the ABS sensors. (there is a connector over the fuel tank if they are seized into the rear arm)
11. Disconnect the brake pipes where they meet the flexible pipes. It is a good idea to have got a nut (from the local auto factor about 50 cent) and a small screw or small ball bearing to block the end of the flexible pipe to stop all the fluid from leaking away. You can also use a short bit of brake pipe from the local scrap yard 3 cm is enough clinch over the end to seal it. It is not a good idea to let any modern braking system run out of fluid because of the difficulties in bleeding afterwards.
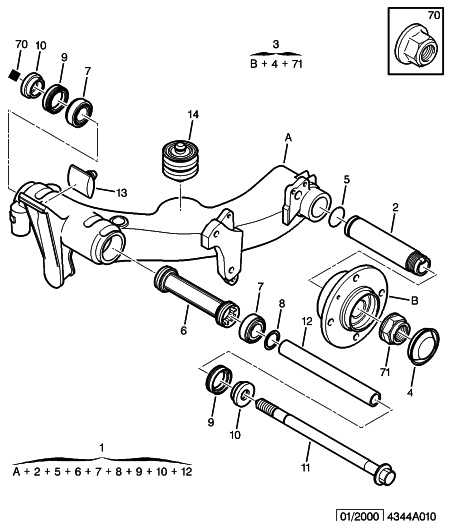
12 Remove the R clip 4 from the knuckle joint where the suspension cylinder connects to the rear arm and pull out the joint.
13. Remove the bolt and nut retaining the rear arm and take out the arm.
14 Using a small(ish) flat screwdriver carefully prise out the spacer 10 and the seal 9 to reveal the bearings 7.
15 There will be one thin spacer shim 8. This is important and will have to be reused.
16 The outer bearing cups can be driven out from opposite sides (probably destroying the plastic tube 6) or can be pulled out if suitable tools are available. A rear arm repair kit can be got from GSF for the BX. The following parts are the same Bearings 7, Seals 9 and plastic tubes 8. The bolt 11, Steel spacer tube 12 and spacers 10 are different.
17 Replace the bearings packing everything with plenty grease. replace the seals 9. Replace the spacer tube 12, shim 8 and collars 10
18 Replace and reconnect all in reverse order.
19 Bleed the brakes
20.Replace the wheels
21 Reconnect the battery (wait for several minutes before introducing the key to the ignition or it may be rejected by the immobiliser)
22 The suspensions will pump up.
23 Start the engine and set the suspension height using the console buttons

There are hundreds of threads though and finding the right one could take some time.
This touches on it too:
411514 wrote: 25 Apr 2016, 09:37 I know that there are several posts on this forum and elsewhere concerning replacement of rear arm bearings on a C5.
I read these before attempting the job, and found them to very helpful. I have now just completed the job, and thought it would be worth a new post to highlight a few of the issues I found which did not appear to have been mentioned in past posts.
The old girl is on about 170k miles, and has been faultless in my five year ownership. About a fortnight ago I started to detect the slightest 'cracking' noise over bumps and potholes, which appeared to come from the rear nearside. I had heard that the problem if left can tend to damage the arms, and so though it would be worth doing ASAP.
Previous posts have covered where to obtain parts. I bought SKF bearings from GSF with a 40% voucher, and the remaining parts from Citroen. For what it is worth, I would suggest that it is only really necessary to replace the bearings, bearing seals, and plastic tube. The remaining metal parts could probably be reused. Certainly, I bought two packs of the shims (at £20 each) which contain about 10 shims per pack, when all is really needed is two shims, and again the old shims could probably be safely reused to save money.
Order generally is (each side), depressurise suspension, up on axle stands, wheels off, anti-roll bar off, disconnect brake line from caliper, disconnect suspension strut rod from arm, arm bolt out and remove arm, extract old bearings/seals/gubbins from arm. Reverse to refit.
Starting with removal of anti-roll bar, this was the first headache. Three of the four bolts were stuck fast and wouldn't budge. I tried my Clarke 240v impact wrench, which has never failed to shift a nut before, but this didn't work. In the end, I found the only way to remove the bolts was to heat them to almost red hot with a blowtorch, and then with a scaffold pole on the of my breaker bar just about got them shifted. It looks like the shank of the bolt was coated either in threadlock or corrosion.
Second problem was disconnecting the strut rod from the suspension arm. I tried everything to no avail, and in the end had to butcher my scissor ball joint splitter, and use the jaw as a wedge to crack the rod out of the arm. I would suggest that this is the only way to do it. As far as I can work out, it is necessary to detach the rod from the arm, as although I tried, it doesn't seem possible to remove the arm with the rod still attached (not enough clearance to manipulate the rod from the strut piston).
Removing arm bolt didn't cause any major problems, and arm came out with any real issue. ditto bearing seals. At this point I did not find what I was expecting. Previous posts have described finding a handful of loose rollers and a cloud of rust. My bearings however looked perfectly fine. Plenty of grease left, and all rollers still in cage. I found the easiest way to remove the outer bearing races from the arm was to use the blowtorch to burn out the plastic tube, which allowed me to push a long chisel (old handle less screwdriver) through from one end, to rest on the rear of the outer bearing race at the other end, and they tapped out no problem. This seemed to be easier than methods suggested by previous posters, such as running a ring of weld about the race to cause the race to contract. With the outer races removed, this is clearly where the problem lay. The surface of the races was heavily worn, with dimples about the lower half of the race, where the roller bearings had been running.
Refitting new bearings was relatively painless. I took the step of separating the outer race from each new bearing the night before, and put the outer race in the freezer overnight, along with the metal spacer tube which is inserted through the bearing inner race. Hard to tell whether or not this is necessary, but it certainly seemed to work.
All in all, not a terrible job, but certainly worthy of the Haynes four spanners rating. I swapped the clutch and flywheel on this car recently, and I would suggest that the rear arm bearings were more difficult. It seems to be the sort of job that, when done once, is much easier. It took me the best part of the day to remove and replace the first side, whilst the second side took less than two hours.
Seemed to solve problem, no cracking noises now.