
Leaky ram and electrovalve!
-
Dommo

- (Donor 2025)
- Posts: 1208
- Joined: 11 Apr 2009, 09:43
- x 20
-
addo
- Sara Watson's Stalker
- Posts: 7098
- Joined: 19 Aug 2008, 12:38
- x 95
There's got to be serviceability in the rams - a fellow here rebuilds the PSA steering ones, and I'd assume the construction nature is similar.
Silicon around the ram as shown, is a bit tragic. If flow is occurring significantly past the ram seals, it's rapidly going to overwhelm that sort of measure.
Silicon around the ram as shown, is a bit tragic. If flow is occurring significantly past the ram seals, it's rapidly going to overwhelm that sort of measure.
-
Dommo
- (Donor 2025)
- Posts: 1208
- Joined: 11 Apr 2009, 09:43
- x 20
-
DickieG

- Monaco's youngest playboy
- Posts: 4878
- Joined: 25 Nov 2006, 09:15
- x 38
That grease shouldn't be there, so it must have been done in an effort to stem/disguise the flow of LHM leaking past the seals.
After 32k miles I'd do a belt change if only for peace of mind, especially as its a relatively easy job on that engine.
The steering noise is normal.
After 32k miles I'd do a belt change if only for peace of mind, especially as its a relatively easy job on that engine.
The steering noise is normal.
25 Jeep Renegade Trailhawk
23 BMW iX3 M Sport Pro
23 Jeep Avenger
13 Ram 1500 Hemi
06 C3 Desire 1.4
72 DS 21 EFi Pallas BVH
23 BMW iX3 M Sport Pro
23 Jeep Avenger
13 Ram 1500 Hemi
06 C3 Desire 1.4
72 DS 21 EFi Pallas BVH
-
Dommo
- (Donor 2025)
- Posts: 1208
- Joined: 11 Apr 2009, 09:43
- x 20
Sounds about right, I should have a new ram on the way in the next few days anyway.DickieG wrote:That grease shouldn't be there, so it must have been done in an effort to stem/disguise the flow of LHM leaking past the seals.
After 32k miles I'd do a belt change if only for peace of mind, especially as its a relatively easy job on that engine.
The steering noise is normal.
I'll get a cambelt kit as going off its history they only did the cam belt and not the tensioners (are there 1 or 2 tensioners/rollers?) or the water pump.
Any particular brand recommended? £34 for a continental or SKF branded belt from eurocarparts who're just down the road from me. Also found Circoli (£21) and KWP (£35) water pumps, I assume one is metal and one is plastic?
Is there a guide out there on how to bleed these engines after a water pump change? Cheers
-
myglaren

- Forum Admin Team
- Posts: 28429
- Joined: 02 Mar 2008, 13:30
- x 5579
When you get it,this guide may help you.
-
CitroJim

- A very naughty boy
- Posts: 54540
- Joined: 30 Apr 2005, 23:33
- x 8078
No, but it's straightforward enough Dom, as is the cambelt. It is one of the most easiest Xantia belts to doDommo wrote: Is there a guide out there on how to bleed these engines after a water pump change? Cheers
It's almost like doing the cambelt on the 206 TU engine an a guide for that is here.
Essential differences is that the crank is pinned using the crank pulley but you MUST NOT use the crank pulley from the Activa as it's a dual-mass one and you can't bank on the timing hole in it being accurate. I use a solid pulley from an old Pug 205 GTi like this one...
Also, the pulley, which must come off, is retrained by a 22mm (often tight) nut.
There is only one tensioner and it's an eccentric, just like the 206. I'd replace it for peace of mind if it sounds or feels rough. Otherwise, reuse it.
Tension is critical and again, set in the same way as the 206. Do sent it a tad looser when cold as the engine is tall and expands a bit when it warms up and tensions it more.
next time I do an Activa Cambelt, I'll do a proper writeup on my website.
Bleeding is easy. Undo the bleeder on the heater matrix elbow pipe and the brass Allen headed bleeder on the brass extension pipe that is visible on the head near the thermostat housing. Fill up until water issues from the bleeders, close them, run up to temperature, bleed again, top up, job done.
The Auxiliary belt is easy to slip off. Engage a 3/8" square drive in the hole on the tensioner pulley, turn it to take the tension out of the belt, pin it up through the holes provided and slip off the belt. Sketch the belt layout as it's a funny one... I have a picture if you do loose it though...
Interesting pictures of the ram
Jim
A bit of a Citroen AX fan...
A bit of a Citroen AX fan...
-
Xaccers

- Posts: 7654
- Joined: 07 Feb 2007, 23:46
- x 185
Well Jim, if you need an Activa's cambelt to change, I'm sure Juliet would be up for it 
1.9TD+ SX Xantia Estate (Cassy) running on 100% veg
1.9TD SX Xantia Hatchback (Jenny) running on 100% veg for sale
Laguna II 2.0dCi Privilege (Monty)
DIY sphere tool
1.9TD SX Xantia Hatchback (Jenny) running on 100% veg for sale
Laguna II 2.0dCi Privilege (Monty)
DIY sphere tool
-
CitroJim
- A very naughty boy
- Posts: 54540
- Joined: 30 Apr 2005, 23:33
- x 8078
-
Dommo
- (Donor 2025)
- Posts: 1208
- Joined: 11 Apr 2009, 09:43
- x 20
Cheers for that guide Jim. Do you need to undo the offside engine mount and drop/raise the engine at all? Or can you do everything by whipping the offside wheel and arch liner thing out? Or is it nearside, I can't remember but I'm thinking it's offside.. And has anyone got a solid crank pulley going 
I've never done a cambelt before but I know the gyst of what to do, I'm assuming you whip off the Activa crankshaft pulley and stick the solid one on, which has a timing hole on it to lock off the crankshaft? Jim you could always use my car for the guide

I had a look under the car today and almost everything in the middle of the rear of the car (in front of the spare wheel) is wet, doh! And the rear ram looks a bit damp which is a bummer, however if I give it a clean pre MOT I'm sure I could get a year or two out of it then change that one too.
Cheers, Dom.
I've never done a cambelt before but I know the gyst of what to do, I'm assuming you whip off the Activa crankshaft pulley and stick the solid one on, which has a timing hole on it to lock off the crankshaft? Jim you could always use my car for the guide
I had a look under the car today and almost everything in the middle of the rear of the car (in front of the spare wheel) is wet, doh! And the rear ram looks a bit damp which is a bummer, however if I give it a clean pre MOT I'm sure I could get a year or two out of it then change that one too.
Cheers, Dom.
-
CitroJim
- A very naughty boy
- Posts: 54540
- Joined: 30 Apr 2005, 23:33
- x 8078
No real need to touch the engine mount Dom, just remove the offside wheel and mudshield and off you go.
A solid pulley is easy enough to find, any late 80s car with an XU engine will provide one such as a BX, 405, 205 and so on. Best visit your local scrappie..
Think of the LHM underneath as free rust-proofing A little goes a long way and the good thing is that it soon evaporates and disappears once the leak stops, even when spilt on drives. It's very benign stuff.
The rearrams are often a tad damp and as long as they're not dripping then no real worries. Wipe it clean before the MOT and all will be good...
A solid pulley is easy enough to find, any late 80s car with an XU engine will provide one such as a BX, 405, 205 and so on. Best visit your local scrappie..
Think of the LHM underneath as free rust-proofing
The rearrams are often a tad damp and as long as they're not dripping then no real worries. Wipe it clean before the MOT and all will be good...
Jim
A bit of a Citroen AX fan...
A bit of a Citroen AX fan...
-
Dommo
- (Donor 2025)
- Posts: 1208
- Joined: 11 Apr 2009, 09:43
- x 20
Picked up the new front ram, second hand rear hydractive electrovalve, and new activa linkage bushes today from mr savoy garage (Malcolm). I'd definately recommend him to potential buyers, he's got an activa coming in soon with a failed MOT, presumably similar to mine - I can't remember what exactly was wrong with it, if anyones interested..
Anyway, I'll get the ram fitted in the next couple of days, then attempt to tackle the rear electrovalve, but after having a look where it goes yesterday I feel a little ill knowing what I need to do
Anyway, I'll get the ram fitted in the next couple of days, then attempt to tackle the rear electrovalve, but after having a look where it goes yesterday I feel a little ill knowing what I need to do
-
CitroJim
- A very naughty boy
- Posts: 54540
- Joined: 30 Apr 2005, 23:33
- x 8078
The rear electrovalve is not that bad Dom. Even removing the sphere block complete, which you may have to do if the valve body is badly corroded, is actually easier than it looks at first glance.
You need to arm yourself with some special tools. A 24mm DEEP socket, a 16mm flare nut spanner and an 8mm flare nut spanner. The latter two are for if you need to remove the sphere block. The 24 mm deep socket will be needed for the electrovalve body if it does not co-operate by coming out when you try to undo it via the 16mm hex on the top of it. When they're well corroded in the body usually separates and that's when you bring the 24mm socket into play but that'll only work if there's enough of the 24mm hex left to get a good grip on. If not it will need to be punched out and this is really best done with the sphere block in a big vice.
You need to arm yourself with some special tools. A 24mm DEEP socket, a 16mm flare nut spanner and an 8mm flare nut spanner. The latter two are for if you need to remove the sphere block. The 24 mm deep socket will be needed for the electrovalve body if it does not co-operate by coming out when you try to undo it via the 16mm hex on the top of it. When they're well corroded in the body usually separates and that's when you bring the 24mm socket into play but that'll only work if there's enough of the 24mm hex left to get a good grip on. If not it will need to be punched out and this is really best done with the sphere block in a big vice.
Jim
A bit of a Citroen AX fan...
A bit of a Citroen AX fan...
-
Dommo
- (Donor 2025)
- Posts: 1208
- Joined: 11 Apr 2009, 09:43
- x 20
How deep does the 24mm socket need to be? I'm fairly sure we've got a deep 24mm socket but I'm not sure..
I've got the part from Malcolm at savoy garage and it has a sphere attached still, so is that a sign that its the complete sphere block and electrovalve?
Which bit is it that leaks again sorry? The electrovalve itself, or the bit it bolts into (is that the sphere block??)? Without knowing exactly what part is what I'm not sure...
Thanks.
Edit:
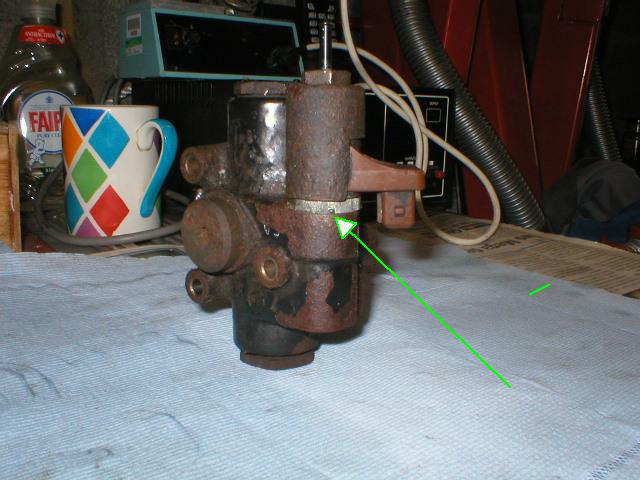
On this picture you posted, presumably the bit above the arrow is the electovalve and the bit below is the sphere body? If so the leaky bit is inbetween the two? Is the leaky bit attached to the body or electrovalve? If the valve I assume just swapping the valve is all you need to do?
Thanks.
I've got the part from Malcolm at savoy garage and it has a sphere attached still, so is that a sign that its the complete sphere block and electrovalve?
Which bit is it that leaks again sorry? The electrovalve itself, or the bit it bolts into (is that the sphere block??)? Without knowing exactly what part is what I'm not sure...
Thanks.
Edit:
On this picture you posted, presumably the bit above the arrow is the electovalve and the bit below is the sphere body? If so the leaky bit is inbetween the two? Is the leaky bit attached to the body or electrovalve? If the valve I assume just swapping the valve is all you need to do?
Thanks.
-
CitroJim
- A very naughty boy
- Posts: 54540
- Joined: 30 Apr 2005, 23:33
- x 8078
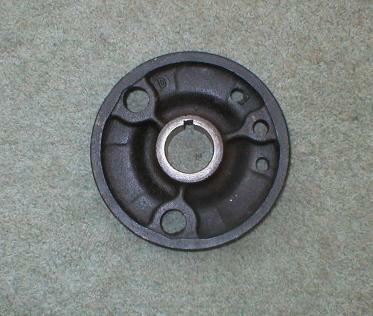
It leaks on the big hex. This is made of aluminium alloy and suffers corrosion. The picture below shows an electrovalve on its own with the seals highlighted (the green o rings). Corrosion eats into the hex and eventually exposes a bit of the O ring seal as shown in my original picture.

The valve screws out of the sphere block but normally corrosion holds it tight so when you attempt to unscrew it, the electrovalve body separates and leaves the alloy part in the block, then you need the 24mm deep socket.
This picture shows a disassembled valve and you can see the top part that will screw out of the alloy body.
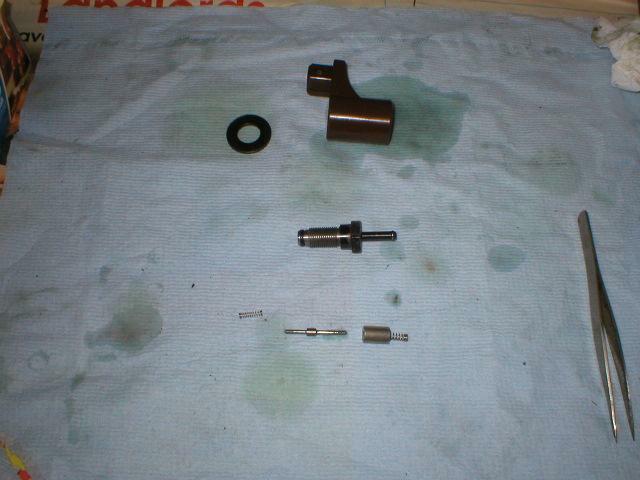
The two halves are loctited together and normally this allows the whole valve to screw out by unscrewing on the top 16mm hex but if corrosion has really got hold, the loctite will separate before the body does.
Hope that makes it a bit clearer Dom.
The valve screws out of the sphere block but normally corrosion holds it tight so when you attempt to unscrew it, the electrovalve body separates and leaves the alloy part in the block, then you need the 24mm deep socket.
This picture shows a disassembled valve and you can see the top part that will screw out of the alloy body.
The two halves are loctited together and normally this allows the whole valve to screw out by unscrewing on the top 16mm hex but if corrosion has really got hold, the loctite will separate before the body does.
Hope that makes it a bit clearer Dom.
Jim
A bit of a Citroen AX fan...
A bit of a Citroen AX fan...