
Zel's Fleet Blog - BX, Jag XJ-S, Sinclair C5, Mercedes 208D & 230TE, AC Model 70.
-
xantia_v6
- Forum Admin Team
- Posts: 10874
- Joined: 09 Nov 2005, 22:03
- x 1423

Re: Zel's Fleet Blog - Xantia Activa, Jag XJ-S, Sinclair C5, Mercedes 208D, AC Model 70.
If you need to drill another hole, can you drill it a little higher to gain some mechanical advantage to make up for the larger bore of the new cylinder?
-
Zelandeth

- Donor 2024
- Posts: 5285
- Joined: 16 Nov 2014, 23:36
- x 1591
Re: Zel's Fleet Blog - Xantia Activa, Jag XJ-S, Sinclair C5, Mercedes 208D, AC Model 70.
Possibly, will need to see what I've got to work with.
Just would be really nice if I didn't need to remove the handlebar yoke...though I think I will have to. I remember looking at that for painting it originally but it looked like a world of pain of rusty fasteners...guess it's a good opportunity to get those ball joints changed though!
Just would be really nice if I didn't need to remove the handlebar yoke...though I think I will have to. I remember looking at that for painting it originally but it looked like a world of pain of rusty fasteners...guess it's a good opportunity to get those ball joints changed though!
Current fleet:
07 Volvo V70 SE D5, 85 Sinclair C5, 84 Trabant 601S, 73 AC Model 70, 62 Rover 110.
07 Volvo V70 SE D5, 85 Sinclair C5, 84 Trabant 601S, 73 AC Model 70, 62 Rover 110.
-
CitroJim

- A very naughty boy
- Posts: 54815
- Joined: 30 Apr 2005, 23:33
- x 8210
Re: Zel's Fleet Blog - Xantia Activa, Jag XJ-S, Sinclair C5, Mercedes 208D, AC Model 70.
Now's the perfect opportunity ZelZelandeth wrote: 03 Feb 2021, 23:58 I remember looking at that for painting it originally but it looked like a world of pain of rusty fasteners...guess it's a good opportunity to get those ball joints changed though!
 Some excellent work going on here and making the little Invacar better and better all the time
Jim
A bit of a Citroen AX fan...
A bit of a Citroen AX fan...
-
Zelandeth
- Donor 2024
- Posts: 5285
- Joined: 16 Nov 2014, 23:36
- x 1591
Re: Zel's Fleet Blog - Xantia Activa, Jag XJ-S, Sinclair C5, Mercedes 208D, AC Model 70.
CityFibre were meant to be visiting today between 1300 and 1700 to route the fibre to our property.
They (predictably at this point) turned up at 1030.
So far that's zero out of four for arriving as scheduled (or indeed scheduled at all rather than just appearing out of the blue).
They were also baffled when they found the sheath had already been fitted as they thought they were here to do that (that makes them the third crew to attempt that job).
Eventually after no small amount of back and forth over the phone between them and their managers they actually fitted the fibre.
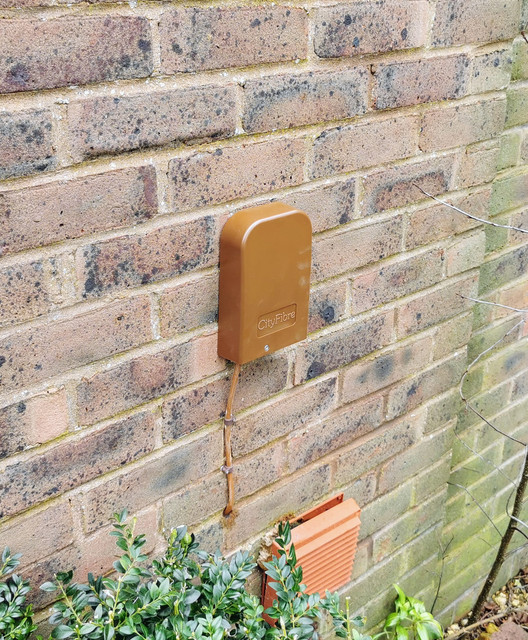
That's fibre to our property now...need to wait till March 2nd for them to come back yet again to drill a hole through the wall and plug in a modem.
Still don't know why they couldn't have done that along with the outer sheath...nor why they need another totally separate crew to do the interior install as they all do all of it according to the guys. How much time and money are they wasting by requiring at least four visits?
They (predictably at this point) turned up at 1030.
So far that's zero out of four for arriving as scheduled (or indeed scheduled at all rather than just appearing out of the blue).
They were also baffled when they found the sheath had already been fitted as they thought they were here to do that (that makes them the third crew to attempt that job).
Eventually after no small amount of back and forth over the phone between them and their managers they actually fitted the fibre.
That's fibre to our property now...need to wait till March 2nd for them to come back yet again to drill a hole through the wall and plug in a modem.
Still don't know why they couldn't have done that along with the outer sheath...nor why they need another totally separate crew to do the interior install as they all do all of it according to the guys. How much time and money are they wasting by requiring at least four visits?
Current fleet:
07 Volvo V70 SE D5, 85 Sinclair C5, 84 Trabant 601S, 73 AC Model 70, 62 Rover 110.
07 Volvo V70 SE D5, 85 Sinclair C5, 84 Trabant 601S, 73 AC Model 70, 62 Rover 110.
-
RichardW
- Forum Treasurer
- Posts: 12514
- Joined: 07 Aug 2002, 17:12
- x 1457
Re: Zel's Fleet Blog - Xantia Activa, Jag XJ-S, Sinclair C5, Mercedes 208D, AC Model 70.
Quality customer service there, Zel!!
Number of people / visits reminds me of the time we dug up the cables to the phone box in our front garden when installing a new water pipe (the house had been the original village phone exchange, hence there was a phone box at the bottom of the drive). There was also a power cable that bit the dust - the village was on overhead wires, and the power went from the post by the road to the phone box overhead, then back underground from the box to the street light - which was about 2' from the original post!! So the cable guy turns up and says he can't do the bit in the box, so calls the box guy who says he can't do the phone bit as it's a pay phone; then the leccy board turned up, and there was some debacle about their jobs as well, so we ended up with 5 crews on the job for a fix that took about half hour in the end! Somehow we got away without paying for the damage....!
Number of people / visits reminds me of the time we dug up the cables to the phone box in our front garden when installing a new water pipe (the house had been the original village phone exchange, hence there was a phone box at the bottom of the drive). There was also a power cable that bit the dust - the village was on overhead wires, and the power went from the post by the road to the phone box overhead, then back underground from the box to the street light - which was about 2' from the original post!! So the cable guy turns up and says he can't do the bit in the box, so calls the box guy who says he can't do the phone bit as it's a pay phone; then the leccy board turned up, and there was some debacle about their jobs as well, so we ended up with 5 crews on the job for a fix that took about half hour in the end! Somehow we got away without paying for the damage....!
Richard W
-
CitroJim
- A very naughty boy
- Posts: 54815
- Joined: 30 Apr 2005, 23:33
- x 8210
Re: Zel's Fleet Blog - Xantia Activa, Jag XJ-S, Sinclair C5, Mercedes 208D, AC Model 70.
At least it's progress of sorts Zel So bloody annoying and frustrating though 
Richard, we live in a crazy world... As they say, the truth is often stranger than fiction and you really couldn't make up stuff like that
So bloody annoying and frustrating though Richard, we live in a crazy world... As they say, the truth is often stranger than fiction and you really couldn't make up stuff like that
Jim
A bit of a Citroen AX fan...
A bit of a Citroen AX fan...
-
Gibbo2286
- (Donor 2020)
- Posts: 8170
- Joined: 08 Jun 2011, 18:04
- x 2943
Re: Zel's Fleet Blog - Xantia Activa, Jag XJ-S, Sinclair C5, Mercedes 208D, AC Model 70.
My experience with BT was much better but years ago.
I bought a derelict cottage to do up, the access to it was over a right of way on the neighbours land, trying to get a phone line installed the neighbour dug his heels in and wouldn't let BT put the line down his driveway.
BT came down from behind the row of houses through the forest putting in seven poles to get there.
I bought a derelict cottage to do up, the access to it was over a right of way on the neighbours land, trying to get a phone line installed the neighbour dug his heels in and wouldn't let BT put the line down his driveway.
BT came down from behind the row of houses through the forest putting in seven poles to get there.
Anyone who has never made a mistake has never tried anything new. (Albert Einstein)
-
GiveMeABreak

- (Donor 2016)
- Posts: 41989
- Joined: 15 Sep 2015, 19:38
- x 6963
Re: Zel's Fleet Blog - Xantia Activa, Jag XJ-S, Sinclair C5, Mercedes 208D, AC Model 70.
It'll be worth the wait though! Are you having FTTP or FTTC? I guess FTTP if they've spliced the fibres at the house. We've FTTP and it positively flies - after having a 5 Mbps radio link prior to this several years ago as we couldn't get any copper broadband, it has gone from one extreme to the other. I've got 150Mbps Down and 32Mbps Up now and that is way more than I need.Zelandeth wrote: 04 Feb 2021, 13:45That's fibre to our property now...need to wait till March 2nd for them to come back yet again to drill a hole through the wall and plug in a modem.
Edit - that is until everything needs 1Gb to Google anything

Please note, I'm no longer active on the Forum, so won't respond to messages.
Marc
Marc
-
Zelandeth
- Donor 2024
- Posts: 5285
- Joined: 16 Nov 2014, 23:36
- x 1591
Re: Zel's Fleet Blog - Xantia Activa, Jag XJ-S, Sinclair C5, Mercedes 208D, AC Model 70.
Fibre to the property. We've got a 35Mbps connection at present and it's creaking terribly under the strain of everyone working from home. We should be looking at around 950Mbps on the new connection once it's installed. Hopefully should be more up to the task.GiveMeABreak wrote: 04 Feb 2021, 18:53It'll be worth the wait though! Are you having FTTP or FTTC? I guess FTTP if they've spliced the fibres at the house. We've FTTP and it positively flies - after having a 5 Mbps radio link prior to this several years ago as we couldn't get any copper broadband, it has gone from one extreme to the other. I've got 150Mbps Down and 32Mbps Up now and that is way more than I need.Zelandeth wrote: 04 Feb 2021, 13:45That's fibre to our property now...need to wait till March 2nd for them to come back yet again to drill a hole through the wall and plug in a modem.
Edit - that is until everything needs 1Gb to Google anything
-- -- --
Few steps forward today.
Had a closer look to see how far out we were on the pushrod clearance issue. Not very much is the answer. This also really highlights the mechanical advantage in the handlebar setup. This equates to a little over 3" of travel at the bars.
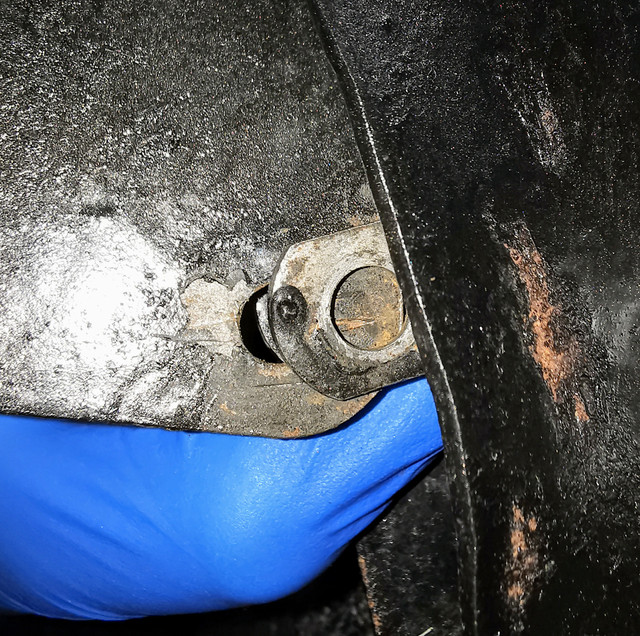
With the adjuster backed as far off as I can without worrying about the nut backing off and coming loose (which would be bad), I was able to reduce the offset to this. The thing I've circled is the little rubber stop the handlebars usually rest on.
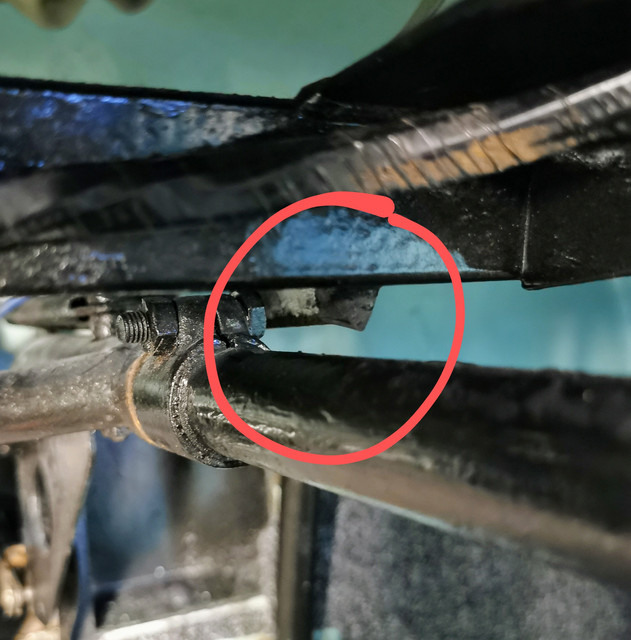
For reference, here's the same clearance at the same spot yesterday.
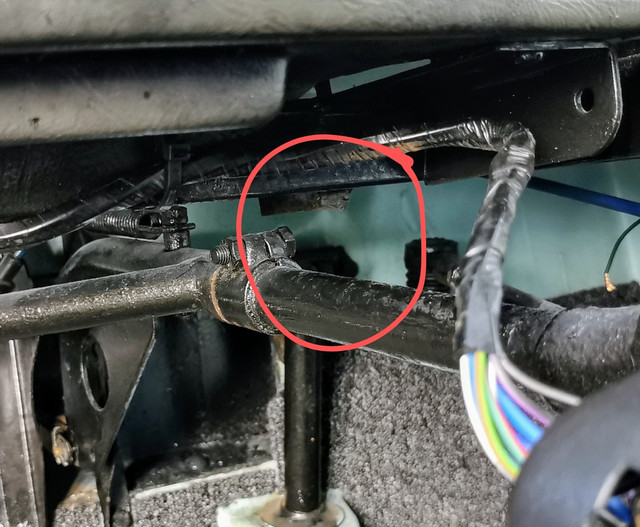
The loss of that bit of travel probably isn't the end of the world (keep in mind this cylinder has a slightly larger bore, so will require slightly less travel but be heavier to operate). That's plan C at this point. I don't like the fact that the return spring tension on the 'bars is resting on the pushrod, as that means any failure of the adjuster locknut or the pushrod retaining circlip on the master cylinder will result in the pushrod ejecting itself from the braking mechanism. This Would Be Bad.
Plan A is to pull the yoke out and drill a new pivot hole slightly above and forward of the existing one. Couple of reasons I prefer this.
[] Firstly is that it removes the aforementioned situation where it's not entirely beyond the realms of possibility that the master cylinder could spontaneously disassemble itself at 70mph on the sliproad coming off the A5. The resting position of the handlebars will keep everything under (light) compression. If the adjuster backs itself off you'll notice the brakes feeling sloppy and hear it rattling long before anything comes apart.
[] Secondly, shifting the pivot point slightly higher thanks to the geometry of the linkage will increase the mechanical advantage provided, so make the brakes lighter - providing an offset for the slightly larger bore cylinder. I'll be taking some careful measurements beforehand to make sure I've still got enough clearance to get a full usable stroke and that the pushrod isn't going to get pushed at too much of an angle. Stroke measurement is something I need to be particularly careful of too given that my knees are closer to the bars than in a standard car due to the upgraded seat. No, there's no way in hell I'm changing that back...I like being comfy!
I'm going to do some testing with the setup as it is now though. Given that this is all very experimental it's entirely possible that I'll find that this cylinder just doesn't work...I wind up with impossibly grabby brakes, or it's like trying to brake a 1920s bus with cable brakes because they're so heavy. Might need to mess around with an adjustable bias valve to prevent the front wheel locking up...I just don't know at this point. I'd rather know the system is fundamentally sound before I go modifying things permanently. Plus I know that getting the handlebars out is going to be an absolute pig of a job.
I did look at removing the handlebars quite early in the restoration as it would have made cleaning them up and painting them massively easier. However they're (as you'd expect) very solidly mounted by a load of fasteners. All of which are to put it politely, disinclined to acquiesce to my request that they move. At least I am armed with a decent selection of Imperial tools now at least so I'm more likely to get there in the end. Plus one of the worst fasteners is on the ball joint, and that's about to be replaced anyway.
I'm half tempted to get the whole thing powder coated while it's off the car. It's such a visually striking bit of the interior that it would really help tidy it up I think. Not sure...either way it'll definitely get some better paint while off the car. Would be sticking with black, pretty sure that's what it was originally painted.
Got most of the system bled through this evening before running into a snag. The offside rear bleed nipple is thoroughly seized. I cheated when originally setting this up by filling the cylinder by hand, fitting it and then bleeding from the pipe union. However that union is also a little chewed up (the run between that cylinder and the axle flexible line is one that came on the car as it's spotless cupronickel), and rounded off the moment I touched it today. If I apply any more force to the bleep nipple it's going to either snap off or strip. I very much doubt it will crack off.
Fair enough. I'd pondered replacing the wheel cylinders since day one. I was frankly astonished they were serviceable given the age and conditions they'd been stored in. They're not expensive, so I think it's time to change them. The nearside one needs to be removed from the hub at some point to replace the rubber boot around the handbrake linkage as it's perished and torn anyway. So time to get three new cylinders in and just change them I think. That way the only ancient bits of the brakes left will be the drums, a few springs and the shoes. All good things from the perspective of long term reliability. I'd like to take the opportunity to dismantle, clean and grease the adjusters too. I didn't really know how they worked when I first got the car back on the road, but now I have that knowledge I'd like to do some preventative maintenance there. If I've got braking work to be done, may as well do the lot.
When I was first reviving the car I didn't really know whether it would be sticking around long term and whether it would be an occasional weekend toy to take to shows or actually see regular use. So there were a few instances of reusing older parts and semi-temporary bodges that I knew I'd likely end up revisiting at some point. As I've found I actually really enjoy driving the car now it's obvious to me now that it's well worth sorting those things out now once and for all.
On that list is also sorting out the metalwork in the engine bay. While the actually important bits of tin that route the cooling air are okay, the splash guard is in a right state. Not likely to find that sitting around anywhere so I'll probably need to make something up myself. That's one I've been putting off though as it's probably going to be an engine-out job because of how the shields are fitted. On the plus side, at least they're not critical to engine cooling like in a VW. The "snorkel" on the engine cover itself serves that purpose instead, ensuring that cooling air is drawn from outside to minimise the recirculation of warm air. I do still plan to fit a temperature gauge though...not having one just bothers me! Thanks to whoever suggested one of the types popular among the air cooled VW crowd that just clamps to a head under the spark plug, that's a way more elegant solution than a wet oil temperature sender that I was originally planning to use.
That's a way down the list yet though!
Even with there still being a bit of air in the brakes though I do have something of a pedal, albeit a very spongey one. Just pushing the car back and forth in the garage it feels like they're working properly and we've got braking from both ends. Doesn't mean much, but from a purely psychological standpoint it was nice to see!
On another forum someone had mentioned that it looked like there was a worrying lack of clearance between the front wheel and the brake master cylinder. They're right, in a lot of photos it does look quite close. That's more down to a bit of an optical illusion though just how things line up. Trying to get a photo from a lower angle (tricky with the body in the way!) shows there's a decent gap.
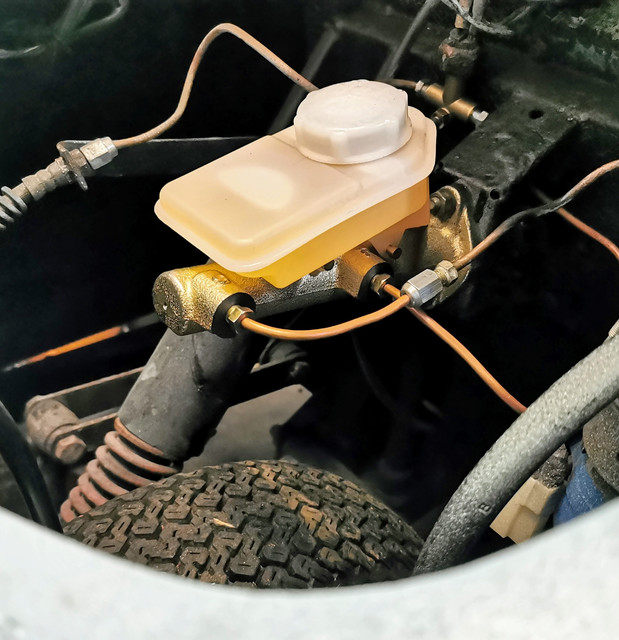
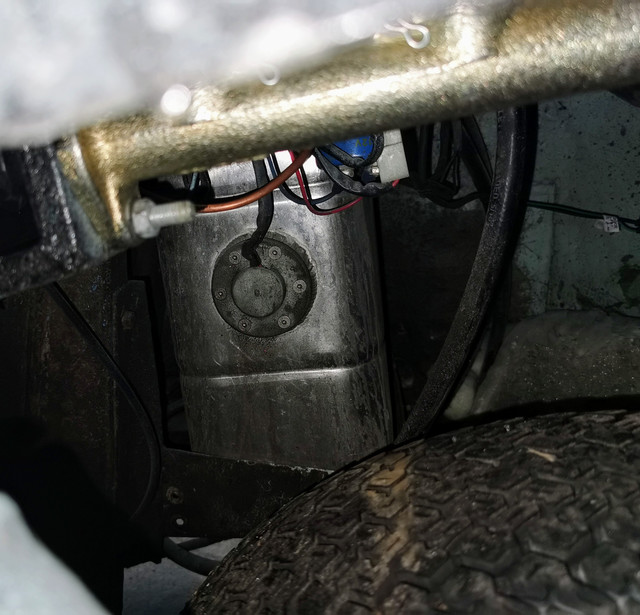
Really shouldn't be any worries of these making contact. Especially given how little weight there is on the front, even under heavy braking the nose doesn't dive much. Glad they asked the question though as it's the sort of thing which could well have been an issue with the new cylinder being so much longer. Glad they promoted me to check.
Current fleet:
07 Volvo V70 SE D5, 85 Sinclair C5, 84 Trabant 601S, 73 AC Model 70, 62 Rover 110.
07 Volvo V70 SE D5, 85 Sinclair C5, 84 Trabant 601S, 73 AC Model 70, 62 Rover 110.
-
Zelandeth
- Donor 2024
- Posts: 5285
- Joined: 16 Nov 2014, 23:36
- x 1591
Re: Zel's Fleet Blog - Xantia Activa, Jag XJ-S, Sinclair C5, Mercedes 208D, AC Model 70.
Had a brief moment this afternoon where I had my first issue with the keypad immobiliser on the Xantia today. Because despite having had the car for going on four years and having punched the code in hundreds - if not thousands - of times, I just had a total mental blank and couldn't for the life of me remember the code. In the click and collect bay at Tesco.
I had a note of it on my old phone but I'd never transferred it to my new one. Cue me and Abby slightly red faced pushing the car out of the parking bay into a space while I sent Jim a text basically going "I'm an idiot...HEEEEELLLLLP!" Thankfully only seconds later I had a response back and we were sorted.
I have now added it to my Lastpass vault so we can't have this problem again. I'd still rather have the keypad than a chip in the key or anything like that. You can't just nick the keys or scan a radio code...you need to actually physically see someone putting a code in. The "isn't it a hassle having to type it in?" Really isn't an issue...I stopped even noticing myself putting it in after about a week.
Though today does highlight the fact that it's worth making sure you have someone contactable who has the code in case you have a complete brainfart one day!
Nothing actually done on the Invacar today, though yesterday evening a pair of wheel brake cylinders were ordered.
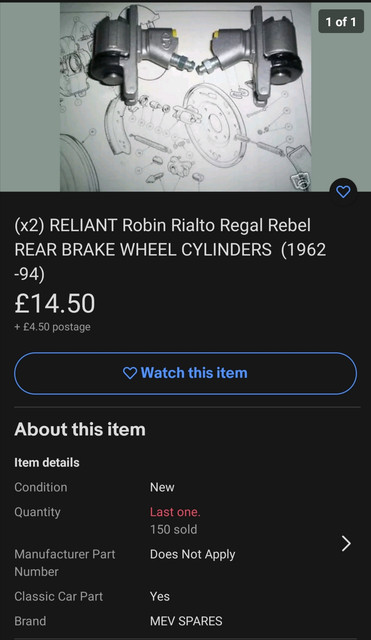
Went with the same supplier that I got the brake hoses from as their service was so good last time.
Also on the subject of buying things I'm keeping tabs on this, hoping it doesn't go for silly money.
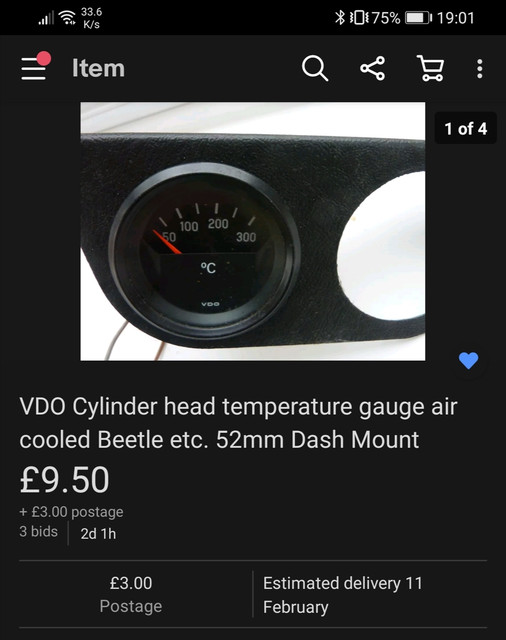
Cylinder head temperature gauge. One of the three instruments which I'll have in the little pod under the dash. Other two will be a voltmeter and a clock. The lack of the latter I've found really irritating - though it will require routing of a dedicated battery feed which is a little annoying given it's basically the furthest point in the car from the battery more or less.
I had a note of it on my old phone but I'd never transferred it to my new one. Cue me and Abby slightly red faced pushing the car out of the parking bay into a space while I sent Jim a text basically going "I'm an idiot...HEEEEELLLLLP!" Thankfully only seconds later I had a response back and we were sorted.
I have now added it to my Lastpass vault so we can't have this problem again. I'd still rather have the keypad than a chip in the key or anything like that. You can't just nick the keys or scan a radio code...you need to actually physically see someone putting a code in. The "isn't it a hassle having to type it in?" Really isn't an issue...I stopped even noticing myself putting it in after about a week.
Though today does highlight the fact that it's worth making sure you have someone contactable who has the code in case you have a complete brainfart one day!
Nothing actually done on the Invacar today, though yesterday evening a pair of wheel brake cylinders were ordered.
Went with the same supplier that I got the brake hoses from as their service was so good last time.
Also on the subject of buying things I'm keeping tabs on this, hoping it doesn't go for silly money.
Cylinder head temperature gauge. One of the three instruments which I'll have in the little pod under the dash. Other two will be a voltmeter and a clock. The lack of the latter I've found really irritating - though it will require routing of a dedicated battery feed which is a little annoying given it's basically the furthest point in the car from the battery more or less.
Current fleet:
07 Volvo V70 SE D5, 85 Sinclair C5, 84 Trabant 601S, 73 AC Model 70, 62 Rover 110.
07 Volvo V70 SE D5, 85 Sinclair C5, 84 Trabant 601S, 73 AC Model 70, 62 Rover 110.
-
mickthemaverick

- Forum Admin Team
- Posts: 20704
- Joined: 11 May 2019, 17:56
- x 7972
Re: Zel's Fleet Blog - Xantia Activa, Jag XJ-S, Sinclair C5, Mercedes 208D, AC Model 70.
Interesting choice that Zel, I'd go temperature, volts and oil pressure every time with a 3 clock assembly. As for the clock you have a watch, a phone, and even a velcro stick on dash clock for peanuts available to tell the time!!
I used to be indecisive, now I'm not so sure!
I used to ride on two wheels, but now I need all four!
I used to ride on two wheels, but now I need all four!
-
Zelandeth
- Donor 2024
- Posts: 5285
- Joined: 16 Nov 2014, 23:36
- x 1591
Re: Zel's Fleet Blog - Xantia Activa, Jag XJ-S, Sinclair C5, Mercedes 208D, AC Model 70.
Oil pressure is awkward with this engine as there's next to no clearance around the oil pressure sender, I'll need to get a pipe routed and then T off it remotely. I might go for it at some point but I'm going for what's simple just now.mickthemaverick wrote: 05 Feb 2021, 23:00 Interesting choice that Zel, I'd go temperature, volts and oil pressure every time with a 3 clock assembly. As for the clock you have a watch, a phone, and even a velcro stick on dash clock for peanuts available to tell the time!!
No stick on things going near my dash...things like that make my teeth itch. It must be neatly integrated! Phone isn't an option while driving for obvious reasons, and my watch is a pain in the behind which usually requires two hands to get it to wake up...to be honest it won't be getting replaced when the display eventually packs in completely.
Current fleet:
07 Volvo V70 SE D5, 85 Sinclair C5, 84 Trabant 601S, 73 AC Model 70, 62 Rover 110.
07 Volvo V70 SE D5, 85 Sinclair C5, 84 Trabant 601S, 73 AC Model 70, 62 Rover 110.
-
CitroJim
- A very naughty boy
- Posts: 54815
- Joined: 30 Apr 2005, 23:33
- x 8210
Re: Zel's Fleet Blog - Xantia Activa, Jag XJ-S, Sinclair C5, Mercedes 208D, AC Model 70.
Zel, delighted to helpZelandeth wrote: 05 Feb 2021, 22:53 I sent Jim a text basically going "I'm an idiot...HEEEEELLLLLP!" Thankfully only seconds later I had a response back and we were sorted.
That cylinder head temperature gauge is a great idea for an aircooled motor

I think it's very wise to renew those wheel cylinders given my experience with Daffodil's. I did manage to unseize and clean them up and on a test they appeared good but I could never really trust them again...
For the price it's cheap peace of mind
Jim
A bit of a Citroen AX fan...
A bit of a Citroen AX fan...
-
RichardW
- Forum Treasurer
- Posts: 12514
- Joined: 07 Aug 2002, 17:12
- x 1457
Re: Zel's Fleet Blog - Xantia Activa, Jag XJ-S, Sinclair C5, Mercedes 208D, AC Model 70.
I could have done with a temperature gauge in our twin pot Visa one day.... based on an overbored 2CV engine, these had a factory supplied winter blanking plate that slid in in front of the fan. Trouble was I was away at Uni so the car was off the road in the spring. I came back in the summer and recommisioned it, then went off to town, on a warm day. In town it was unhappy idling, which was unusual, then it started to act up on the way home. It suddenly dawned on me that I had not removed the blanking plate - opening the bonnet to do so revealed it was a bit hot!! Kept going, and then there was a big hill, and it wasn't happy, and slowed as I got nearer the top - I was sure it was going to seize. Then suddenly it cleared and we were away again - phew 
Richard W
-
Zelandeth
- Donor 2024
- Posts: 5285
- Joined: 16 Nov 2014, 23:36
- x 1591
Re: Zel's Fleet Blog - Xantia Activa, Jag XJ-S, Sinclair C5, Mercedes 208D, AC Model 70.
I still need to have a shot of a Visa one day. I really really fancy a GSA too...sadly they're pretty much out of my price range for decent ones these days.RichardW wrote: 06 Feb 2021, 08:10 I could have done with a temperature gauge in our twin pot Visa one day.... based on an overbored 2CV engine, these had a factory supplied winter blanking plate that slid in in front of the fan. Trouble was I was away at Uni so the car was off the road in the spring. I came back in the summer and recommisioned it, then went off to town, on a warm day. In town it was unhappy idling, which was unusual, then it started to act up on the way home. It suddenly dawned on me that I had not removed the blanking plate - opening the bonnet to do so revealed it was a bit hot!! Kept going, and then there was a big hill, and it wasn't happy, and slowed as I got nearer the top - I was sure it was going to seize. Then suddenly it cleared and we were away again - phew
-- -- --
Today's adventures start on the electronics workbench.
Our patient was a lovely little Prinztronic Mini7 calculator I picked up about a week ago.
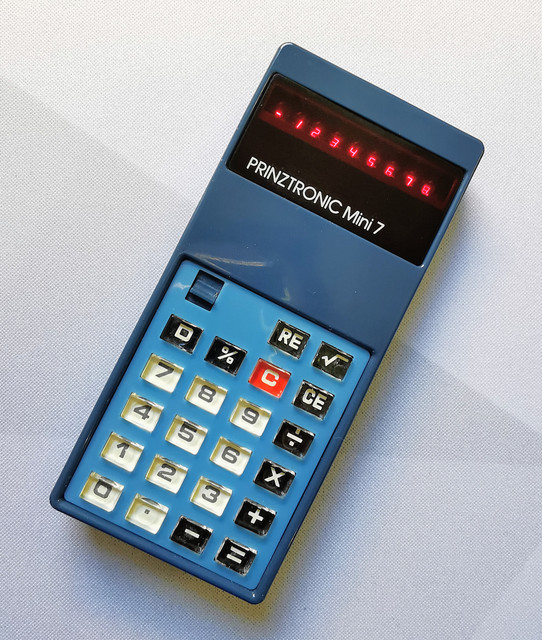
While it powered on there was no response from the keypad (aside from the number 2) and there was clearly an intermittent issue with the power supply.
This isn't a particularly high end calculator...in fact it's very much built down to a price. No screws on the case, it all just clips together.
It is quite stylish though (especially in this two tone blue) and by the standards of the time was fairly compact - I was really surprised by how small it is actually, the photos make it look a lot larger than it really is. Though I'd probably have cursed the dependence on AAA batteries with no DC input jack back in the 1970s...
Took a while to figure out how to get it apart without damaging anything but wasn't that hard really.
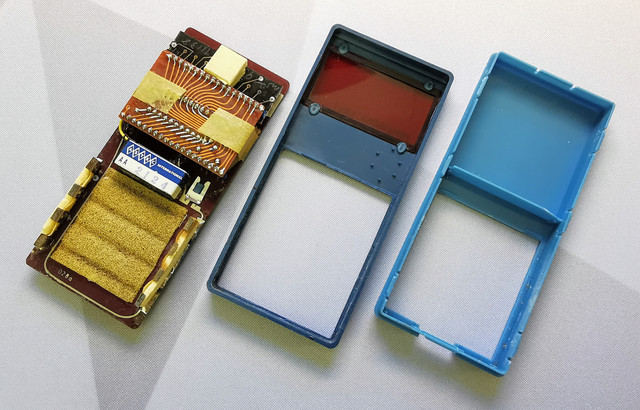
No surprises to find a TI TMS series chip at the heart of a calculator from this era - that era being pinned down to mid 1975 thanks to this date code.
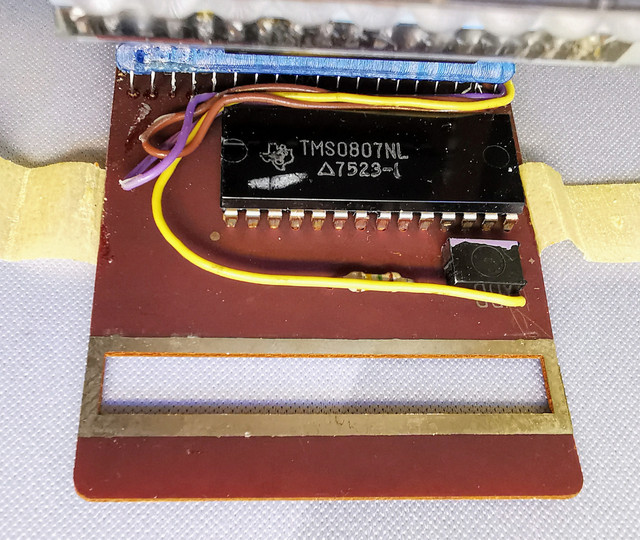
There is one other IC in here which I'm pretty sure is just a display driver given where it is in circuit.
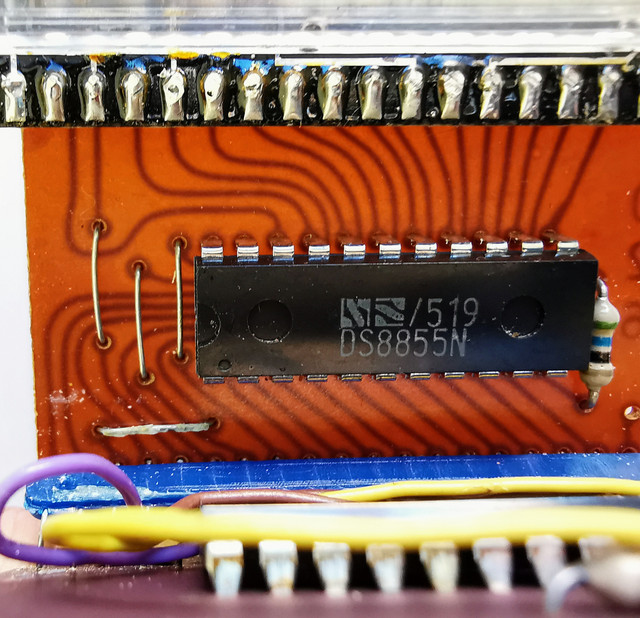
Don't recognise that maker's logo. Anyone able to ID it? Edit: have since been advised this is a National Semi chip. Not a logo of theirs I recall seeing before.
The reason for the intermittent power was a dead simple cracked solder joint between a battery post and the PCB.
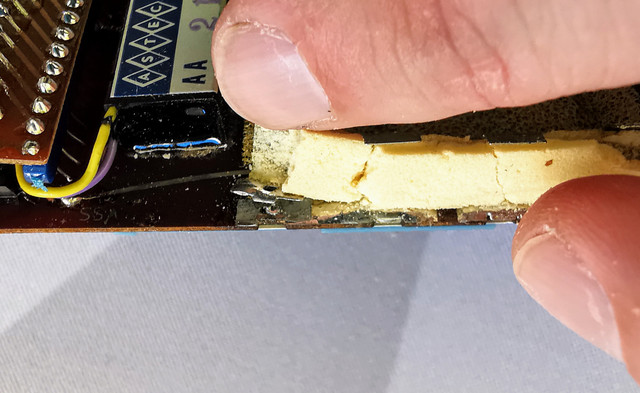
Easy repair.
The issue with the keypad became self explanatory the moment I started to dismantle it as the metal domes from the keypad switches started to cascade over the desk like metallic confetti.
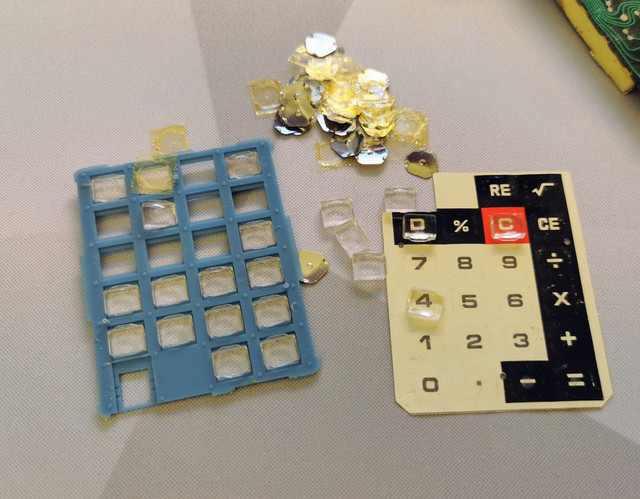
Those domes should all be stuck to this PCB!
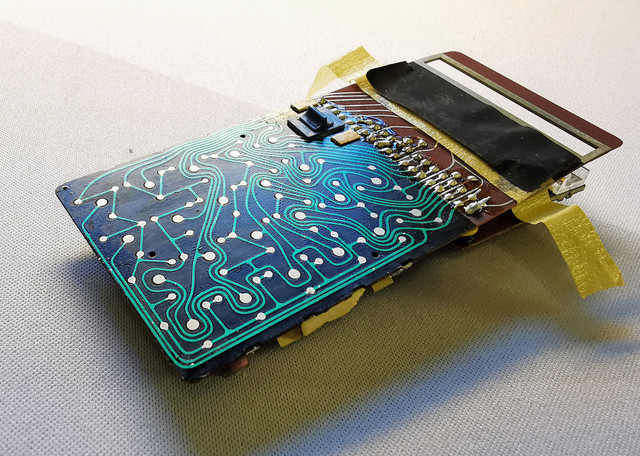
Getting these all back where they were supposed to be was a bit like trying to herd a scurry of squirrels who are all hyped up on Red Bull, but we got there in the end.
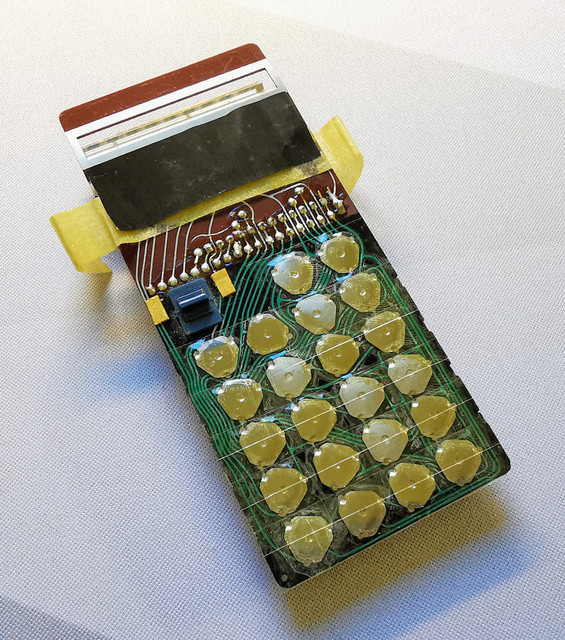
I was quite interested to see how the keypad legends were printed...I had assumed the legends were screen printed on the back of the keys themselves. Was quite surprised to find that it was actually just a printed sheet of paper behind the keypad. There are little lenses moulded into the back of the keys which makes the printed text look a little larger.
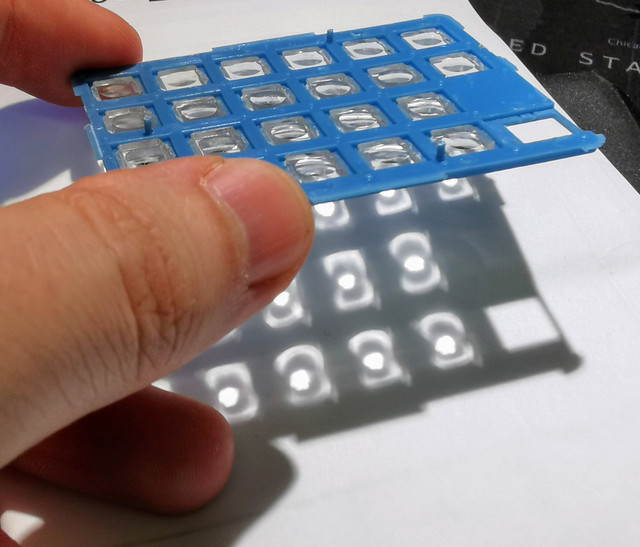
Quite clever actually. Means they only needed to make one standard type of keycaps for the whole range, just printing a bit of paper to accommodate different layouts or features.
Plus it looks really classy I reckon.
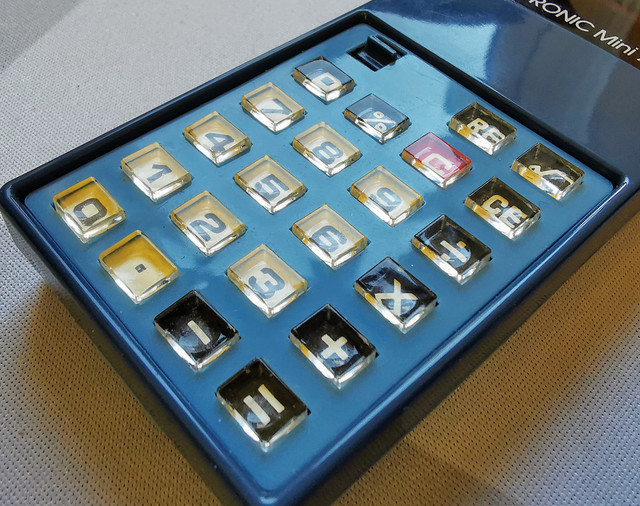
That alone was responsible for my deciding I needed one from this family in the collection the moment I saw one.
Glad to report that it now seems to be fully functional again. I do need to replace the decomposed foam behind the battery contacts, but that's a job for another day. For testing purposes this is absolutely fine.
It is a comically slow calculator though for the period...square root calculations take the best part of 1/2 a second. Division about 1/4 a second...which by 1975 is quite slow. It also doesn't have any logic to stop you taking the square root of negative numbers. It does correctly catch divide by zero though.
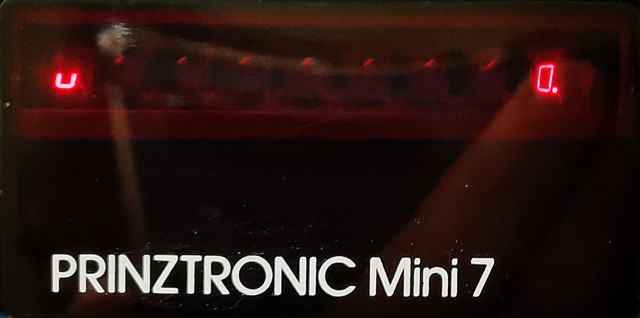
The small u at the far left is the arithmetic error indicator on this display.
Should be able to get a page put together for it on the website soon hopefully.
We were then able to move into the garage.
Knowing I was going to need access to the rear brake unions on the flexible lines I needed to remove the rear service hatch again, so decided it was a good opportunity to test something out.
The flashband I'd stuck to it as sound deadening did help, but I don't think it made nearly enough difference to be worth the weight. It pretty much doubled the weight of the hatch. It also added enough extra to the dimensions to make it even more awkward to remove. Additional mechanical noise was being added as well as the insulation never really adhered well to the underside so it was usually sitting directly on the CVT pulley cage.
So today I pulled off most of it (a few areas were thoroughly stuck and weren't going to come off without a huge fight) and gave it a few coats of rubberised truck bed liner.
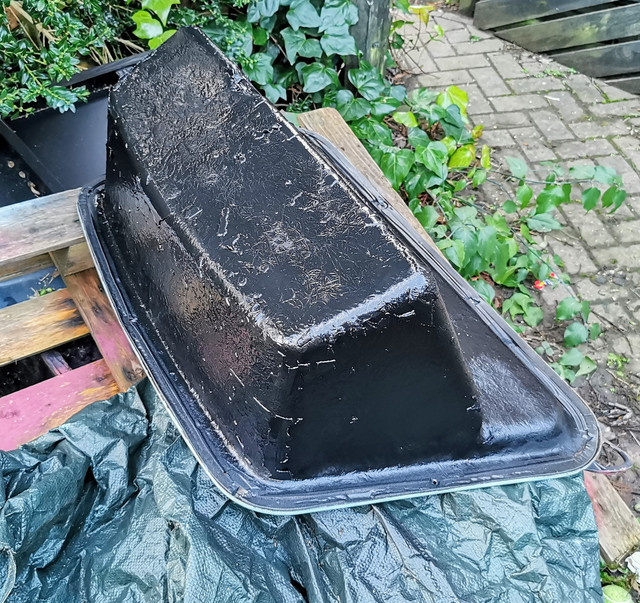
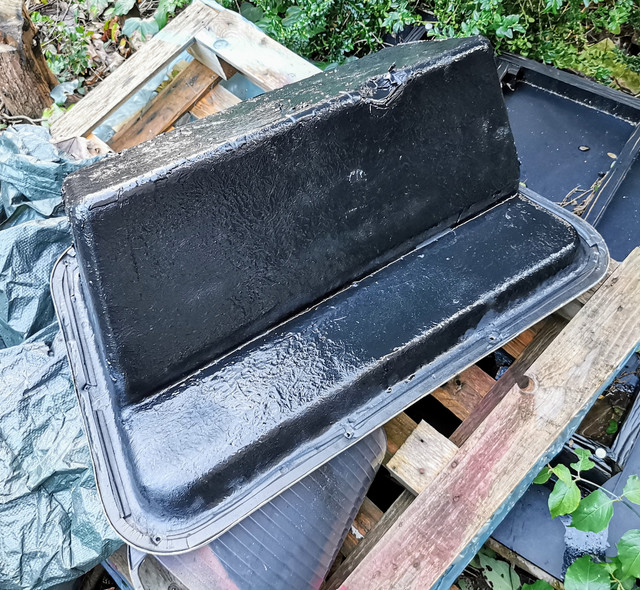
Several more will be added next time we get a break in the weather. It's already noticeably dulled down the sound of you tap it so mission accomplished hopefully. I'll report back on whether I notice any difference when driving.
The main mission for the day was getting these fitted.
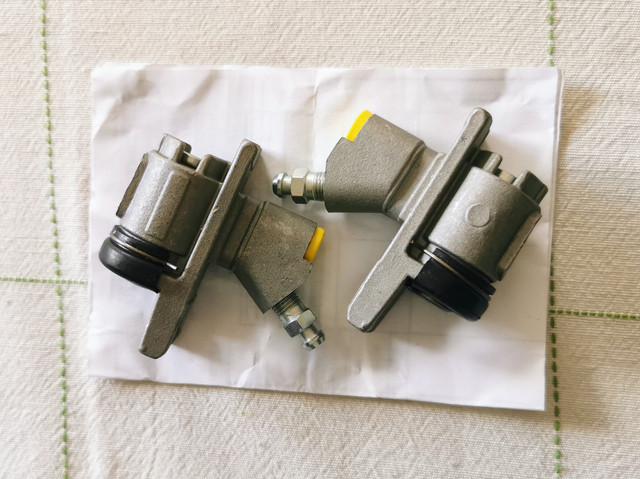
Delivery was once again ridiculously quick from MEV Spares. Ordered at 23:55 on Thursday, parts dropped into my letter box before midday on Saturday.
Nothing particularly complicated here, just fiddly.
I knew I couldn't easily get the union on the back of the cylinder off so didn't even bother. Just pulled it at the Flexi end and planned on feeding the whole lot out through the backing plate in one piece.
Went pretty smoothly. Getting those U clips off the back of the cylinder is a heck of a lot easier when you know how they work! I must have wasted hours on it when I took the first wheel cylinder off KPL, this took me about ten minutes.
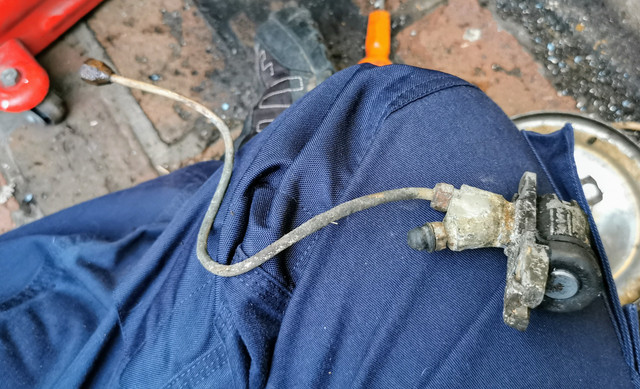
Before going any further I made a point of double checking what the threads in the wheel cylinders were *before* I had flared the new brake line... I'd already been very nearly caught out when the master cylinder turned out to be metric. These aren't.
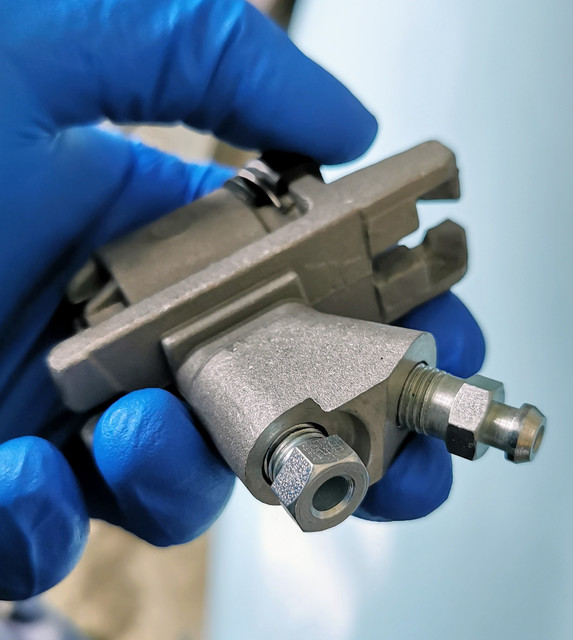
Once I'd suitably plugged the brake line off the old cylinder so it could spray brake fluid into my eye, I was then able to use it to give me an idea how much pipe I needed.
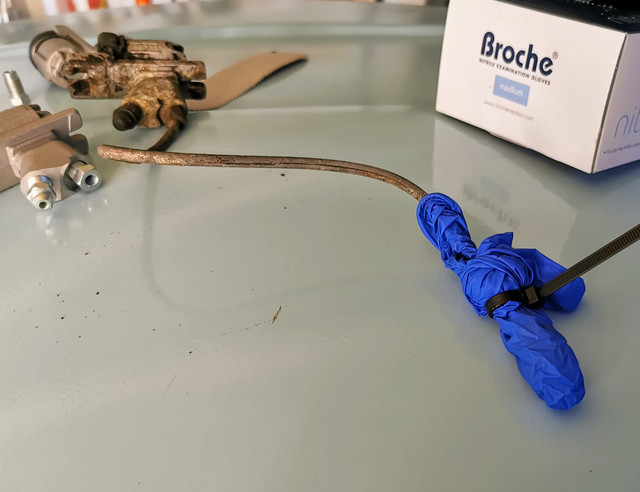
Also checked very carefully to ensure they were indeed as close to identical as possible.
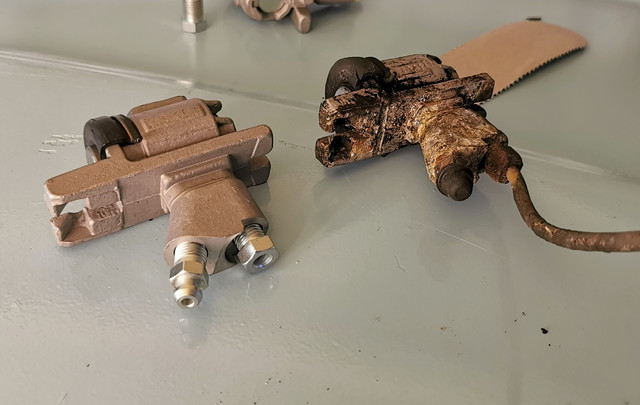
All indications were good.
It was at this stage I ran into a slight snag. These new cylinders are much more of a snug fit through the slot in the back plate. This wouldn't be a problem with the hub on most cars where you can slide it in straight...however thanks to the rather bulky hub on the Invacar you have to slot it in at a slight angle to clear the wheel mounting flange. Just enough to make it bind up. After a bit of head scratching I eventually chose to very gently tap it past the tightest point with a hammer and block of wood. Hopefully nothing was harmed...but short of removing the whole hub I couldn't see an alternative.
I then had a mental foul up and convinced myself I'd fitted it upside-down and spent 20 minutes pulling the cylinder out again to compare to the original. Of course it was absolutely fine so I had to put it all together again.
By this point it was getting dark...and right about the point it got properly dark, my work light decided that this was an ideal opportunity to run out of charge.
Cylinder is in, horseshoe clips are both in, hydraulic line is connected at both ends and the rubber boot is correctly seated around the cylinder and handbrake linkage.
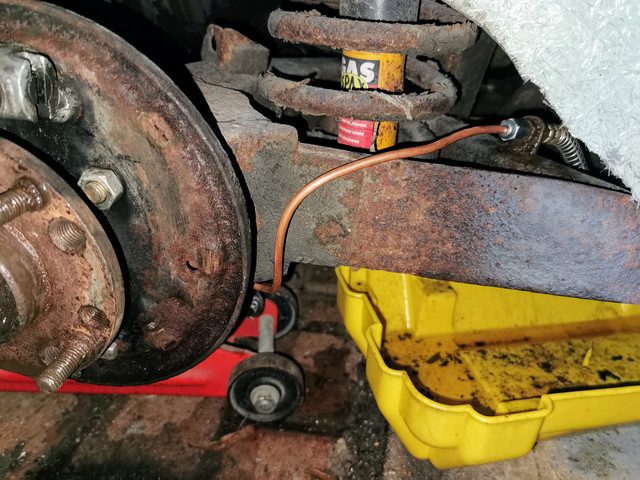
The original pipe had been touching the suspension arm at the lower corner so I deliberately made the new pipe a bit longer so it could be routed better. May see about adding a clip roughly level with the shock absorber to ensure the new pipe can't vibrate.
I really do need to get a wire brush and some paint on that rear suspension at some point, it just looks horrendous.
Sadly thanks to having run out of daylight (it started raining while I was tidying up too), I've a few things left to fit...
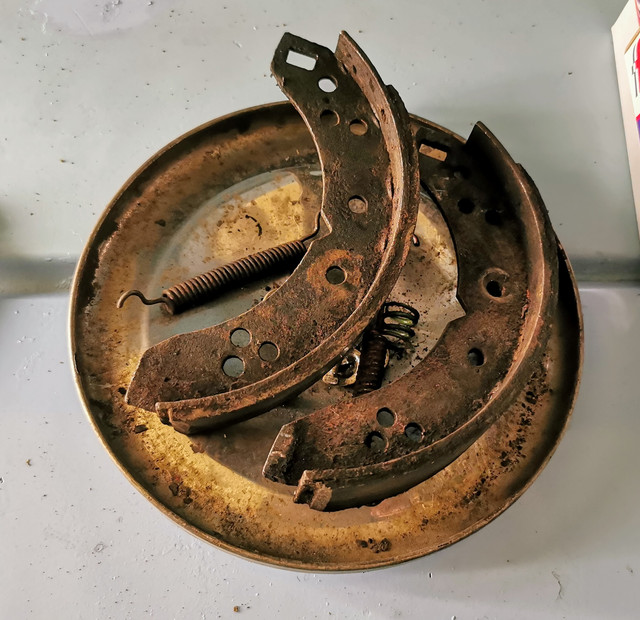
No way I was trying to refit those springs in the dark. They're fiddly enough in full daylight, trying to fit them in the dark is just asking to get a spring in the eye!
Hopefully get this side finished and the other one done tomorrow. At least the nearside one I can get to with the car in the garage, offside one requires me to wheel it outside first.
Current fleet:
07 Volvo V70 SE D5, 85 Sinclair C5, 84 Trabant 601S, 73 AC Model 70, 62 Rover 110.
07 Volvo V70 SE D5, 85 Sinclair C5, 84 Trabant 601S, 73 AC Model 70, 62 Rover 110.