Height Corrector

Plastic Clip

My problem
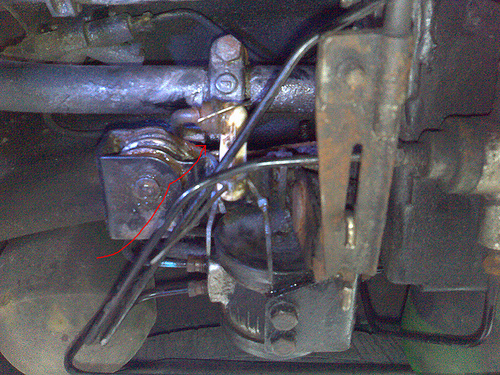
Hope it helps someone out.
This weekend, (weather permitting, I think) the height corrector and the housing will come off and i will clean it up and take more photos with a proper camera.
Moderator: RichardW
I'm perfectly clear on what you mean, but I really believe 6 sided sockets are easier to source ...Mandrake wrote:... best tool to use is a custom made spanner made from an 8 sided socket with a slot cut in one side ...
Thanks for the correction Anders, my brain was switched off when I wrote that...(I've edited the post) I did indeed mean a 6 sided socketAndersDK wrote:I'm perfectly clear on what you mean, but I really believe 6 sided sockets are easier to source ...Mandrake wrote:... best tool to use is a custom made spanner made from an 8 sided socket with a slot cut in one side ...
And what you really meant to say was : dont use the cheapo standard 12 sided socket, instead use a 6 sided ...

(an easy diy tool I made years ago 8) )
BTW its an 8mm socket for standard small dia (3.5mm) piping, 10mm socket for the medium dia piping (4.5mm).
I would definately put a little grease on the threads in a country where corrosion on cars is so prevalent...even here where its not usually a problem I do it.slim123 wrote:No you dont need anything like PTFE on the threads, but a little grease wouldnt be a bad thing, then they will come out easy next time.
I can't quite picture how a Flank drive spanner works, or what it looks like have you got any pics of one ? Sounds like it might be worth getting! (I can usually get away with a normal spanner here as corrosion is seldom a problem, but I would be a lot happier with the right tool....)Every body has their own favorite choice of weapon when it comes to tools for the job, but a decent mono hex flare nut spanner should do the job, or in my case, whilst visiting Pleiades once I found Martin using an open ended spanner to undo some realy rusted pipe nuts, on closer look it was a Snap On 8mm Flank Drive, so I bought myself one, it never fails as the Flank Drive spanner grips on the sides of the nut rather than on the corners like all other spanners. A worthwhile investment, I wish I could afford the rest of the set!!