To diagnose a faulty ABS Sensor you ideally need to have access to a diagnosis tool such as a Lexia to tell you which sensor is at fault. Failing this, most of the time it is also possible to use these pinout diagrams and measure the resistance of each sensor -
Up to Jan 1998:

From Jan 1998 onwards:

The ABS ECU is located just forward of the LHM reservoir, we are going to need to remove the multiplug and do our testing on that.
Each sensor should measure around 1080 ohms.
Removal of Existing Sensor:
Remove the relevant rear roadwheel and securely put the rear of the car on axle stands. It's useful to de pressurise the suspension system at this point to improve access (front of the car going down, tail coming up, also helps when it comes to fitting the new sensor). Its also a good idea to disconnect the battery.
Firstly, we need to disconnect the sensor from the loom. Access is poor from the wheel hub. The best way to do this, is from underneath the car. I replaced the NSR sensor so I could gain good access next to the exhaust, using a mirror and a long nose pair of pliers, if doing the OS it may make it easier to remove the spare wheel and carrier.
The plug is clipped on using a U shaped clip which needs to be taken off before splitting the sensor wire from the loom.
Using a suitably sized spanner, take off the three bolts holding on the trailing arm shield. If you're unlucky like me, all 3 bolts will shear
You should now see a roughly oval shaped rusty piece of metal with an ABS sensor going through it. It should be relatively easy to remove the sensor holding bolt, but removing the actual sensor will be a problem as it corrodes itself into place. There are several ways of getting it out depending on how seized it it - prising it out, soaking with WD40, molegrips etc. I had no option but to hack it off using a combination of a junior hacksaw blade, chisel and a hand held drill.
The co-axle wire now needs to come off. Push the grommet out of its hole and feed the wire down around the trailing arm, easier said than done
Potential Problems:
Sheared brake disc shield bolts:
The best way to drill these out is to unscrew the brake calliper and remove the brake disc. There shouldn't be a need to disconnect the pipe unions if the weight of the calliper is taken up with some string tied to a secure spot. Two of the sheared bolts can then be 'punched' and drilled out. One of the bolts cannot be drilled out as the hub is in the way, access is easy from underneath the car though. When I drilled mine, I lost my thread so rather than using a tap and dye, I had a few nuts and bolts the right size in stock.
Rusty ABS shield:
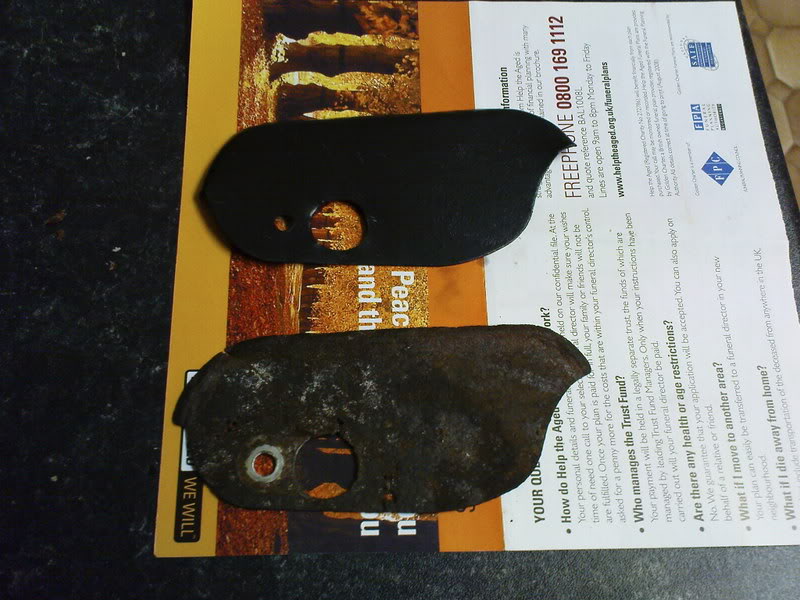
While everything is off it would be wise to replace this with a new part from Citroen, though they did quote me a 4-6 week wait as they didn't have any in the UK
If you're handy with metalwork, its easy enough to make up a pattern part with the old one as a guide. If not, I'd be more than willing to make one up with heat resistant paint for the cost of materials and postage
Refitting the new sensor:
Make sure the sensor fitting hole isn't too rough as this will make fitting the new sensor difficult. Just use a small file to smooth it out a touch.
Get your new sensor, put the heat shield on and loosely fit it in the hole, its worth putting the securing screw in loosely to guide the sensor in and prevent it being damaged by the ABS cog teeth. It is a tight fit for such a delicate part so use grease and a small tap hammer and cloth or rubber mallet to get it home, tightening up the securing bolt regularly. This bolt should be tightened to 8nm.
Clip and feed the sensor wire in around its path and feed a piece of string just above the trailing arm but below the grommet hole around the trailing arm and tie it to the connector plug on the new sensor.

Pull on the string carefully to bring the connector plug up around the trailing arm and if you're lucky, through the grommet hole. I found if I pulled the connector as far as I could on the string, then pulled the sensor wire back a bit it made it easier to pull the connector through.
The hardest bit for me was putting the grommet into place. I found the best way, was to get the grommet above its hole and press it down. With the grommet above its hole, you have more wire to plug the connector into the loom.
To actually get the grommet parallel to the hole is a challenge in itself as the trailing arm is in the way. To do this, using a trolley jack, jack up the trailing arm and manoeuvre the grommet as close to the hole, which will probably be a diagonal to the hole.

Now let the trailing arm down and it should 'grab' the grommet and push it level to its hole. Push the grommet up using a long implement such as a long nose pair of pliers from underneath the trailing arm housing, if you can push the grommet into its hole, great. If not, push it right up through and use the extra length to reconnect the sensor to the loom.

Again, its easier to replug it underneath the car, pull the connector towards you using the string and put the clip back on. You can then put the grommet into its hole, I used a pair of 90 degree cir clip pliers to push it back down.
Then its just a case of refitting everything back together.
With this job, it really is a case of trying different things that work for you and looking at different angles for attack to make it easier for yourself.
Feel free to add your experiences and tips
EDIT: Avatar13 has very kindly taken some photos to use in the guide, his are the three relating to the refitment of the ABS sensor. Thanks!
The first two images relating to ABS pinouts were from somewhere on this forum, no idea where I nabbed them from, hope you don't mind
EDIT: Original location of the S1 Xantia ABS pinouts appeared to have disappeared, kindly and efficiently recreated by VertVega